


A few months ago, I was lucky enough to try out Balsamiq mockups and review it in a blog post (Turn Any Computer into a Napkin). In January I saw a bit of chatter about a new tool called Napkee that was built to enable easy generation of a working user interface from a Balsamiq mockups layout. The tool works with both HTML and AIR/Flex outputs, I am really only interested in the HTML part, so if you are looking for info on how it works with AIR/Flex turn back now. I’ve been using Balsamiq rather heavily in a side project of mine, and I got very excited about the prospect of being able to create HTML directly from it. Much like Balsamiq, Napkee has a variety of criteria for free licenses and they were gracious enough to grant me one.
After working with it a bit, I can say that the software definitely works as advertised, if not quite as I expected. The first work I did with the application was to use it to load up some existing mockups that I had. These were for views that I already had coded and working, and just wanted to update with a new layout. I was hoping for something that I could just copy and paste into my existing view, add a few bits of interaction with the model, and be done. This was not to be, but what is might actually be better. The views I was using were just simple forms, without much styling on the elements (and what styling there was was controlled by CSS classes). No positioning was used at all (aside from the order they appear within the container).
The files generated by Napkee on the other hand, appeared (to my untrained eye) to be quite a mess at first. Just looking at the HTML I’d never expect it to work. But it did work in every browser I tested with (IE6, IE8, Chrome, Firefox). Let’s look at a simple layout, starting with the mockup:
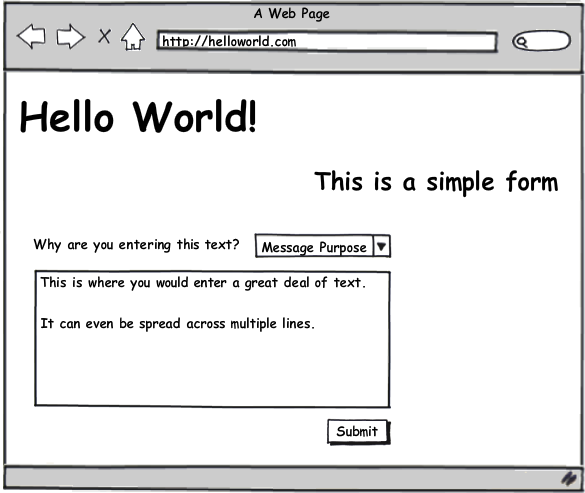
So we’ve got a couple headers, a text area, and a combobox. Pretty simple, eh? From here we can take a look at what Napkee will actually do for us. After loading the mockup file into Napkee, the first thing we see is the Preview tab – this essentially shows the same thing as the mockup (only without the browser window outside of it). Switching to the HTML tab, it looks like a bit of a mess at first. Consider the HTML it generates:
<span id="nap1" class="napkeeComponent napkeeTitle">Hello World!</span>

<span id="nap2" class="napkeeComponent napkeeSubTitle">This is a simple form</span>

<textarea id="nap3" class="napkeeComponent napkeeTextarea">This is where you would enter a great deal of text.

It can even be spread across multiple lines.</textarea>

<button id="nap4" type="button" class="napkeeComponent napkeeButton">Submit</button>

<select id="nap5" class="napkeeComponent napkeeCombobox">
<option>Message Purpose</option>
</select>

<span id="nap6" class="napkeeComponent napkeeLabel">Why are you entering this text?</span>
The different objects don’t really appear to be placed on in any particular order, but that is an illusion. They are placed in the order that I added them to the mockup (which is also the order the XML representations of the components appear in the .bmml file). I’ve typically worked more on the back-end of projects, within fairly tight confines with regard to layout. I’ll admit that for a few minutes I wondered how this could ever work. Clicking through the other tabs, the method behind the madness quickly became apparent though.
It turns out that what Napkee exports is actually much less vanilla than I initially expected. The other tabs are not actually for separate JS or CSS files – this is what threw me off. There’s a separate css file that uses jQuery UI to style the different widgets. The CSS that is generated for each mockup is embedded within the exported HTML file, and used for defining an element’s position, font size, color, etc… Here’s an example:
#nap5{
	left:336px;
	top:249px;
	width:138px;
	z-index:5;
	font-size: 13px;
	font-style:normal;
	font-weight:normal;
	text-decoration:none;
}
It even goes so far as to stub out javascript event handlers. In my case, these aren’t really necessary, but it’s rather nice to see.
$("#nap1").click(function(event){
	event.stopPropagation();
	event.preventDefault();
});
I already use jQuery (and UI) rather heavily, so I am a big fan of the dependencies on jQuery being built in. I can see how this might be off-putting for some, but it is easy enough to replace the javascript stubs (and once you have some actual code written, I suspect you wouldn’t be messing with this particular part of the export at all), so I really don’t see this as too big a deal (of course, YMMV).
If I haven’t made this abundantly clear, I am far from a UI design expert. But I think I could benefit from using this type of approach (and not just because I can have Napkee draft my markup for me 😉 ). The more I think about it, the more it grows on me. As an experiment, when I finally get to redoing the layout in my views I will be going with the Napkee exported files and working any server-side interactions into the resulting html, rather than the other way around. I may re-order the elements eventually just for the sake of my eyes.
The last concern I had was with regard to the element id’s. By default, they consist of a user-defined prefix (which in turn defaults to “nap”) combined with the ID from the mockup definition. I’d considered a script or two to replace the element ID’s with whatever I needed, but remembered that when poking around the Napkee site that they were listed as a “Certified Partner” for Balsamiq. This got me wondering if there was anything in Balsamiq to support this kind of product, and after a few minutes of poking around stumbled onto Balsamiq’s custom property feature. This lets you specify your own ID for the component, and also any custom data you would like to include with it. There’s a video included in that blog entry that does a great job showing how powerful this can be in conjunction with Napkee, I’ll include it here for convenience:
I hacked around with the custom ID’s / custom data for a bit, and it works as advertised, just like everything else I’ve tried with this application. Watching that video gets me very excited about the amount of behavior that can be specified in a mockup (and subsequently programmed for you automagically to some extent). The mockup seems a good place to define some behaviors (showing or hiding UI elements is a great example, I’m sure there are others), and between Balsamiq and Napkee this is certainly possible. I especially like the
At least from my humble programmer’s perspective, this pair of tools seem like a fantastic combination. Balsamiq can do just about all the design that I am capable of, and Napkee does a great job getting it into a more web-ready format. Both are kept very simple, and as someone who doesn’t really have a lot of time to spend on UI design I really appreciate the resulting ease of use. The output will still need a bit of polish for displaying live data, this is primarily data display, population of selection lists and building links, so it’s not too daunting of a task in my situation. I suspect that as I work with this combination of tools more I will be able to narrow the gap between Napkee’s output and what I use in my application substantially, and be able to get a lot more done in the limited time that I have for the pet projects I’ve been using it for so far.
 Alex is a software engineer from southeastern PA, where he lives with a lovely wife and a veritable smorgasbord of pets. He loves mountain biking, open source software, barbecue and Syracuse basketball.
