How long does it take to browse through a website after each build and make sure none of the pages have mysteriously blown up? 5 Minutes? 20? No time at all? The time we invest in manual testing adds up. As we switch focus to newer parts of a site we may even stop testing the ones we ‘finished’, confident that they’re stable and won’t be affected by our newer changes (yeah right). And despite the time spent manually testing, we still eventually deploy issues that a 30s check in the right part of the application would have detected.
Enter browser automation tools, such as Selenium. With browser automation tools we can invest some extra time up front to define those manual tests in code, then continue to run those tests long past the time we would have stopped doing it manually.
Note: This post is a walk-through for creating some automated browser test cases. To get the most from it you will probably want to download the tool below and launch it from a second browser so you can follow along. It assumes you have Firefox installed and are comfortable with HTML and css selectors.
The Smoke Test
There are levels to automated testing, starting with “none” and ending with some fairly complex industry packages and/or in-house frameworks. Today we’re going to look at the cheapest option, recording and rerunning a set of tests using Selenium IDE, a Firefox browser plugin. At this level we can replace many of our manual smoke tests with an automated set for a low initial investment.
Selenium IDE is a browser plugin that can record and playback actions we make in the browser. Using Selenium we can record a set of paths through our website, add some checks, and be reasonably confidant that the site is still working.
Pros: Free, Low up front time cost
Cons: Tests are fragile*, Potential for lots of duplication*, tests run on local browser
Neutral: There’s a learning curve but good documentation and quick feedback*
- I’ll come back to these three points
For the purposes of the post, we will use a couple pages from my personal website. We will create two tests to verify the main page loads properly and that the contact form submits and validates properly. In the even that I make a change to a shared file, these tests will ensure the pages continue to pass some basic tests.
Getting Started
First we need to download the plugin (assuming you have Firefox installed): Download Selenium IDE.
After downloading the plugin and restarting, we should have a “Selenium IDE” option in the Tools menu (Windows users can press the ‘Alt’ key to see the top menu).

Selenium IDE in the Firefox Menu
Pressing that Selenium IDE button will give us both a popup interface and a set of release notes that unfortunately are probably less than useful to a first time user.

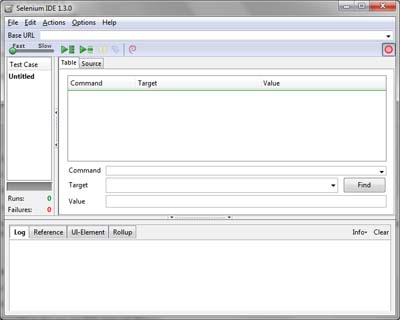
Selenium IDE
The main areas of the interface are:
- A test case list on the left which displays the list of “Test Cases” in the current “Test Suite”
- A command window in the main viewing area, which will display the individual commands we execute as part of selected test case
- A series of tabs at the bottom, of which we will only be interacting with the Log and Reference initially
So now that we have an interface, lets jump into creating the first test case to give us something to explore.
Note: The FireBug Firefox extension is an invaluable tool when working with Selenium, I highly recommend you download FireBug if you don’t already have it.
The First Test Case
Before we start recording our first test case, it’s a good idea to create a saved Test Suite file. Pay careful attention to the title bar for the file dialog, as it will first ask you to save the Untitled test and then ask to save the Untitled Test Suite. Out of personal preference, I use a “.testsuite” and “.test” extension for my selenium IDE files.
- Test Suite
- A group of test cases, including their name and filename
- Test Case
- A series of commands that reports a single Pass/Fail result when they are run
We are now ready to start recording our first test. This test will click the “home” link in my website, verify we are on the right page, and verify two books are shown from my reading list.
Creating a Basic Recording
With our browser open, click the red circular icon on the right side of the Selenium IDE toolbar  . This tells Selenium IDE to start recording our browser interactions. Returning to the browser window, enter “http://www.tiernok.com” in the address bar to navigate to the site. Click the “home” link in the navigation will load the index page. Once this is done, we can return to the IDE and stop the recording by pressing the record button again.
At this point we see a few things in the interface.

Selenium IDE – Getting Started
The Base URL field above the toolbar has populated with the URL of the site we are testing, the “Untitled” test case has a star next to it to indicate unsaved changes, and the command list in the right window has been populated with two commands. Let’s save these changes (Ctrl + S) and test them. Navigate the browser to a different site, return to the Selenium IDE window, and press the “Play Current Test Case” button (the play symbol with a single horizontal line in focus). As expected, the browser opens the root URL (step 1), then presses the “Home” link. The results are displayed under the test case list as 1 Run and 0 Failures and we see the details of the commands echoed in the Log tab at the bottom.
Now that we have the mechanics, lets add verifications. We are going to make some assertions about what should be displayed in the page and Selenium IDE will test them for us. The first thing we want to do is make sure we ended up on the correct page, which we can do by asserting the title of the page.
Adding a simple Assertion
To add an assertion command in the command list, select the empty row below the “clickAndWait” command.

Selenium IDE – Adding a Command
Under the command list, we have three inputs for the new command: “Command”, “Target”, and “Value”. Theoretically these are used to define what command Selenium should execute, the target it is acting on, and a value for the command. These are not always 100% accurate, as we are about to see.
In this case we want the command “assertTitle” to indicate our expectation to Selenium that the page title will be a specific value. As we start typing it, the command dropdown will filter the list of available commands. Once the command is entered, Selenium IDE populates the reference tab with additional information about that command. Since “assertTitle” doesn’t have a target, we can simply enter the value of the page title into the “value” field.
Let’s try an incorrect value first, just to see what happens when a test fails. Enter “ice cream” or something else nonsensical as the value and run the Test Case again.
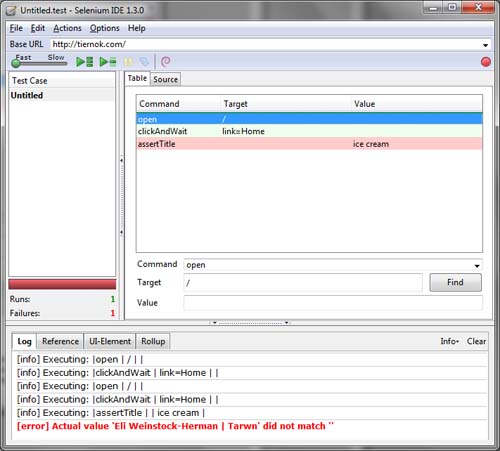
The result is different this time. Under the Test Case list we still have 1 run, but now we have 1 failure and a red bar. In the command list to the right, the “assertTitle” line has a red background (unless it currently has focus). In the log at the bottom we have some red text indicating the command that failed.

Selenium IDE – Results
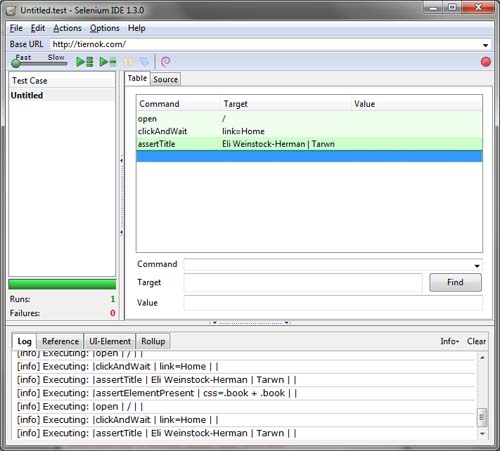
We have actually learned one more thing. If we look closely at the error we will see that it tried to match the page title against an empty string and failed. The “assertTitle” command actually reads it’s argument from the “target” input, not the “value” one. A better way to think of these inputs is as “Argument 1” and “Argument 2” rather than as “Target” and “Value”. If we put the value “Eli Weinstock-Herman | Tarwn” in the “target” input and run the tests again, it should Pass.

Selenium IDE – Results
Which it does. Now we need to move on to the slightly more complex case of verifying the presence of elements that change on every page load.
Asserting Something Is Present
There are a couple different commands we could use to create this test. For the purposes of the post, we will use the “assertElementPresent” command to verify the first and second books are available. Using Firebug (F12, Inspect button, hover over a book), we can see there is a “book” CSS class that wraps around the image and title text of each book.
Add a new command to the Test Case, this time entering “assertElementPresent” in the “Command” input with a target of “css=.book”. There are several locators we can use here, for instance xpath= would allow us to use an xpath locator. To verify the target string, press the “Find” button tot he right of the input. If Selenium is able to find a match, the element will flash briefly in the browser window. Additionally, double clicking the command in the command list will test just that line and report the result.
To test that there are two books, we are going to be sneaky and use the CSS selector “css=.book + .book”. Since this CSS path will only locate an element if it finds two book elements in a row, it is an easy way to verify that both are present. We can update the command with this new locator target and run the Test Case to see it passes successfully.

Selenium IDE – Test Case Commands
The last thing we need to do is rename the Test Case to something useful. Right-Click the Test Case in the Test Case list on the left and edit the test name. I named my test “HomeLinkDisplaysHomePageWithBooks”, which may seem a bit clumsy but tells me exactly what I’m tetsing without loking at the details.
_Note: Attempting to test too many concepts in a single test makes the test more fragile (ie, increases the frequency we will need to update it as we make site changes) and requires more digging to determine what failed when the test doesn’t Pass. A Descriptive name is not only useful but helps keep me from combining too many tests.
Note #2: Another option for this test would have been the “assertXpathCount” command that allows us to enter an xpath argument and verify the return count matches a specific number.
The Second Test Case – Adding some Interaction
Now that we can create a test case that makes some basic assertions about the page, it’s time to move on to a test that requires some interaction. In this case we are going to test that the contact form properly submits and returns an error when we enter less than the required number of inputs.
Recording the Test
To start, lets create a new test case by selecting “New Test Case” from the File menu in Selenium IDE. Like we did with the original test, lets save this one before we make any changes. I am going to call my test “ContactPageReturnsErrorWhenEmailFieldEmpty.test”.
Note: Something to consider when naming tests is how you want to organize them. Besides being descriptive, I also try to use a consistent pattern to make them easily sortable/searchable in the file system.
Let’s start another recording and open “http://www.tiernok.com” again. Click the “Contact” link in the top navigation, enter text in the Name and Message inputs in the form, then press the submit button. That’s the whole workflow, so lets stop the recording and see what we have.

Selenium IDE – Test Recording
This test has some new commands in it, but they are pretty self explanatory. We opened the root site, clicked on the “Contact” link and waited for the page to load, typed in two input boxes, and clicked the submit button, again waiting for the next page to load. To finish up the test, lets add an assertion for the error message.
Asserting the Error Message
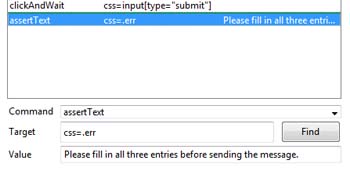
Like the earlier Test Case, there are a few different ways we can write this assertion. In this case the two obvious methods are using either “assertTextPresent”, which tests that the text shows up somewhere on the page, “assertElementPresent”, which could look for an element with the “.err” CSS class, or “assertText”, which combines the two commands above to test that a specific element has specific text.

Selenium IDE – Error Assertion
I’ve used the last option in my Test Case (as well as Firebug again to locate the element in the browser). If I save the Test Case and run it, I should see the browser run through the steps and Pass, just like our earlier test.
Note: You may have noticed the Fast->Slow slider above the Test Case list on the left. This slider controls how fast or slow the individual commands are run when processing the tests. It can be helpful to run individual tests slowly, but the fast setting is useful when you want to run multiple tests or the whole set.
Review
Through the course of the post we have created two basic tests. Neither took very long to create and it wouldn’t take long to expand this suite to cover the entire site. Selenium IDE makes it easy to create basic test cases and tie them together into a suite. The tools, augmented with Firebug, make it fairly easy to build the series of commands for each Test Case and there is a fairly detailed command reference available.
However there were some points I mentioned above that I need to return to.
Test Fragility and Duplication
Tests in Selenium IDE tend to be somewhat fragile. In general, automated interface tests have a certain level of fragility because it’s easy to break them simply by moving a few elements around or renaming some controls. The Selenium IDE is on the extreme side of this curve because these values are used at the individual command level rather than having a central list of search or match strings.
We can reduce the effects of this fragility by keeping tests shorter, as shorter tests are easier to correct or update. Selenium IDE has the ability to define suite-level variables, so in some cases I created variables for common strings and put those declarations in a first “test case”.
Other Limitations
In addition to the fragility above, there are other limitations. Using a Test Suite to test two separate base URLs (for instance a Dev and a QA version or local and production) is difficult and requires some trickery. Scaling the tests can also be tricky, especially if you are used to the ability to run categories of unit tests or select subsets to run on the fly. There is also the issue of leaving your PC alone long enough to run the tests, since the browser will steal focus as it’s running tests.
Note: There is also another oddity. When you have Selenium IDE open, links that open in new tabs or windows will be opened in a new window without the ability to scroll. This has gotten me more than once.
And That’s a Wrap
Selenium IDE offers an excellent first step for verifying everything is working from the interface level. It also provides a great introduction into the mindset of using a web automation framework for testing and has a lot of power for a very cheap price. While there are some limits to how far this approach will get you, the gains are fairly cheap and can be a real time saver. In a later post I will talk about the next step, interfacing directly with Selenium WebDriver from code to test a site.


 My roles have included accidental DBA, lone developer, systems architect, team lead, VP of Engineering, and general troublemaker. On the technical front I work in web development, distributed systems, test automation, and devop-sy areas like delivery pipelines and integration of all the auditable things.

