


Working with Service Fabric and want a local cluster to test and develop against? Here’s the step-by-step path I took from a set of fresh Windows VMs to a running, secured Service Fabric cluster using self-signed X509 certificates. There are a number of Microsoft docs that cover this subject, this is a single beginning-to-end path that also includes fixes for gaps or errors in those docs as I went.
Here are the technical details:
- 3 Hyper-V VMs running Windows 2016 x64, single-core, 2046MB RAM
- ServiceFabric 5.6.220.9494
My VMs are:
- SFNode0 – 192.168.1.200
- SFNode1 – 192.168.1.201
- SFNode2 – 192.168.1.202
Here we go!
Step 1: Download the Service Fabric Standalone Package
Starting on SFNode0, I download the package. There is a brief struggle through the overly strict IE security settings (did you know docs.microsoft.com uses google-analytics?).
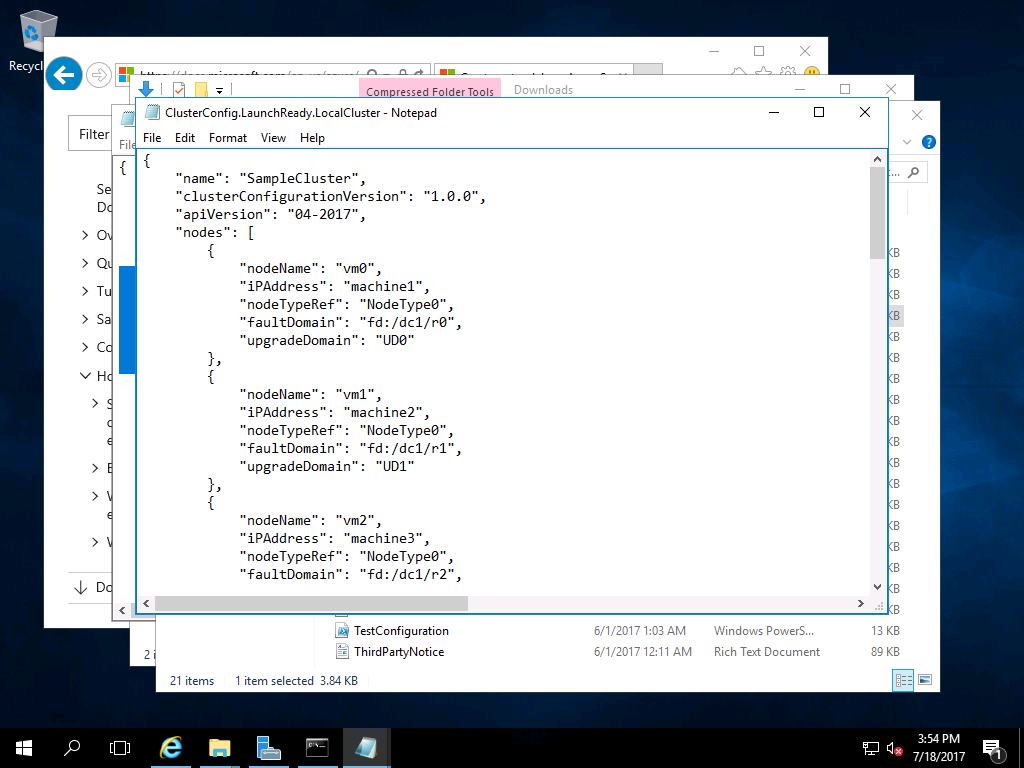
Unpack the downloaded archive and make a copy of the ClusterConfig.X509.MultiMachine.json so we can modify a copy without changing the original. I’ve named this “ClusterConfig.LaunchReady.LocalCluster.json” for my cluster.
Step 2: Cluster Configuration File
The configuration (or “manifest”) is explained in detail in Microsoft Docs. I’ll call out the specifics of what I’m changing as I go.
Initial Cluster Configuration
The first update is the name of the cluster:
"name": "LaunchReady.LocalCluster",
"clusterConfigurationVersion": "1.0.0",
"apiVersion": "04-2017",
The clusterConfigurationVersion and apiVersion can stay unchanged. Later when we make changes to the cluster, we’ll increment the clusterConfigurationVersion (and commit it to our git repository).
Configuring Nodes
The next section is the node definitions. I’ve updated these to reflect the names of my VMs, a common fault domain to indicate the shared server they are running on, and a common update domain (it woul dbe better to make these different, I wasn’t thinking when I first created this).
{
	"nodeName": "SFNode0",
	"iPAddress": "SFNode0",
	"nodeTypeRef": "NodeType0",
	"faultDomain": "fd:/hyperv0",
	"upgradeDomain": "UD0"
},
{
	"nodeName": "SFNode1",
	"iPAddress": "SFNode1",
	"nodeTypeRef": "NodeType0",
	"faultDomain": "fd:/hyperv0",
	"upgradeDomain": "UD0"
},
{
	"nodeName": "SFNode2",
	"iPAddress": "SFNode2",
	"nodeTypeRef": "NodeType0",
	"faultDomain": "fd:/hyperv0",
	"upgradeDomain": "UD0"
}
Here’s a break down of the properties:
- nodeName: is the name that we will see in logs and the management console.
- iPAddress: is a discoverable name or IPAddress for the node
- nodeTypeRef: NodeTypes are defined later in the configuration and represent port and reliability settings for the node See MSDN
- faultDomain: An indicator of (potentially) shared physical resources that the node relies on (if this goes down, all nodes with this indicator will as well)
- upgradeDomain: Identifier to group (or not) which nodes will be upgraded simultaneously during an upgrade
I am going to skip over the diagnosticsStore section for now, as the defaults will be good enough until I have the cluster running, which requires the configs above and the X509 configs coming up next.
Configuring X509 certificates
More background detail: Secure a standalone cluster on Windows using X.509 certificates
I am going to secure this as if it is a production cluster, to ensure any work I do in my local lab won’t suddenly blow up when I switch to an Azure cluster, but I’ll use self-signed certificates since it is a local lab. I’ll use a single certificate for node-to-node and server-to-client (ClusterCertificate, ServerCertificate) because I don’t plan on performing certificate rollovers. I’ll have a second certificate for clients to authenticate with when connecting (ClientCertificateThumbprints).
First, switch to a system that has the ServiceFabric SDK installed. It won’t be present on your nodes at this point.
Next copy the CertSetup.ps1 file to your desktop or another location that will allow you to edit the file (we don’t want to replace one the SDK relies on and Windows security will prevent you from saving over it in the current location).
Next, follow the instructions to generate a cluster/server certificate and a client certificate (I named mine “LaunchReadyLocalClusterCert” and “LaunchReadyLocalClientCert”). This requires editing the names in CertSetup.ps1 on line 22 (Cleanup-Cert function), line 96, and line 163.
Launch PowerShell as an Administrator, then run the altered script .\CertSetup.ps1 -Install. When it completes, edit the script to enter the second certificate subject name and run it a second time.
Opening “Manage computer certificates” from the Start menu, I can see my two certificates listed in Personal/Certificates:
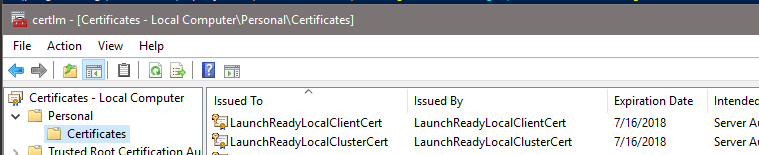
Certificates Successfully Generated
To export these to pfx files, I copied the thumbprint from the details for each certificate and ran it like so:
$pswd = ConvertTo-SecureString -String "NotMyRealPassword!" -Force –AsPlainText

#Client cert
Get-ChildItem -Path "cert:\localMachine\my\ae 01 64 c8 27 56 71 59 e8 3b c9 37 c4 47 b8 75 7d 1c f3 7e" | Export-PfxCertificate -FilePath C:\LaunchReadyLocalClientCert.pfx -Password $pswd
#Server cert
Get-ChildItem -Path "cert:\localMachine\my\e7 98 12 6c 5c 04 46 55 ef ad f7 e3 99 88 0a 82 e7 87 c8 6f" | Export-PfxCertificate -FilePath C:\LaunchReadyLocalClusterCert.pfx -Password $pswd
```<div style="background-color: #FFFFCC; padding: 1em; margin: 1em;">
  Potential Error: If you receive a null object error, you may have an invisible character at the beginning of the thumbprint. I put my cursor at the beginning of the thumbprint and pressed backspace once and was able to run the script no the next try.
</div>

With the PFX files produced, now we have to get them onto the nodes.

The quickest solution, since I'm on the same network, is to open up a shared folder from my desktop temporarily and download to each of the 3 nodes. From the [Install the Certificates][5] instructions, I create a script to install the certs and copy their second script to set permissions and drop those in the fileshare also.

**Install my certs:**

```powershell
$pswd = ConvertTo-SecureString -String "NotMyRealPassword!" -Force –AsPlainText

## Client Cert
Import-PfxCertificate -Exportable -CertStoreLocation Cert:\LocalMachine\My -FilePath "C:\LaunchReadyLocalClientCert.pfx" -Password (ConvertTo-SecureString -String $pswd -AsPlainText -Force)
## Server Cert
Import-PfxCertificate -Exportable -CertStoreLocation Cert:\LocalMachine\My -FilePath "C:\LaunchReadyLocalClusterCert.pfx" -Password (ConvertTo-SecureString -String $pswd -AsPlainText -Force)
On each node, I copy the 4 files, run the Install script, then run the Permissions script once for each Thumbprint:
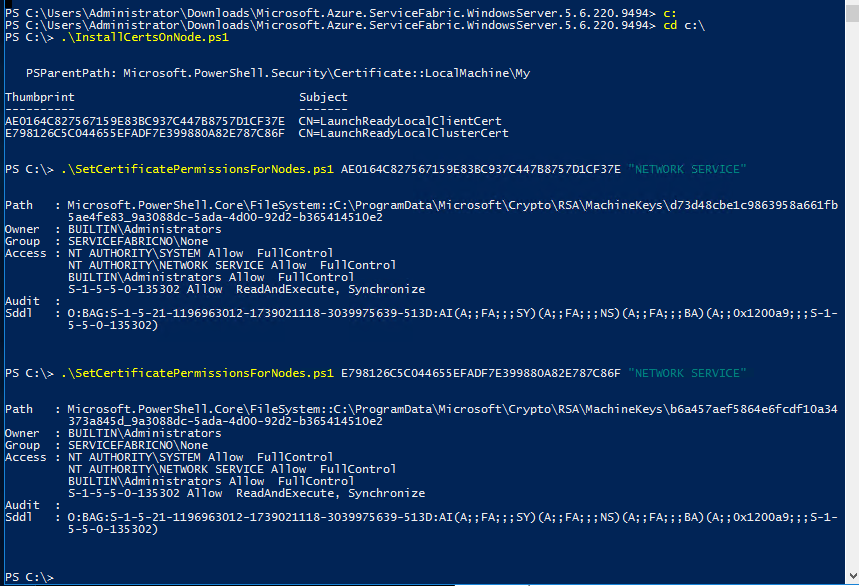
Install Certificates and Grant Access
Finally, I return to SFNode0 and enter the thumbprints in the “Security” section of my cluster configuration, removing the ThumbprintSecondary properties, the ClientCertificateCommonNames property, and the ReverseProxyCertificate property that I don’t intend to use.
Step 3: Test the Configuration
Note: Make sure you look at the paths in the fabricSettings section and move these to a non-OS drive if available. These are not changeable once the cluster is created. I chose to keep the defaults for this local cluster.
Before testing, there are some notable prerequisites buried in the Environment Setup:
- #9: Add firewall entry to allow ports 135, 137, 138, 139, and 445
To test the configuration, I opened a powershell console on SFNode0 and run .\TestConfiguration.ps1 -ClusterConfigFilePath .\ClusterConfig.LaunchReady.LocalCluster.json
Here are the errors as I work through them:
Name Resolution Failure
Error: “Machine ‘SFNode2’ is not reachable on port 445. Check connectivity/open ports. Error: No such host is known”
Fix: Name resolution failed to find the host on my local network, so I switched my iPAddress properties to actual IP Addresses.
Missing Firewall Rule
Error: “Machine ‘SFNode2’ is not reachable on port 445. Check connectivity/open ports. Error: A connection attempt failed because the conncted party did not properly respond…” (classic timeout error)
Fix: Add the Firewall rule I mentioned above to allow traffic on 135, 137, 138, 139, and 445.
SMB? Reboot all the things
Error: “Machine ‘SFNode2’ is not reachable on port 445. Check connectivity/open ports. Error: The connection was actively refused”
Fix:
Open the Network Adapter properties and make sure “File and Printer Sharing for Microsoft Networks” is enabled (or netstat -ao and make sure you’re listening on 445)
Reboot <- It’s like Windows NT all over again! (I don’t know why this fixed it, but it did)
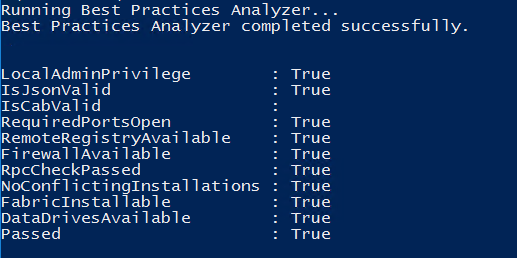
Much Success!
Step 4: Deploy the cluster
Time to try deploying the cluster, using the provided CreateServiceFabricCluster script.
(cue ominous organ music)
.\CreateServiceFabricCluster.ps1 -ClusterConfigFilePath .\ClusterConfig.LaunchReady.LocalCluster.json -AcceptEULA
Here’s a summary of what the script is running (so you know it hasn’t gone off the rails):
- Check and create if necessary: Runtime directory
- Check and create if necessary: Trace folder
- Download Runtime package (small delay for download time)
- Creating Service fabric Cluster…
- Details per machine: Configuring, Configured, Started FabricInstallerSvc, …(HDD clicky clicky)…, Started FabricHostSvc, (short delay)
- Your cluster is successful created! …
This took a few minutes to run for me, but of course YMMV depending on internet speed, CPU resources, etc.
Step 5: Connect to the cluster
Connecting via web browser is easy, but the documentation assumes you are using an insecure setup. http://localhost:19080/Explorer/index.html will time out.
Use https instead and use something like Chrome instead of IE. Chrome will popup an option for you to select the Client Certificate we produced earlier, and then connect successfully:
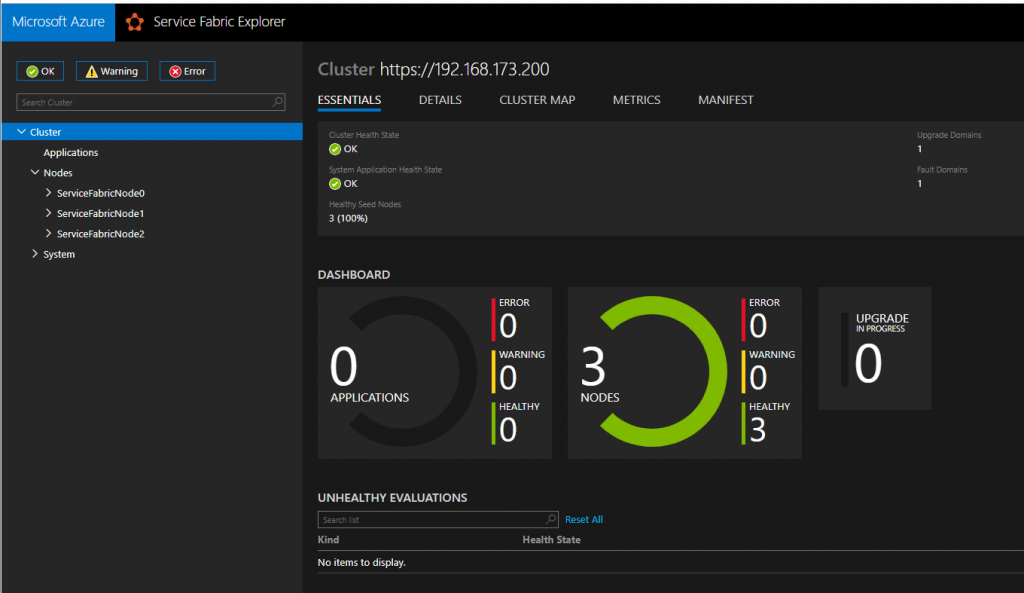
Service Fabric Dashboard
Because the certificate is self-generated, it will be treated as insecure by the browser and may require you to also go through a “no, really, I trust this certificate” routine.
Step 6: Publish a ServiceFabric Project from VisualStudio
Switching to Visual Studio, your ServiceFabric project should have a folder named “PublishProfiles”. Make a copy of the default “Cloud.xml” profile and rename it to “LocalCluster.xml”.
There is an example for connecting via X509 certificates in a comment in the xml file, so replace the current content with that example and edit appropriately. Use the Thumbprint from the Server certificate above (also can be found in the cluster manifest screen at https://(ip address):19080/Explorer/index.html#/tab/manifest).
My file now looks like this:
Add the new profile file to the project in Visual Studio.
Right click the project and select “Publish”. In the Publish dialog, select your new Profile file from the first dropdown. The dialog will verify it can connect to the Cluster:

VS 2017 – Publish Package for Service Fabric
(Yes, I’m using a hotmail address, it amuses me 🙂 )
Click Publish and Visual Studio will build the project and publish it to the cluster. Visual Studio will provide feedback as it publishes the application and we can see the results in the dashboard:

Unhealthy, But Deployed Dashboard View
Successful deployment! Except my application is unhealthy in this case, which I will now go start to debug 🙂
 My roles have included accidental DBA, lone developer, systems architect, team lead, VP of Engineering, and general troublemaker. On the technical front I work in web development, distributed systems, test automation, and devop-sy areas like delivery pipelines and integration of all the auditable things.

