Human beings are good at creative tasks. Put an end user in front of an interface and ask them to find an error and good luck stuffing that particular cat back into the bag. Where we don’t perform as well is performing those tasks repetitively. After several cycles we begin to lose focus, start listening more to our expectations than what we are actually seeing in front of us, gradually forget steps, or worse lose track and have to restart from the beginning. By automating the redundant tasks, we play to the strengths of the computer and free the human to return to creative duties.

Delivery Pipeline – Focus of Current Post
This is the fifth post in a multi-part series on my Continuous Delivery pipeline project. The previous post completed the Continuous Integration job by performing a test deployment of the final package. In this post I’ll build the next stage in the pipeline, a job that is responsible for performing automated system testing against the website.
The Interface Automation Stage
In a production project this would probably be called Automated User Acceptance testing, but this project seems far too small to use that term and I don’t intend to automate enough user requirements. So I’ll refer to it as the Interface Automation Test project.
The Interface Automation stage will consist of the following steps:
- Start when triggered by CI Build Job
- Retrieve the automation project from it’s code repository
- Retrieve the specific zip package the triggering CI build produced
- Build the Automated test project
- Deploy the site to a test site
- Smoke test the deployment
- Run the automated tests
- Import the test results and finish
Let’s start with the automated interface tests.
MvcMusicStore.InterfaceTests
The Interface tests project is a separate project and repository from the production site. Keeping this solution separate allows the CI build job to only be concerned with building the production code and unit tests and prevents the risk of cross-contamination between the production project and the automated interface project.
The project is available on BitBucket. I don’t intend to dive into the all of the details of building that project (and to be honest I didn’t build much in the way of test coverage), but feel free to follow up with me on the forums or in the comments below if you would like to discuss it.

Interface Tests Project
The project uses Selenium WebDriver to interface with the web browser by implementing the PageObject pattern (I covered this in a previous Selenium post if you would like to read more about the mechanics). Using this pattern I create a library of “Pages” that each correspond to a Page in my website.
With an abstracted library of “Pages”, I then use Nunit to write tests that follow a path of actions or pages through the site. For instance, a tour of the site looks like this:
[TestFixture]
public class BasicSmokeTests : TestFixtureBase {

	[Test]
	public void SmokeTest_TourTheTopLinks() {
		IndexPage index = PageBase.LoadIndexPage(CurrentDriver, Settings.CurrentSettings.BaseUrl)
					  .NavigateToStore()
					  .NavigateToLogo()
					  .NavigateToCart()
					  .NavigateToHome();
	}

}
Each page is aware of the shared top navigation links and implements methods to click those links and return the PageLibrary page that is associated with the real website page the link leads to. During navigation, the engine compares the expected page title in the object to the actual title in the browser to ensure we have loaded the page we were expecting. This allows me to treat each navigation as an implicit assertion as well, without having to specify it separately.
I use a TestFixtureBase class to manage the browser Driver instance and to load settings out of a local configuration file. This configuration file currently only lists the URL the site, but could also contain test usernames or data to use for a specific environment.
With a framework in place, it is easy to start expanding coverage.
[Test]
public void WhenTheUserSelectsTheClassicalGenre_TheyArePresentedWithTheListOfAlbums() {
	PageBase.LoadIndexPage(CurrentDriver, Settings.CurrentSettings.BaseUrl)
			.SelectGenre("Classical")
			.AssertAlbumsPresent();
}
Because I have used the Nunit framework, I can use any existing Nunit testrunner to run these tests, including the standard Nunit GUI or console executable.
Creating the Build Job
With a basic automated interface project built, I have enough of what I need to configure the new build job.
Create the Job and Build
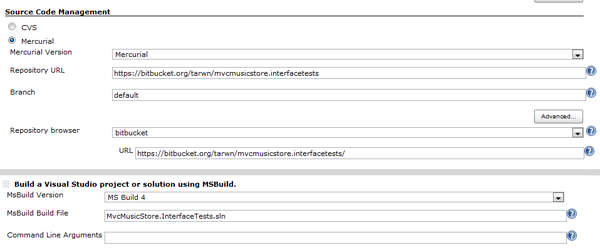
Opening Jenkins in my browser, I create a New Job, selecting the freestyle project and specifying the name and a useful description. In the job configuration I go ahead and setup the mercurial repository information to pull down the Automated Interface test code. I then add steps to execute a build of the project and verify that the job works so far.

Interface Tests – Build Configuration
To test the settings thus far, I’ll trigger a build manually and verify this portion of the project works. I’ll also go ahead and add twitter to my post-build steps again, just because.
Import the CI Artifacts
With the build step working, now I can focus on picking up the artifacts from the CI Build and getting them setup on a test site. From the plugins screen I install the “Copy Artifact” plugin, the “Trigger Parametrized Build” plugin, and the “Nunit” plugin.
In the top of my job configuration I’ll check the “This Build is Parametrized” box and add a SOURCE_BUILD_NUMBER parameter where I will specify the CI Job’s build number that I want to run against. Initially this will require me to manually enter the build number, a bit later I’ll return to the CI Build and create a trigger to pass the parameter automatically.

Interface Tests – Build Parameters
Next, I’ll add a “Copy artifacts from another project” step (Thank you “Copy Artifacts” plugin) to the top of the build steps. This plugin has a number of different options, but I’ll use the build number I passed in as a parameter to retrieve the artifacts. Using the parametrized number option allows me to run the job by typing a build number in, which can be handy, and is similar to how the later QA and Production deploy stages will be setup to retrieve artifacts (I like consistency).

Interface Tests – Copy Artifacts
At this point I realized I had forgotten to check the “Clean Build” option in my Mercurial settings, so I’ll go back and add that so I don’t risk having a stale copy of the artifacts from a prior run.
Deploy and Smoke Test
Now that I have all the pieces in place, it’s just a matter of putting them together. Like the CI Build Job, I’ll create a Deploy batch command and a Smoke Test batch command. The only difference is that here I have specified a different target website and I have used the parametrized “SOURCE_BUILD_NUMBER” instead of the local BUILD_NUMBER environment variable.

Interface Tests – Deploy for Testing
I’ll also configure the test results to be captured in the Post-build, just like the CI Build.
Run the Automation Tests
I’ll download Nunit from the Nunit website and install that on my server, then create the last two steps to put the correct configuration file in my assembly folder and run the Nunit testrunner to execute the tests. At this point I’ll also install Firefox on the server, as that is the browser I am automating for the tests.

Interface Tests – Run the Tests
The first step is a basic copy command to copy the prepared “auto” config to “TestRun.config”, the file my test code will pick up when it starts. The Nunit command executes the nunit console against the compiled assembly, which runs all available test methods in the assembly, just as if I was running it from the GUI.
“C:Program Files (x86)NUnit 2.5.10binnet-2.0nunit-console.exe” MvcMusicStore.InterfaceTestsbinDebugMvcMusicStore.InterfaceTests.dll /framework:net-4.0 /xml:SeleniumTestResult.xml
The last part, before I run my build again, is to import the results of the test run like like I did with MS Test and the smoke tests. The Nunit plugin has provided a “Publish Nunit test result report” section in the post-build options, so I’ll check that box and enter the xml path I specified for the output of the nunit-console command.
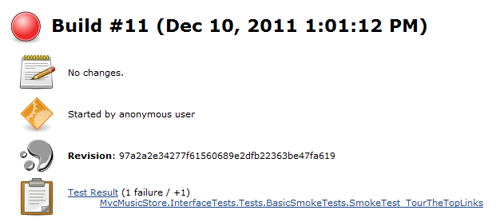
With that completed, I’ll run the test again to verify the results.

Interface Tests – Failed Test
Hmm, that saves me the trouble of breaking the tests to make sure the results are accurate. It turns out when I was cleaning up absolute paths in the MVCMusicStore project I missed the link under the logo, so when the tests tried to navigate through that link they didn’t get to the page they were expecting and correctly failed the test.
Fix that issue, wait for the CI Build to run again, trigger this job with the number of that last CI Build and now I have a success.
Wiring them Together
The last step is to configure the CI Build to automatically trigger this new job when it completes. Opening the CI Build job, there is a new option in the Post-build configuration section that was added when I installed the “Trigger Parametrized Builds” plugin. I’ll add a “Predefined Parameter” with the same name as I used in the new job, SOURCE_BUILD_NUMBER, and I’ll populate it with the local BUILD_NUMBER environment variable of the CI Build job.

CI Build – Parameterized trigger
Saving the change, when I execute a CI job now, it successfully triggers an Automated Interface Test job on the build artifact it just completed.
Next Steps
With a functioning CI Build job and a triggered automated test job, we’re in the home stretch. The last steps will be to implement a nice dashboard for these to provide a graphical representation of each individual build chain and to create build jobs to deploy to a QA and a production environment, the last two steps of my process diagram above.


 My roles have included accidental DBA, lone developer, systems architect, team lead, VP of Engineering, and general troublemaker. On the technical front I work in web development, distributed systems, test automation, and devop-sy areas like delivery pipelines and integration of all the auditable things.

