Introduction
If you are using [Chocolatey][1] and you would now like to make a package of your own program to make it available through Chocolatey then you need to go through a few steps. Here is how I did it for ChocolateyGUI.
But you can also watch the video ferventcoder has put up on [youtube][2].
WarmUp
First I installed WarmUp via Chocolatey of course.
cinst warmup
Or in my case I just used the GUI.
Then I downloaded the [nugetpackages from ferventcoders github account][3] and copied the Chocolatey folder in the _template folder to c:/CODE/_templates which will give you something like this.
And now you can do the commandline thing and prepare your package easily.
You will now find that it has created a package in your user folder.
The package
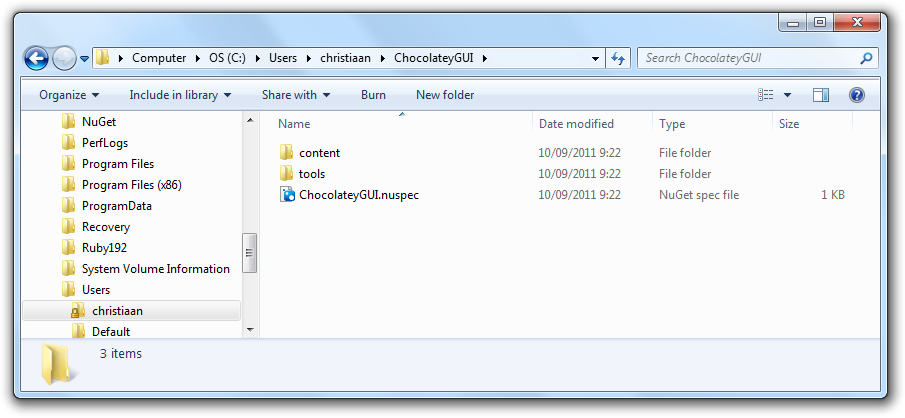
We now have to change the nuspec file. To this.
<?xml version="1.0"?>
<package xmlns:xsi="http://www.w3.org/2001/XMLSchema-instance" xmlns:xsd="http://www.w3.org/2001/XMLSchema">
  <metadata>
    <id>ChocolateyGUI</id>
    <title>ChocolateyGUI</title>
    <version>0.0.1</version>
    <authors>Christiaan Baes</authors>
    <owners>Christiaan Baes</owners>
    <summary>A GUI for Chocolatey</summary>
    <description>ChocolateyGUI
| Please install with chocolatey (http://nuget.org/List/Packages/chocolatey).</description>
    <projectUrl>https://github.com/chrissie1/chocolatey-Explorer</projectUrl>
    <tags>ChocolateyGUI chocolatey admin</tags>
    <licenseUrl>http://www.apache.org/licenses/LICENSE-2.0</licenseUrl>
    <requireLicenseAcceptance>false</requireLicenseAcceptance>
  </metadata>
</package>```
And I also added a License.txt to the content folder.

Then I copied my MSI-file into the tools folder.

Now it is time to change the chocolateyinstall.ps1.

Mine looks like this.

```xml
try {
  $scriptPath = $(Split-Path $MyInvocation.MyCommand.Path)
  $nodePath = Join-Path $scriptPath 'SetupChocolateyGUI.msi'
  Install-ChocolateyInstallPackage 'ChocolateyGUI' 'msi' '/quiet' $nodepath
  Write-ChocolateySuccess 'ChocolateyGUI'
} catch {
  Write-ChocolateyFailure 'ChocolateyGUI' "$($_.Exception.Message)"
  throw
}```
After you have done all this. You have to pack it up with nuget.

<div class="image_block">
  <a href="https://lessthandot.z19.web.core.windows.net/wp-content/uploads/users/chrissie1/chocolatey/chocolatey14.png?mtime=1315641116"><img alt="" src="https://lessthandot.z19.web.core.windows.net/wp-content/uploads/users/chrissie1/chocolatey/chocolatey14.png?mtime=1315641116" width="707" height="255" /></a>
</div>

and now we should be able to test our package.

<div class="image_block">
  <a href="https://lessthandot.z19.web.core.windows.net/wp-content/uploads/users/chrissie1/chocolatey/chocolatey15.png?mtime=1315644145"><img alt="" src="https://lessthandot.z19.web.core.windows.net/wp-content/uploads/users/chrissie1/chocolatey/chocolatey15.png?mtime=1315644145" width="675" height="391" /></a>
</div>

<div class="image_block">
  <a href="https://lessthandot.z19.web.core.windows.net/wp-content/uploads/users/chrissie1/chocolatey/chocolatey16.png?mtime=1315644166"><img alt="" src="https://lessthandot.z19.web.core.windows.net/wp-content/uploads/users/chrissie1/chocolatey/chocolatey16.png?mtime=1315644166" width="707" height="717" /></a>
</div>

And, woohoo, our program is installed.

## Chocolatey.org gallery

Now I just need to upload the nupkg file to thocolatey.org and let you guys play with it.

[And here it is][4].

<div class="image_block">
  <a href="https://lessthandot.z19.web.core.windows.net/wp-content/uploads/users/chrissie1/chocolatey/chocolatey17.png?mtime=1315644515"><img alt="" src="https://lessthandot.z19.web.core.windows.net/wp-content/uploads/users/chrissie1/chocolatey/chocolatey17.png?mtime=1315644515" width="924" height="513" /></a>
</div>

## Conclusion

This was all pretty easy to do. And it works. Go ahead try it out.

 [1]: http://chocolatey.org/
 [2]: http://www.youtube.com/watch?v=Wt_unjS_SUo
 [3]: https://github.com/ferventcoder/nugetpackages
 [4]: http://chocolatey.org/packages/ChocolateyGUI/0.0.1


 Chris is awesome.