Accidental Systems Administrator, Accidental Database Administrator

Virtual Lab entry on the LTD Wiki
Setting up the Virtual Machine
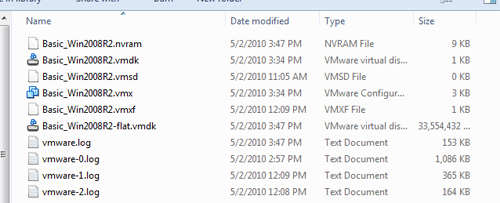
In the first post we created a basic Windows 2008 R2 virtual machine to serve as a starting point for our later systems. Our first step will be to to make a copy of tis system for our new SQL Server installation. To begin with, we’ll make a copy of the folder, renaming that copy to match the name we will be assigning to our new server. If we look inside the folder we will see a variety of configuration files, including the file that serves as our virtual harddrive.
TO keep things consistent, we will rename the vmx and vmxf files to match the new server name as well. Once we have edited the names we need to open the vmx file in using our favorite editor (mine is EditPlus) and edit the values for “displayName” and “extendedConfigFile” to reflect the new file names. It’s possible to rename the other files but requires editing a larger number of configurations and I prefer to leave them with their original name to reflect the system I used as a template.
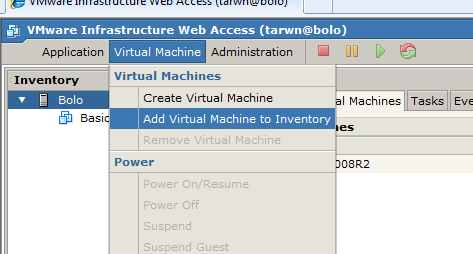
To add the new, copied system to VMWare we open the menu and select the option to “Add Virtual Machine to Inventory”.
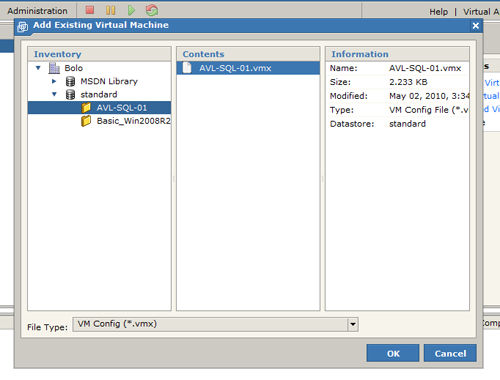
A dialog is presented with the list of stores that are set up on the local system. We select the store our copied VM resides in and then select the VM. The center column should now show us the vmx file we renamed, so we will select that and press Ok.
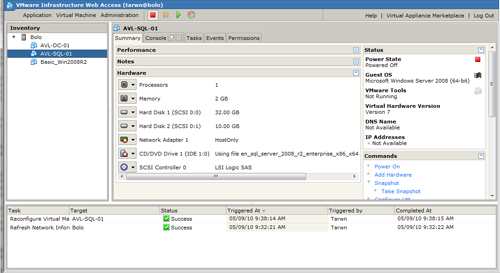
The next step, once the VM is added, is to modify some of the settings. This basic VM was created with 4GB of memory, bridged networking, and an optical disk pointing to the Windows 2008 R2 ISO. These settings were to optimize the installation process, but now we should modify them to fit the needs of our new system. The optical disk will be pointed to the ISO for the SQL Server installation disk and the memory will be reduced to a more reasonable value. The network will remain in bridged mode until virtual network management is addressed in a later post.
The last step is to add a virtual drive for database storage. In later articles we will walk through comparisons of different virtual and physical drive options, but for today we will be creating a simple secondary virtual drive to serve as storage. This secondary drive will start off small, as we don’t intend to work with a large amount of data on the system.
Configuring the OS
Once the Virtual Machine is prepped, it’s time to boot into our system for the first time and prepare it for the SQL Server installation.
When we first attempt to start the new virtual machine, the below error message is displayed prominently on the VMWare interface and we have to select either the “Copied” or “Moved” option to continue.
Before going too far with the new server, lets start by providing it with it’s new name and executing the obligatory reboot.
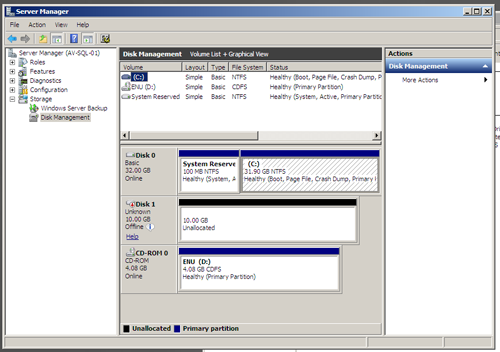
Next up is mounting the new virtual drive. We can access the “Server Management” snap-in by right-clicking on the Computer in Explorer and selecting “Manage” or by typing “Manage” into the Start menu search and selecting “Server Manager”. In the left column is a treeview with a number of options. Expand the Storage option and select “Disk Management” to see the available disks.
Initially the disk is listed as Offline (bottom of center column). Right-clicking the offline disk will provide the option to bring it Online. Once Online the disk will require initialization, so we right-click and select Initialize.
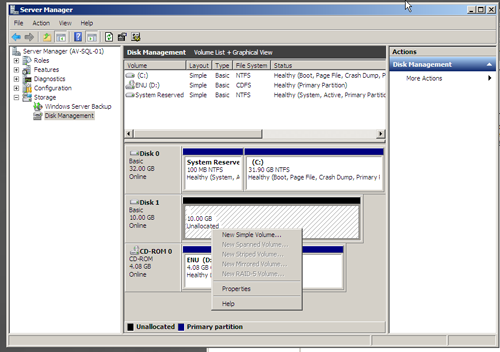
Once the drive reports a status of “Initialized” we can allocate it by right clicking on the volume and selecting “New Simple Volume”.
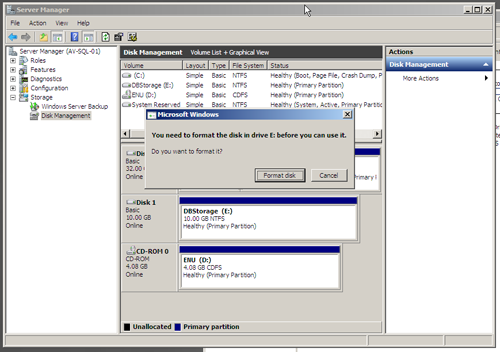
Windows provides a wizard to walk through the drive allocation process. For the sake of this article we will select all of the defaults it provides, which should net a brand new 10237MB “E:” drive formatted for NTFS. Once the wizard is complete, the Server Management console will update the drive status and a dialog will appear with Windows asking if it can now format the new drive.
If something is complex enough to have a wizard and configuration system, it's generally complex enough for the defaults to give you an evenly rounded, mediocre set of settings. This is why system/storage/database admins cringe when they find systems installed with the defaults, the equivalent of carefully configuring the system to perform equally poorly for all possible situations.
When the Format screen appears, Windows provides several values and offers some defaults. Since this drive is going to be used primarily for SQL Server, we will change the “Allocation Unit Size” from 4K to 64K.
- The options you get
- Your I/O pattern
You can find an excellent article here: Fundamentals of Storage Systems: Stripe Size, Block Size, and I/O Patterns at SQL Server Central
The downside of a 64k unit size with NTFS is that NTFS compression requires 4k unit sizes, so selection of any other size means you cannot use this option.
<div class="screenshot">
  <a href="http://www.tiernok.com/LTDBlog/FirstSQL/orig/5_startup.png" title="View Fullsize" target="_blank"><img src="http://www.tiernok.com/LTDBlog/FirstSQL/5_startup.png" alt="Adding the new virtual disk" /></a><br /> Server Management – Adding a Disk
</div>

<p>
  And finally the last step in our OS setup is to create a new administrative account for the future SQL Server services. While the Server Management console is still open, expand the Configuration option in the right column, expand "Local Users and Groups", and select the "Users" option.
</p>

<div class="screenshot">
  <a href="http://www.tiernok.com/LTDBlog/FirstSQL/orig/6_startup.png" title="View Fullsize" target="_blank"><img src="http://www.tiernok.com/LTDBlog/FirstSQL/6_startup.png" alt="Adding an Administrative User" /></a><br /> Server Management – Adding a New User
</div>

<p>
  To enter the new user information we'll right click in the center column. To reduce future surprises we'll make sure the checkboxes are set to not require password change.
</p>

<div class="screenshot">
  <a href="http://www.tiernok.com/LTDBlog/FirstSQL/orig/7_startup.png" title="View Fullsize" target="_blank"><img src="http://www.tiernok.com/LTDBlog/FirstSQL/7_startup.png" alt="Adding an Administrative User" /></a><br /> Server Management – Adding a New User
</div>

<p>
  Elevating the user's permissions is fairly straightforward. After creating the user, we right click them and select "Properties". We select the "Member Of" tab and add the user to the local Administrators group.
</p>

<div class="screenshot">
  <a href="http://www.tiernok.com/LTDBlog/FirstSQL/orig/8_startup.png" title="View Fullsize" target="_blank"><img src="http://www.tiernok.com/LTDBlog/FirstSQL/8_startup.png" alt="Adding an Administrative User" /></a><br /> Server Management – Adding a New User
</div>

<h2>
  Setting up SQL Server
</h2>

<p>
  If we had decided to use the host's optical drive for the VM's optical drive it would now be time to put the disc in the drive, whereas the ISO method should be good to go.
</p>

<div class="hint">
  If you need help determining what version of SQL to install, there is useful information on the <a href="http://msdn.microsoft.com/en-us/library/ms144275.aspx" title="View edition information for SQL Server 2008" target="_blank">edition information page at MSDN</a>.
</div>

<p>
  As we begin the installation process, the installer is going to check our prerequisites right away (unlike some prior versions that seemed to require everything from dog trainers to fiery hoops to get the job done). Press "Ok" and let the setup installer do it's thing.
</p>

<p>
  Once this check passes (or we potentially go through the process of installing the .Net Framework and a newer version of Windows Installer), the setup process will present us with a "SQL Server Installation Center" window. If you haven't installed SQL Server recently, you are probably going to be surprised by the number of links that are available. Compared to the 5 menu options available on the SQL Server 2000 dialog, this one is almost a book.
</p>

<h3>
  Installation
</h3>

<p>
  First things first, lets make sure we have everything that SQL Server wants. The 5th option on the first screen is for the "System Configuration Checker". Selecting this option will start a dialog/wizard process that is going to go through and verify we have any additional prerequisites (such as being logged in with administrative rights) that the installer will need.
</p>

<div class="screenshot">
  <a href="http://www.tiernok.com/LTDBlog/FirstSQL/orig/0_install.png" title="View Fullsize" target="_blank"><img src="http://www.tiernok.com/LTDBlog/FirstSQL/0_install.png" alt="System Configuration Checker" /></a><br /> System Configuration Checker – All Green
</div>

<p>
  Once everything in the configuration checker is green, we can move on to the Installation. Selecting "Installation" from the right sidebar presents us with a new set of options to select from. As we are installing a new server from scratch, lets select the first option "New Installation or Add features". After another Configuration Check, the setup presents a wizard for installing the Support Files.
</p>

<div class="screenshot">
  <a href="http://www.tiernok.com/LTDBlog/FirstSQL/orig/1_install.png" title="View Fullsize" target="_blank"><img src="http://www.tiernok.com/LTDBlog/FirstSQL/1_install.png" alt="SQL Server 2008 R2 Setup - Support Files (Next, Next, Install)" /></a><br /> SQL Server 2008 R2 Setup – Support Files (Next, Next, Install)
</div>

<div class="mylab">
  I did receive a warning at the end of the Support Files installation. Basically the wizard is just warning me that the firewall may block the TCP ports for SQL Server unless I configure it otherwise. As the firewall is still running the default settings from installation, it's probable you received this warning as well.</p>

  <div class="screenshot">
    <a href="http://www.tiernok.com/LTDBlog/FirstSQL/orig/2_install.png" title="View Fullsize" target="_blank"><img src="http://www.tiernok.com/LTDBlog/FirstSQL/2_install.png" alt="SQL Server 2008 R2 Setup - Firewall Warning" /></a><br /> SQL Server 2008 R2 Setup – Firewall Warning
  </div>
</div>

<p>
  Once the Support Files have installed, we are presented with a dialog asking us to select whether we are trying to install SQL Server or PowerPivot for Sharepoint. Leaving SQL Server selected and pressing next will present us with a series of checkboxes to allow us to pick exactly which components we would like to install. Select the boxes the conform with what you intend to use the system for and press "Next".
</p>

<div class="screenshot">
  <a href="http://www.tiernok.com/LTDBlog/FirstSQL/orig/3_install.png" title="View Fullsize" target="_blank"><img src="http://www.tiernok.com/LTDBlog/FirstSQL/3_install.png" alt="SQL Server 2008 R2 Setup - Component Selection" /></a><br /> SQL Server 2008 R2 Setup – Component Selection
</div>

<div class="mylab">
  Since my intent is to create a basic database server, I have selected the bare minimum number of components that I will need. These are the Database Engine, client tools connectivity, and the Management Tools. I probably could have selected the basic set of tools for this system, but it won't make that big a difference.
</div>

<h3>
  Installation Configuration
</h3>

<p>
  After making selections for what components to install, the setup program provides a number of screens to allow initial configuration of the system.
</p>

<p>
  First we should decide whether this will be the default instance on the server or a named instance. If we were working with an existing server than we would need to look at the existing installation to determine which way to answer this question. As we are installing our first instance no a virtual server, however, we can go ahead and select the Default option.
</p>

<div class="screenshot">
  <a href="http://www.tiernok.com/LTDBlog/FirstSQL/orig/4_install.png" title="View Fullsize" target="_blank"><img src="http://www.tiernok.com/LTDBlog/FirstSQL/4_install.png" alt="SQL Server 2008 R2 Setup - Instance Configuration" /></a><br /> SQL Server 2008 R2 Setup – Instance Configuration
</div>

<p>
  The disk space requirements step is always either purely informational or the beginning of a bad day. In this case we created our initial system with enough space to continue.
</p>

<p>
  Next we are setting up the accounts used for the system services. Press the "Use the Same Account for all SQL Services" button, select "browse" and find the NT User we created earlier. Enter the password for the user and press "Ok" to assign it.
</p>

<div class="screenshot">
  <a href="http://www.tiernok.com/LTDBlog/FirstSQL/orig/5_install.png" title="View Fullsize" target="_blank"><img src="http://www.tiernok.com/LTDBlog/FirstSQL/5_install.png" alt="SQL Server 2008 R2 Setup - User Account Configuration" /></a><br /> SQL Server 2008 R2 Setup – User Account Configuration
</div>

<div class="hint">
  I don't suggest changing the collation from the default for your first SQL instance and I can't offer much assistance if you do. if you do choose to change the collation, however, I have a great deal of experience dealing with the results of servers being set to strange collations and not getting along, plus the site has a number of experts that know way more than I do about SQL Server administration. So if you do get adventurous and hurt yourself, put a post up in the <a href="http://forum.lessthandot.com" target="_blank">forum</a> and someone should be able to help you out.
</div>

<p>
  Next we have the Account Provisioning tab, Data Directory configuration, and FILESTREAM configuration. For Account Provisioning we have to decide whether every connection will be made using Windows Authentication or whether there is the potential that one or more of our vendors use SQL Authentication.
</p>

<div class="screenshot">
  <a href="http://www.tiernok.com/LTDBlog/FirstSQL/orig/6_install.png" title="View Fullsize" target="_blank"><img src="http://www.tiernok.com/LTDBlog/FirstSQL/6_install.png" alt="SQL Server 2008 R2 Setup - Account Provisioning" /></a><br /> SQL Server 2008 R2 Setup – Account Provisioning
</div>

<div class="mylab">
  Personally I always use mixed mode, though this may be the developer in me. In many environments we used SQL Authentication for in house web applications that had no special needs on the domain and thus did not get domain accounts (services and windows applications still used domain accounts). Some environments take the opposite approach and always crate separate domain accounts for every single web or local application. Many vendors go the SQL Authentication route because they can provide a script to create the user with necessary rights (or assume you will give them the sa password).
</div>

<p>
  On the Data Directories tab we have the option of defining the default folders that files will be created in. Setting these defaults will not ensure other IT personnel will create files in the correct directories, but it will start them in the right place and catch those one-off backups people tend to leave in the SQL installation folders.
</p>

<div class="screenshot">
  <a href="http://www.tiernok.com/LTDBlog/FirstSQL/orig/7_install.png" title="View Fullsize" target="_blank"><img src="http://www.tiernok.com/LTDBlog/FirstSQL/7_install.png" alt="SQL Server 2008 R2 Setup - Data Directories" /></a><br /> SQL Server 2008 R2 Setup – Data Directories
</div>

<p>
  Continuing on through the next few screens, we should finally arrive at the "Ready to Install" screen. Pressing the "Install" button grants us one free coffee break, after which we will continue on with the initial configuration.
</p>

<p>
  (insert intermission music here)
</p>

<h2>
  SQL Server Configuration
</h2>

<p>
  After installation of the software, there are still a few steps before we are done. Before continuing, let's do a reboot and then ensure all of our services started correctly.
</p>

<p>
  The SQL Server Configuration Manager is available from the Start Menu (Start -> All Programs > SQL Server 2008 R2 > Configuration Tools > SQL Server Configuration Manager).
</p>

<p>
  Verify that the SQL Server service is set to start automatically and verify that the SQL Agent process is set the way we want it. If the Agent service is not correct, right click it and use the Properties dialog to set the startup to the appropriate value.
</p>

<div class="screenshot">
  <a href="http://www.tiernok.com/LTDBlog/FirstSQL/orig/0_config.png" title="View Fullsize" target="_blank"><img src="http://www.tiernok.com/LTDBlog/FirstSQL/0_config.png" alt="SQL Server 2008 R2 Setup - SQL Server Configuration" /></a><br /> SQL Server 2008 R2 Setup – SQL Server Configuration
</div>

<div class="hint">
  The SQL Server Browser service is what responds to tools like SSMS when they are browsing for available services on the intranet. Depending on your environment you can choose to leave this disabled (more secure) or you can use the properties dialog to set the service to startup automatically on boot.
</div>

<p>
  Next we verify that the network configuration is set correctly. Since we intend to connect to the server from a remote client, we need to ensure that the TCP/IP option is enabled by right-clicking and entering the properties dialog.
</p>

<div class="screenshot">
  <a href="http://www.tiernok.com/LTDBlog/FirstSQL/orig/1_config.png" title="View Fullsize" target="_blank"><img src="http://www.tiernok.com/LTDBlog/FirstSQL/1_config.png" alt="SQL Server 2008 R2 Setup - SQL Server Configuration" /></a><br /> SQL Server 2008 R2 Setup – SQL Server Configuration
</div>

<div class="mylab">
  Oddly enough my TCP/IP setting was already enabled. Is it me or do they keep flipping the defaults back and forth for this setting in each major version?
</div>

<p>
  If we have made any configuration changes in the past section we will want to do one last reboot. The SQL 2008 R2 installer did not ask for a reboot, but before we start working with the server we want to make sure that the next reboot (when a real server would be in service) will not come with any surprises.
</p>

<ol style="margin-left: 3em">
  <li>
    Pin the "SQL Server Configuration Manager" to the Taskbar
  </li>
  <li>
    Open SQL Server Management Studio (SSMS) and let it go through it's first time initialization
  </li>
  <li>
    Verify that you can connect to the local server with the sa account in SSMS
  </li>
  <li>
    Pin SSMS to the taskbar
  </li>
  <li>
    Open SSMS on your Host system and verify you can connect to the server (depending on your VM network settings of course)
  </li>
  <li>
    Record the new NT user and sa passwords in your password safe (I like <a href="http://keepass.info/" title="Visit the Keepass site" target="_blank">Keepass</a>)
  </li>
</ol>

<p>
</p>

<h2>
  Additional Tasks
</h2>

<p>
  We still have a few more tasks to complete before we can call this system ready, though I won't be walking you through the rest of the way until a later post.
</p>

<p>
  Once we have the server set up this far, it's a good idea to go ahead and start setting up some of the internals, such as Database Mail and some of the Alerts. While these may be less useful on a test instance, it is good to build a habit of setting them up as part of a new instance. We also want to take this opportunity to reduce the amount of RAM assigned to SQL Server and set up our first backup schedule for our system databases.
</p>

<p>
  While this seemed like a fairly straight-forward Next, Next, Next, Done installation, there was some thought put into where I was going to put files, memory sizing, etc. I highly encourage you to check out <a href="http://www.straightpathsql.com/archives/tag/installation/" target="_blank">this article series</a> for a more extensive set of pre-installation questions and thoughts.
</p>

<p>
  In later weeks we will be working on the creation of a Domain Controller and Domain accounts, but afterward we will be coming back to this system and exploring other setup options, maintenance, and administrative activities.
</p>

<p>
  <label>Additional Articles:</label><a href="http://wiki.lessthandot.com/index.php/Virtual_Lab" title="View the wiki entry">Virtual Lab entry on the LTD Wiki</a>
</p>




 My roles have included accidental DBA, lone developer, systems architect, team lead, VP of Engineering, and general troublemaker. On the technical front I work in web development, distributed systems, test automation, and devop-sy areas like delivery pipelines and integration of all the auditable things.

