


This article will show you how to use two methods in order to restrict the amount of data that is needed in a Merge Replication setup: Join and Parameterized Filters.
Join Filters are exactly what they sound like. If a Join Filter is configured in a publication, the publication acts almost exactly as a join in a T-SQL query would. The tables are joined on key columns and the data is thus filtered down through the tables.
Parameterized Filters are used to restrict data to partitions of data that are related to a user or host name. This is extremely useful when data is mobile, and online and offline situations are involved. Data can be configured into partitions based on a user’s SUSER_SNAME() or a machine’s HOSTNAME(). Not only can this be valuable in filtering what a user will receive for data but it can also be a valuable method in creating Re-Publisher publications based on the HOSTNAME() values.
Setup and configure Sales Publication
The following publication and subscription utilize Parameterized and Join filters. The AdventureWorks database is being utilized as the publication database. AdventureWorksSalesperson database will be created and used to act as the subscribing database.
If you need to download AdventureWorks, you can find it on Codeplex. To create the subscriber database, the following script can be executed.
CREATE DATABASE [AdventureWorksSalesperson]
ON PRIMARY
(NAME = N'AdventureWorks2008R2_Data', FILENAME = N'C:SQLRCAdventureWorksSalesperson_Data.mdf' , SIZE = 220928KB , MAXSIZE = UNLIMITED, FILEGROWTH = 102400KB )
 LOG ON
(NAME = N'AdventureWorks2008R2_Log', FILENAME = N'C:SQLRCAdventureWorksSalesperson_log.ldf' , SIZE = 35712KB , MAXSIZE = UNLIMITED, FILEGROWTH = 20480KB )
GO
ALTER DATABASE [AdventureWorksSalesperson] SET RECOVERY SIMPLE
GO
--change physical file names where required on your systems
Note: This database default growth for data and log files has been calculated based on the partition size that will be applied. You should always estimate the partition size and create databases to follow that size requirement to prevent unwanted data and log growth.
A good way to prepare for creating a publication that uses filters is to write the query that mimics the same functionality. In this case, the publication is using parameterized filter SUSER_SNAME() on Person.Person and then Join Filters on Sales.SalesOrderHeader, Sales.SalesOrderDetail and Production.TransactionHistory.
SELECT
	1
FROM Person.Person
JOIN Sales.SalesOrderHeader ON [Person].[BusinessEntityID] = [SalesOrderHeader].[SalesPersonID]
JOIN Sales.SalesOrderDetail ON [SalesOrderHeader].[SalesOrderID] = [SalesOrderDetail].[SalesOrderID]
JOIN Production.TransactionHistory ON [SalesOrderHeader].[SalesOrderID] = [TransactionHistory].[ReferenceOrderID]
WHERE [Person].[LoginAccount] = SUSER_SNAME()
This query represents the resulting partition of data that will be sent to a subscriber matching the SUSER_SNAME().
In order to utilize AdventureWorks to publish data with parameterized filters, the Person table needs to be altered to include a column that will hold SUSER_SNAME().
ALTER TABLE Person.Person
ADD LoginAccount NVARCHAR(128)
Update all columns that match a BusinessEntityID of 275 to match your login account.
Example
UPDATE Person.Person
SET LoginAccount = 'ONPNTtkrueger'
WHERE BusinessEntityID = 275
Create a Publication
To create the publication, ensure the distributor has been configured. Right click Replication in SSMS and click configure distributor to do this step prior, or do it from the publication setup wizard.
Next, create a new publication by right clicking Local Publications and selecting New Publication

Click next to the welcome screen if it appears.
In the Publication Database selection, choose AdventureWorks (link provided earlier for downloading the AdventureWorks database)

The Publication Database selection will allow the wizard to perform the first step of enabling the database for replication. All databases have a publisher setting of enabled or disabled for replication. The setting is disabled by default so unneeded maintenance of the database in the replication system tables is not done.
Click Next.

In the Publication Type window, select Merge publication and click Next.

Depending on the version of SQL Server, the Subscriber Types will vary. For this example, the subscriber is the same version as the publisher, SQL Server 2012 RC0. If you are performing these tasks on a SQL Server 2008 publisher but want to use a SQL Server 2005 SP2 or greater version as a subscriber, select the check box to enable the support for SQL Server 2005 at this time.
Choosing versions that are an earlier compatibility level can have a slight performance impact. When possible, always try to have your publications publishing to subscribers of the same versions (all editions) of SQL Server.
Click Next when the selection are made (or leave the default if the same versions are used)
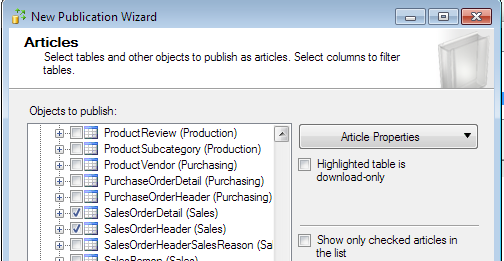
In the Articles window, check the boxes next to Person, SalesOrderHeader SalesOrderDetail and TransactionHistory.
Highlight the SalesOrderHeader table and dropdown the list for Article Properties. Select, Set Properties of Highlighted Table Articles". This will allow the changes for Row and Column Tracking.

In the window that appears to alter the properties of the article, scroll down to the bottom of the window. Under Merging Changes, change Tracking level setting to Column-Level tracking.

Next, click the Resolver tab in the same article properties window.
Choose “Use a custom resolver (registered at the Distributor) and select the “Microsoft SQL Server DATETIME (later Wins) Conflict Resolver”.
Enter, “DueDate” in the box below the resolver list and click OK to close and save the article properties for SalesOrderHeader.

Click next in the publication wizard to move to the filter table rows editor.
Select Add Filter from the list box.

In the initial screen, the Person table should be selected, if it is not, drop the list down and select it. The only changes needed to use the Person table as a parameterized filter is to edit the Filter statement.
Add to the filter statement, “[LoginAccount]=SUSER_SNAME()”
Click the radio button to specify “A row from this table will go to only one subscriber” in the How many subscriptions will receive data area.
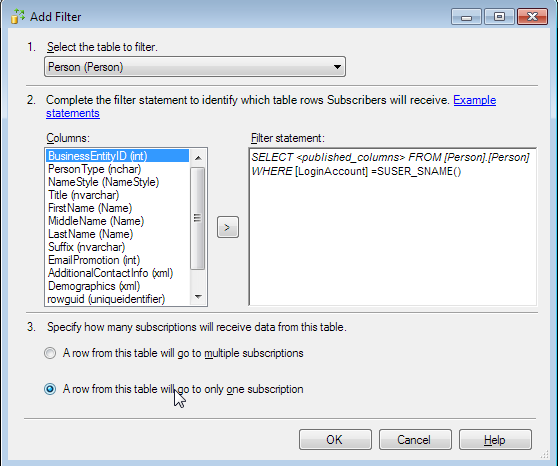
Click OK to save the filter on Person.
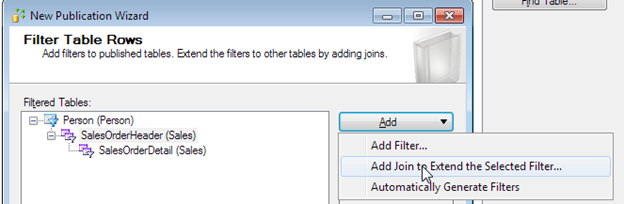
Click the Add list again and select “Add Join to Extend the Selected Filter…”

In the Add Join window, ensure that Sales.SalesOrderHeader is selected in the Joined table list.
Leave Use the builder to create the statement selected. For Filtered table column select BusinessEntityID (int) and then select SalesPersonID (int) for the Joined table column.
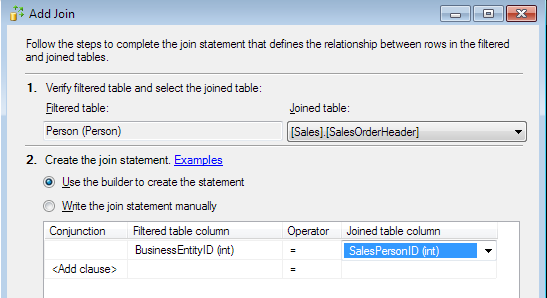
Click OK to close and add the join filter.
Back in the article properties window, click the Add list again and select “Add Join to Extend the Selected Filter…”
Drop down the Joined table and select Sales.SalesOrderDetail. In the join statement step 2, use SalesOrderID (int) for the filtered table column and SalesOrderID (int) in the joined table column.

Click OK to add the join filter.
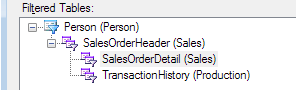
The filter window should appear as shown below.
Back in the article properties window, click the Add list again and select “Add Join to Extend the Selected Filter…”
Drop down the Joined table and select Production.TransationHistory. In the join statement step 2, use SalesOrderID (int) for the filtered table column and ReferenceOrderID (int) in the joined table column.
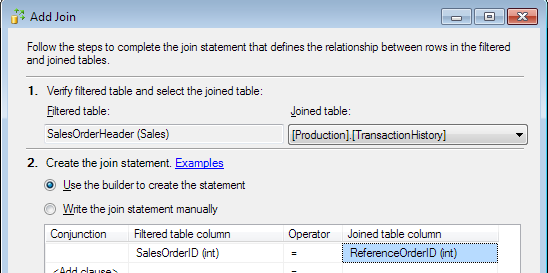
Click OK to add the filter and ensure the completed filters appear as shown below.
Click Next to move to the Snapshot Agent settings window.
For this setup, the defaults are left for the snapshot agent.

Click Next to move to the Agent Security window. Click the browse button in the Connection to Subscriber box. In the Snapshot Agent Security settings window that appears, Select, “Run under the SQL Server Agent service account” so the snapshot utilizes the agent account to perform the tasks.
(If your security does not allow the agent to access the file system, enter an account that can)

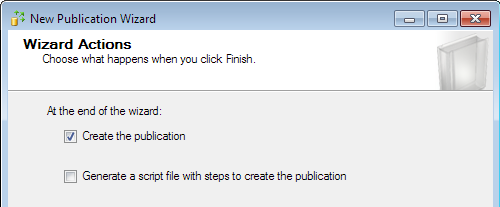
Click OK, then Next to move to the Wizard Actions window. The defaults were left here as well.
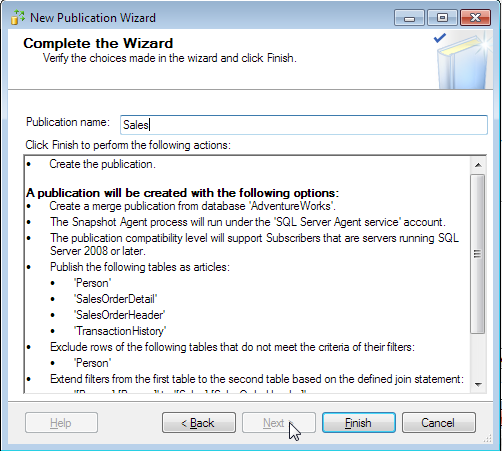
Click Next and then enter a name of, Sales, in the Complete the Wizard screen.

Click Finish to create the publication.
Add a Subscriber
To add a subscription to the publication just created, follow these steps.
Right click the new publication and select New Subscriptions…
The first screen will list all the publications available. If the publisher instance is not the one used to create the publication earlier, change the list box to represent the correct instance.
Highlight the publication, Sales and click Next.
For this example, create the subscriber as a push subscription. This will create the SQL Agent Jobs on the instance and allow us to utilize the agent as a synchronizing method. Pull subscriptions will require other methods such as the replmerg.exe or Windows synchronization to initiate a replication session between the publisher and subscriber.
Click next to move to the Subscribers selection window.
In the Subscribers window, check the Subscriber instance or select the list to find a different instance. Once selected, drop down the subscription database and select the database that will be used as the subscribing database. If following these steps, use the database AdventureWorksSalesperson. The create script was provided earlier in this article.

Click Next to move to the Agent Security widow. Click the browse button similar to the agent security settings performed prior in the publication wizard. Select the radio buttons to impersonate the agent service account and click OK. Click next to move to the final screen and click Finish to create the subscription.

Testing row updates
If the subscription was setup as a Push Subscriber, the snapshot will be applied automatically by the merge agents running under the SQL Agent.
To check the state of the snapshot agent, right click the replication node in SSMS and select, Launch Replication Monitor.
Expand the My Publishers (if a publisher is not shown, right click My Publishers and click Add. Follow the screens to add a publisher) select the Sales publication and then click the Agent tab to the right.
The snapshot will show completed if it was successful.
Possible failure can consist of security errors, access to the ReplData folder, Job Ownership errors or the agent has not started yet. To troubleshoot these, view the history of the agent job itself and attempt to manually run it.
Agent jobs will follow a naming convention if the defaults were used.
INSTANCE-database-publication-increment – Example: ONPNTRC0-AdventureWorks-Sales-1

Test the publication and subscription by altering data in the SalesOrderHeader table on the subscriber database, AdventureWorksSalesperson.
update Sales.SalesOrderHeader
set ShipDate = getdate(), OrderDate = getdate()-10,DueDate = getdate()-1
where SalesPersonID = 275
Back in the replication monitor, click the All Subscriptions tab. Right click the subscriber and click Start Synchronizing.

Check the changes were sent to the publisher by querying the AdventureWorks database.
select * from Sales.SalesOrderHeader where SalesPersonID = 275

The changes should show on both publisher and subscriber.


