This week at SQL University we’re talking about Performance Tuning. Performance tuning SQL Server means just about anything that increases the availability of data to the client requesting it. This could be anything from an index to a team configuration on your NICs. During this week’s class, I’m talking about something that is normally not brought up in tuning discussions: Merge Replication and how data partitions and applying snapshots can be optimized.
When looking at a data partition or any publication dealing with transactional or merge replication, the database is the first place to tune. Replication is just like any other process that is going to query the database. When working with data partitions based on SUSER_SNAME, for example, we would tune for the fact that these snapshots are going to be requesting data only related to that specific column. Index wisely in this case. A slow snapshot agent means longer locking on the tables, more resources consumed and fewer resources for the client requests.
Tuesday of this week we discussed a package design. The primary optimization task of that design was based around cutting time off of bringing the snapshot from the publication down to the client for initialization of a subscriber. I wrote that design in SQL Server Integration Services and we will go over it now.
Design put to work
A short review before we dive into the SSIS package:
- Enumerate the publication – sp_helpmergepublication @publication_name
- Extract the retention period – retention column returned from sp_helpmergepublication
- Enumerate all partitions – sp_helpmergepartition @publication_name
- For each partition, decide if the last refresh date minus the retention period is in the past – sp_helpmergepartition @publication_name, @suser_sname
- If the date calculation is in the past, execute the agent job to run a snapshot
- Once the agent job is done, compress the folder and move to another location available to subscribers
SSIS is made to move data. Andy Leonard does a great job of saying that and showing it here. I like to push SSIS as an extension to SQL Servers ability to act as a job server as well as data mover. I still believe that the right tool for the job should be used. In this case, SQL Server is directly involved in the merge replication process and we’ll keep it on a job server close to home.
Getting to it!
We will test off a merge replication publication named Prescriptions. This will be one table and based on SUSER_SNAME for the data partition. This table can be created from the script below.
CREATE TABLE [dbo].[tblPrescriptions](
	[PresID] [int] NULL,
	[UserCreate] [varchar](30) NULL,
	[DrugID] [int] NULL
) ON [PRIMARY]
GO
The filter on the table is, WHERE [UserCreate] = suser_sname()
I won’t go into the setup script for this publication as it is out of scope. These details should be enough to get your own test publication going. In the publication two accounts were added. FRED and ONPNT.
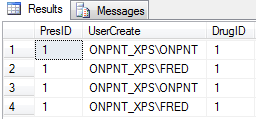
Data inserted as follows:
The Package
The first step is to setup the request for the publication information. We do this with an Execute SQL Task and insert the results into a variable with the data type as object. To do this, change the ResultSet to Full result set and then map a variable of the object data type to the index 0 of the results. Name the SQL Task, Get publications.
The SqlStatement being used is: sp_helpmergepublication @publication = ‘Prescriptions’
Note: we are not using a variable in this example but for reuse; change this to utilize a variable and a property expression to build the SqlStatement source. Don’t forget to set, Bypass Prepare to true for the task!
Create two variables at this time with both set as strings. User::PubName and User::Retention.
Bring the success precedence constraint to a Foreach Loop Container and name it, Enumerate publications. Set the enumerator type to Foreach ADO Enumerator.
Tick the radio button to, Rows in the first table. In the Variable Mappings, map the variable PubName to index 1 and Retention to index 4. The index is based on the column you want to assign to the variable from the result set. For the procedure called, the result set contains the publication name in position 1 and the retention number in position 4.
Create four more variables.
- PartID as a string
- LastRefreshDate as DateTime
- JobID as string
- DynoFolder as string.
Add an Execute SQL Task to the Foreach Loop Container and name it, Get partitions. This task will call the sp_helpmergepartition procedure to return the partitions for the publication. The statement to use in the SqlStatement value is shown below.
sp_helpmergepartition @publication = ‘Prescriptions’
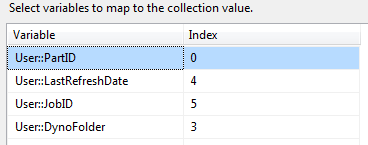
Connect the execute task to another Foreach Loop Container named, Enumerate partitions. Set this Foreach Loop Container with the same configuration as the first. Use the variable User::PartitionHelp for the source variable and map the following variables as shown.
The variable mappings will set the partition ID, the last date the snapshot was successfully executed and created, the SQL agent job ID of the snapshot job and the folder where the snapshot is placed.
At this point the package is ready to start working on a partition. We have the retention time set on the snapshot, the last refresh date and all the required information to execute and directly access the snapshot.
The insides of the loop
The partition loop will use script tasks, Execute SQL Task by expression, File System Task and a CozyRoc custom task for compressing folders named Zip Task. Yes, I think they could have worked on that name a little more but the zip task is pretty awesome and I recommend it. It’s a little rough to set the properties for dynamic use, but once set, the speed is comparable to a lot of custom compression components.
Create the remaining variables that are required.
DynoDestination as a string
ZipLoc as a string and evaluate as an expression of, @[User::DynoDestination] + “.zip”
Bring a script task over into the partition loop container and name it, Determine needs for snapshot. This task will require the retention and last refresh date variables. Take these two variables and use DateTime.AddDays to add the retention variable value to the last refresh date variable. If the date is less than the present date and time (System.DateTime.Now), the snapshot needs to be run. Use a success precedence constraint to an execute sql task for this condition being met.
After bringing an Execute SQL Task and naming it, Execute sp_job_start, configure the SQL task to execute a property expression with the following expression.
“exec msdb.dbo.sp_start_job @job_id = ‘” + @[User::JobID] + “’”
This will be evaluated to the current partitions snapshot job and start the job. Nothing else is needed in the SQL task.
The problem that we find now is, the sp_start_job only issues the start command and does not wait until a completion of the job. Only a failure of the actual execution would be a result other than, command executed successfully.
To monitor the status of the job, another script task will be used. This could be another SQL Task with a WAITFOR but the script task allowed for some added flexibility with the language abilities.
Add the next script task and connect it to the previous SQL task. Name the script task, Monitor job status. Add the JobID variable to the ReadOnlyVariables and use the following code for monitoring the job status.
public void Main()
        {
            SqlConnection conn = new SqlConnection();
            DateTime current = System.DateTime.Now;
            conn = (SqlConnection)(Dts.Connections[1].AcquireConnection(Dts.Transaction) as SqlConnection);
            DataTable dt = new DataTable();
            SqlCommand cmd = new SqlCommand("exec msdb.dbo.sp_help_job @job_id = '" + Dts.Variables["JobID"].Value.ToString() + "',@job_aspect = N'JOB'", conn);
            Thread.Sleep(5000);
            bool watcher = false;


            while (watcher == false)
            {
                using (SqlDataReader dr = cmd.ExecuteReader())
                {
                    if (dr.HasRows)
                    {
                        dr.Read();

                        if(dr["last_run_outcome"].ToString() == "0")
                        {
                            watcher = true;
                        }
                        else if (dr["last_run_outcome"].ToString() == "1")
                        {
                            watcher = true;
                        }
                    }
                }
           }

            conn.Close();
            Dts.TaskResult = (int)ScriptResults.Success;
        }
    }
}
The code above has a Thread.Sleep call in it. This is due to the script task being called so quickly after the sp_start_job that the job more than likely would not actually be started yet. In order to work around this the thread is put to rest for 5 seconds to give it time. This could be a much more logical method of testing the start or pending status. This worked well for our example.
The remaining code executes the sp_help_job with the JOB value for job aspect. This returns the latest information on the jobs execution. We are interested in the last run outcome and in a long running job or further checks, the last run time and last run date.
If the job is found to be a status of 1, success, the loop returns a true value and exits to move on. If the status is found to be 0, failure, the loop exists and used last in a failure notice task.
Once the monitor is completed and the jobs executed, the snapshots are created and the remaining task is to move and compress them. Compression takes quite a bit of CPU to execute. For this reason the folders are moved and an application server would be used.
In order to validate the folders, add a script task named Check folder availability and connect to the previous SQL task. Add the DynoDestination variable as a ReadOnly Variable and use the following code to validate and create, if needed, directory.
public void Main()
        {
            if(!Directory.Exists(Dts.Variables["DynoDestination"].Value.ToString()))
            {
                Directory.CreateDirectory(Dts.Variables["DynoDestination"].Value.ToString());
            }
            Dts.TaskResult = (int)ScriptResults.Success;
        }
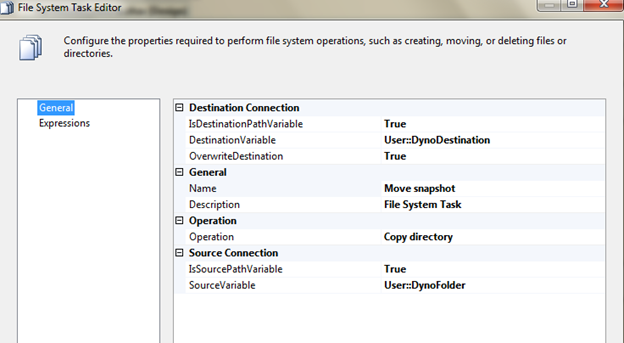
Next, add a File System Task named Move snapshot to the partition loop and connect the directory validation script task as success precedence. For the source and destination of the file system task, use the variables as follows.
Destination Variable = DynoDestination
Source Variable = DynoFolder
Marking the IsSource and IsDestination variable values to true allows you to use these variables in place of file or directory connections.
The last step is the CozyRoc Zip Task. You can download and test this task from their site for this example, but follow through with the rules they have and, well, pay them and stuff. They have very good products and components for SSIS in my opinion.
The Task is hard to set at first. One thing I realized, you must set the properties before going into the editor if you want to use variables for the source and destination. This isn’t like most built-in SSIS tasks, so it was a gotcha.
Follow the directions and steps for configuring the Zip Task for variables from the CozyRoc site here.
Ready to run it?
The system state is as follows.
- Merge Publication named Subscriptions
- Data Partitions set for FRED and ONPNT
- SSIS Package to check, execute snapshots and compress if needed
- Retention set in days and 1
- LastRefreshDate set to 2 days ago (to force the snapshots to run)
F5!
Next, check the folders to ensure the snapshots executed and then were copied to the secondary folder and compressed.
The regular snapshots are found in the ReplData folder
And the directory set for them to move to was, C:ReplData_Compress
Viewing that folder shows the results.
We’ve now set the snapshots and have them ready for download.
In the next post we will talk about applying these snapshots, and some settings required on the subscriber.
I hope you enjoyed this. The package was quite fun to write and I plan to really build it up and place it here for download soon.


