Availability Groups were introduced in SQL Server 2012 and have quickly become the forefront of high availability for the SQL Server Database Engine Services. In prior versions of SQL Server, true high availability was not a complete solution packaged with the native installation and feature set. While mirroring was introduced in SQL Server 2005 and provided a much-needed advance towards achieving highly available data services, mirroring still required much customization to effectively provide a true high availability solution.
It’s important to define high availability as it pertains to database level services – database high availability requires the means of retaining data services to users, applications and services within a defined allowable interruption of data services. This equates simply as, are data services available to any connection within a given tolerance. The nines has always been the flavor of measuring availability in the way of uptime. “My database server achieved four nines availability last year!” This achievement is essentially stating the database services were not available for an estimated .01% of the total operating hours in a year or, 52 minutes. Remember, this achievement is based on service level agreements that can have vast variations. While even Full Clustered Instances of SQL Server implement a level of high availability, there is still the single point of failure that is of highest importance to the data services – the database. Points of failure and focusing on where they may occur, begins allowing a visual representation of how availability achievements can be achieved.
Points of Failure
- Hardware
- Operating System
- Data Corruption
- Data Loss
- Network
These five possible points of failure are specific to almost all data services. As discussed, Full Clustered Instances is a protection against hardware and operating system failures, mirroring is protection against data loss and corruption events, and geo-clustering can be utilized to prevent network failure events. However, even combining all of these technologies or features, the concept of data connectivity is still of concern as customization is needed if a single point of connection is not available to an application or user.
As stated already, pre-SQL Server 2012, even a four nines achievement was difficult. This was due to the customization that was needed to maintain a mirror failover event. Given that SQL Server is mirroring from instance name to instance name, and there is no single entry point for applications, some manual or programmatic intervention would be needed to handle the fact that a data server name could change. While connection strings built in certain frameworks could allow for a failover partner attribute, not all connectivity types and providers supported them. This forced coding changes, monitoring needs and much effort to manage a complete, seamless failover of one designated primary database server.
Availability Groups in SQL Server 2012 combats these issues directly by joining clustering and mirroring technologies and associating them into a group that coexist and all rely on each other in order to maintain availability. The concept of applying a cluster design and including single instances acting on their own, begins to remove failure points in all areas of availability.
With Availability Groups and Windows Server Failover Clustering, we can look at the same failure points differently, asking how they allow for availability to be retained at any point of failure.
- Hardware
- Prevention be implementing the same level of protection in FCI but with WSFC
- Operating System
- Prevention be implementing the same level of protection in FCI but with WSFC
- Data Corruption
- Prevention with mirrored databases between each instance in the group
- Data Loss
- Prevention with mirrored databases standing on unique disk subsystems
- Network
- Allowance of multi-subnet clustering for added protection of network loss
The following step-by-step illustration has been composed for a general setup and configuration need of Availability Groups in SQL Server 2012. This is essential to becoming familiar with Availability Groups and determining how they fit into specific high availability needs and how data services are being used. The specific setup and configuration for the Availability Group, SQLAG located on the network, has been utilized to document the needed setup and configurations. Use this document for setup and configuration of new Availability Groups or the model in place on the network for the Availability Group SQLAG.
Availability Groups are being utilized for three primary objectives:
- Achieve High Availability
- Offload read-only queries (or requests)
- Achieve a Disaster and Recovery solution
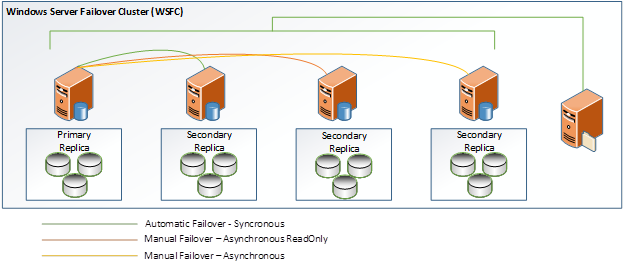
In order to meet all three objectives, a 4-Node Availability Group has been designed, based on a node and share majority solution.
[ ][1]
][1]
In the Availability Group solution pictured above, the following scenarios Availability Group can be achieved:
- Loss of primary database or physical hardware
- Automatic failover to synchronous node 2
- Loss of primary database or physical hardware and loss of secondary automatic synchronous node 2
- Manual failover to node 3 secondary or node 4 secondary
- Loss of primary database or physical hardware
- Manual failover to node 3 secondary or node 4 secondary
- Loss of primary database or physical hardware and loss of file share
- Automatic failover to synchronous node 2
- Manual failover to any other node provided 3 nodes maintain connectivity
Note: Failover scenarios are extended to any node and cluster services maintained provided file share resources are online. This failure scenario will maintain the cluster and listener resources of up to 2 nodes. File share loss lowers a maximum node failure loss of one node. If file share loss occurs and 2 nodes are lost, the cluster cannot be maintained.
Windows Server Failover Clustering and Availability Group Information
Setup of the Availability Groups in the structure covers one or more databases. The naming conventions utilized are listed below along with each setting that has been configured in this setup per node.
Windows Server Failover Cluster (WSFC)
Lab Server Build – Ensure to search for new hotfixes
- Windows Server 2008 R2 Enterprise Service Pack 1
- Physical Memory – 4.00 GB
- 64-bit Operating System
- Processor – Intel Xeon X5660 @ 2.80Ghx
- 1 CPU allocation (Logical count = 1)
- Hotfix patches applied
- KB2494036
- A hotfix is available to let you configure a cluster node that does not have quorum votes in Windows Server 2008 and in Windows Server 2008 R2
- KB2687741
- A hotfix that improves the performance of the “AlwaysOn Availability Group” feature in SQL Server 2012 is available for Windows Server 2008 R2
- KB2494036
Server names
- NODE1
- NODE2
- NODE3
- NODE4
Cluster Name
- SQLCLSTR
Quorum configuration for WSFC
- Node Majority File Share
Network Configuration
- Cluster Network 1****
- Cluster Access IP – 10.2.4.71
- Subnet 10.2.4.0/24
- NODE1
- 10.2.4.31
- NODE2
- 10.2.4.34
- NODE3
- 10.2.4.50
- NODE4
- 10.2.4.55
- NODE1
- Subnet 10.2.4.0/24
SQL Server Availability Groups
SQL Server Instances
Microsoft SQL Server Enterprise (64-bit)
Build 11.0.2100.0
Named Instances
NODE1\SHAREPOINT2013
NODE2\SHAREPOINT2013
NODE3\SHAREPOINT2013
NODE4\SHAREPOINT2013
Availability Group (AG)
AG Name
- SQLAG
- Timeout configuration for all replicas – 10 seconds
- Endpoint port utilized – 5022
AG Listener Name
- SQLAGLISTENER
- 10.2.4.72
AG Replicas
NODE1
- Primary
- Synchronous Role
- Automatic Failover
NODE2
- Secondary
- Synchronous Role
- Automatic Failover
NODE3
- Secondary
- Synchronous Role
- Read Only
- Read-intent only
- Manual Failover
NODE4
- Secondary
- Asynchronous Role
- Manual Failover
WSFC Setup and Configuration
Cluster Setup
Four servers are acting as nodes in the Windows Server Failover Cluster (WSFC). The servers are all located on the subnet 10.2.4.x. Each server has the failover clustering full feature installation.
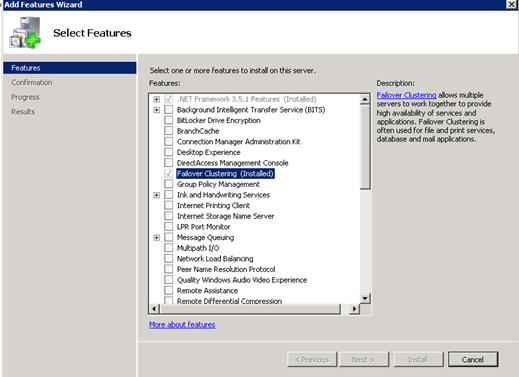
Configuring the WSFC cluster first requires each server to have the Failover Clustering feature installed. To perform this installation, follow these steps.
Connect to each server or open Server Manager for remote access to each server. In Server Manager, go to the Features node and click the Add Features link.
[ ][2]
][2]
In the Select Features wizard, check "Failover Clustering" and click Install.
[ ][3]
][3]
Once the installation is completed, a restart of the server is not required but highly recommended.
Perform these steps for every server that will be enlisted in the WSFC.
Configure the Cluster
The following steps are used to configure the cluster containing the four logical servers that have the failover clustering features installed.
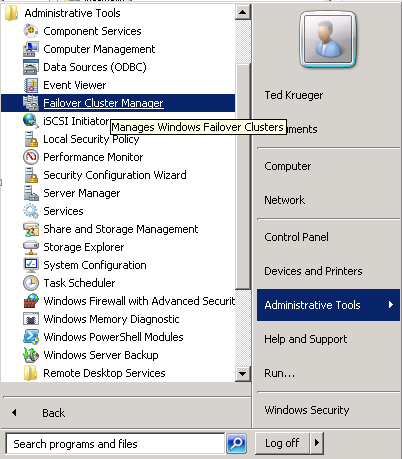
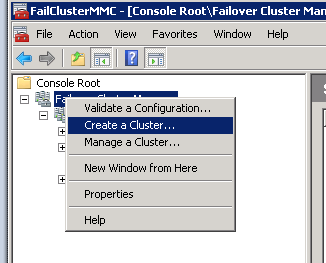
On a local computer with Failover Manager installed, or one of the servers that will be in the cluster, click Start–>Administrative Tools–>Failover Cluster Manager.
(The Failover Cluster Manager can also be opened by using the MMC snap-in.)
[ ][4]
][4]
[ ][5]
][5]
(If the welcome screen is shown, click Next.)
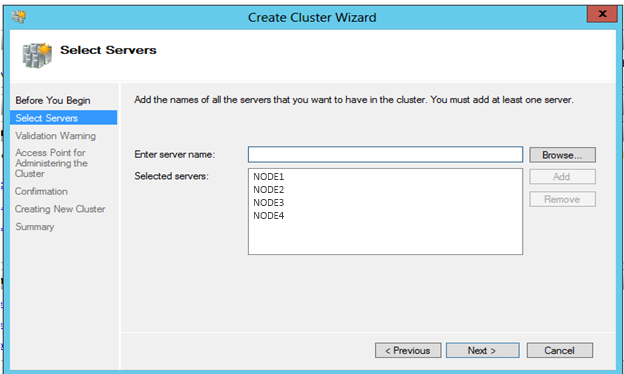
Enter in each server’s name that will be part of the cluster. Click Add after typing in the server name or utilize the Browse button to search the domain for registered server names.
[ ][6]
][6]
Click Next to review the Validation Warning options.
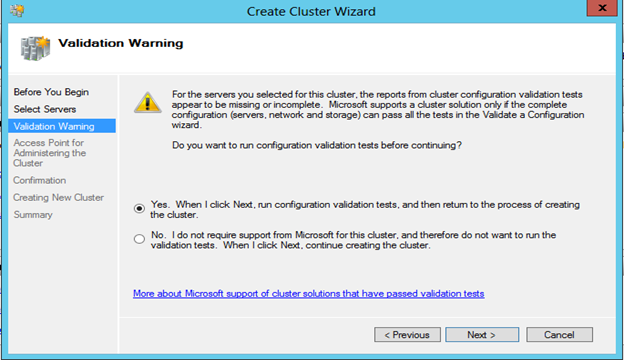
In the Validation Warning screen, if validation tests have not been executed yut, select Yes and click Next to run the validation tests. This will review the servers for all configurations and options, as they pertain to the server being set up correctly for participation in a cluster.
[ ][7]
][7]
Select No to bypass the validation warning review
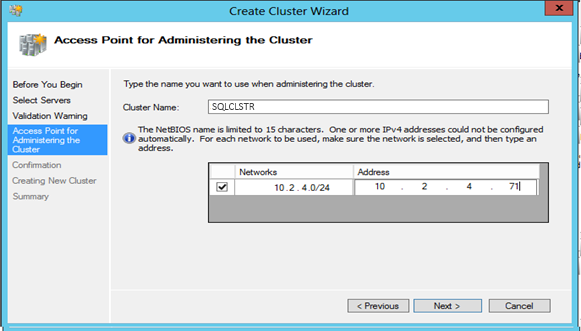
In the Access Point for Administering the Cluster, enter the name of the cluster and the network information needed. If multiple subnets will be utilized, add both in this screen.
[ ][8]
][8]
Click Next and confirm the settings are accurate. If any changes are required, click Back to make adjustments.
Click Next to create the cluster.
[ ][9]
][9]
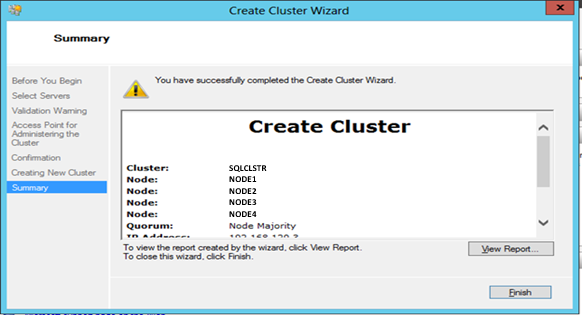
Once completed, click Finish.
Configuring the Quorum
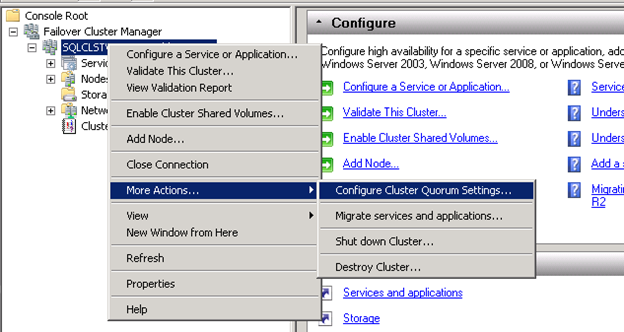
To configure the quorum settings for the new cluster, right click the cluster name in Cluster Manager. Scroll to More Actions and select Configure Cluster Quorum Settings. Click Next to the Before You Begin screen if it is shown.
[ ][10]
][10]
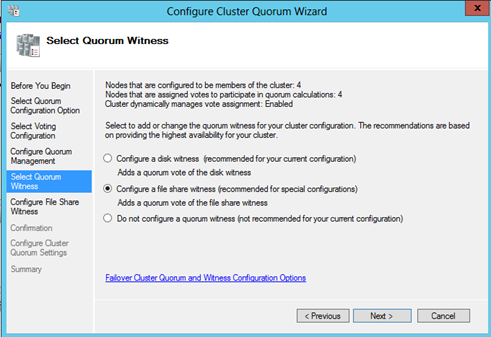
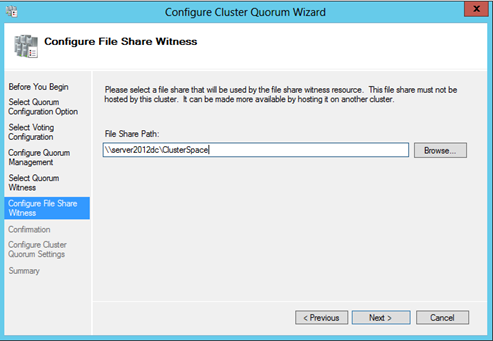
In the Select Quorum Configuration screen, chose which type of quorum should be utilized. If a disk or file share resource has not been added, the only selection available will be Node Majority. Note: to create a share resource, the share must be located outside of the servers in the cluster. For this configuration, we want a file share as a fifth node to retain a healthy quorum in the event of node losses.
[ ][11]
][11]
Select Node and File Share Majority (for clusters with special configurations)
[ ][12]
][12]
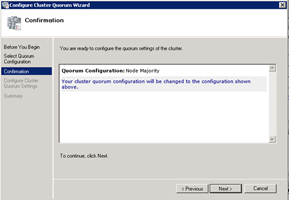
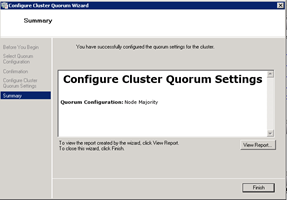
Click Next to confirm settings and click Next again to configure the settings.
[ ][13] [
 ][14]
][14]
SQL Server 2012 Availability Group Setup and Configuration
Configure the SQL Server Availability Group
In order to configure an Availability Group, the following steps are required in this sequence.
Each server that will take part as a replica must be in a WSFC.
- A network name should be created to act as the listener (the name by which applications and users will connect to SQL Server and the databases in the Availability Group). A listener can be created from the wizard if the listener is not created beforehand.
- Security should be set up for the administrator that will be executing the AG setup. This account must be in the sysadmin server role on all SQL Server instances that are acting as replicas and have access to read the domain Active Directory services. If a listener is not prepared before creating the AG, the account is required to be a domain admin.
- Each server that will act as a replica must have AlwaysOn features enabled in SQL Server.
- The database(s) that will be in the Availability Group should be restored or created on the replica that will act as the primary. These database(s) should be in RECOVERY mode and set to a recovery model of Full.
- Each database on the primary requires a full backup to be executed.
- A share should be created to retain the full backup of the primary replica’s database(s). This share can be located on any of the replica servers or an external share resource.
Once the above security and required resources are available, continue with the steps below to create the AG.
Remote into each server that will act as a replica in the Availability Group and configure SQL Server for AlwaysOn features to be enabled. (Warning: This setting requires SQL Server to be restarted.)
Open SQL Server Configuration Manager.
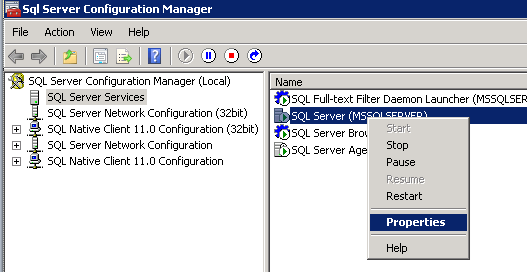
Select SQL Server Services in the tree view. Right click the SQL Server instance to be configured and select Properties.
[ ][15]
][15]
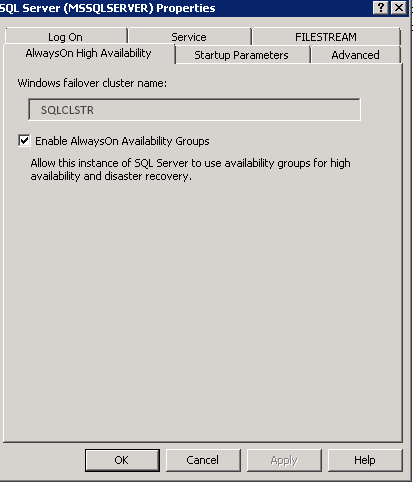
In the SQL Server Properties window, select the AlwaysOn High Availability tab. Check Enable AlwaysOn Availability Groups. The Windows failover cluster name should default to the cluster that the server is part of. If this does not auto-populate, the server is not in a WSFC and is required to be added before this step is performed.
[ ][16]
][16]
Click OK and restart the SQL Server services.
(Perform the above steps for each SQL Server that will be in the Availability Group.)
Connect to SQL Server via SQL Server Management Studio (SSMS) on the server that will act as the primary replica in the Availability Group. Restore or create the database(s) that are required to be in the Availability Group. Perform a full back up on each database. (Note: ensure each database is in Full Recovery Model)
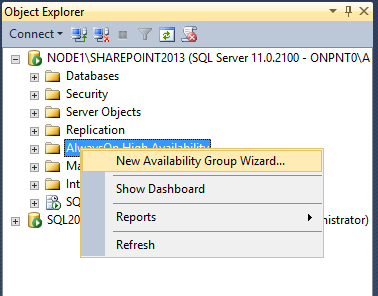
Expand the AlwaysOn High Availability node. Right click the Availability Groups node and select New Availability Group Wizard
[ ][17]
][17]
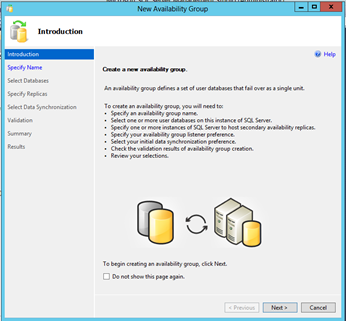
Click Next if shown the Introduction window.
[ ][18]
][18]
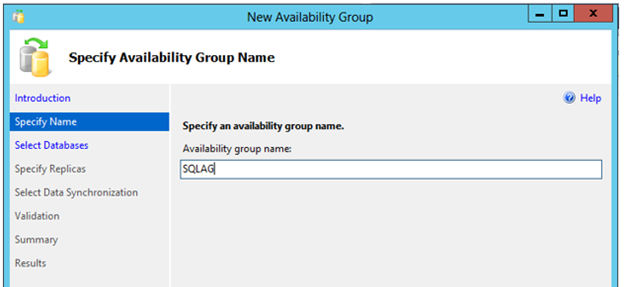
Enter the name chosen for the Availability Groups and click Next.
[ ][19]
][19]
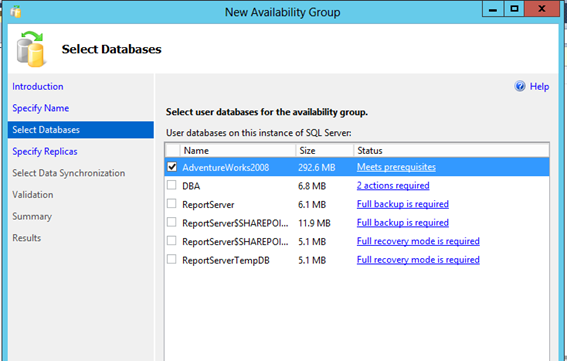
Ensure each database that will take part in the Availability Group passes validations. If a database does not pass the validation process that is required to be added to an Availability Group, the list to the right of each database will show what is required. For example: if a full backup was not performed, the link will read, “Full backup is required”.
[ ][20]
][20]
After performing the required prerequisites, click Refresh to re-validate the databases. Once the validation process states, “Meets prerequisites”, check each database that is required and click Next.
[ ][21]
][21]
In the Specify Replicas screen, click the Add Replica…button to add the replicas that will be part of the Availability Group.
Make the configuration changes as shown below
- Primary 01 – check Automatic failover, Synchronous Commit
- Secondary 02 – check Automatic failover, Synchronous Commit
- Secondary 03 – check synchronous Commit and select Readable Secondary option “Read-intent only”
- Secondary 04 – Leave all options as default
[ ][22]
][22]
Click the Endpoints tab to ensure all settings are populated
[ ][23]
][23]
If changes are required due to network needs or port configurations, make them in this window. For example: if port 5022 is used for other communications, adjust to port 5023 or another free port.
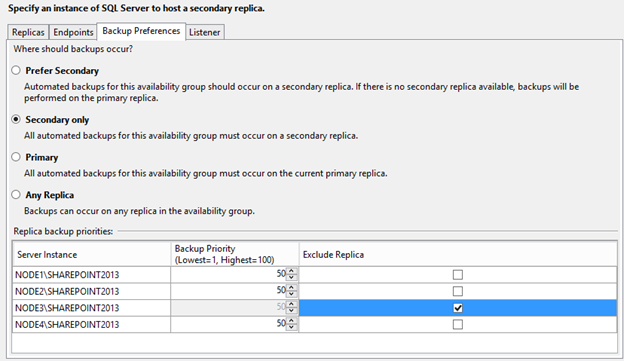
Click the Backup preferences tab.
Check Secondary only option for backup preferences and check the checkbox for Replica NODE3.
[ ][24]
][24]
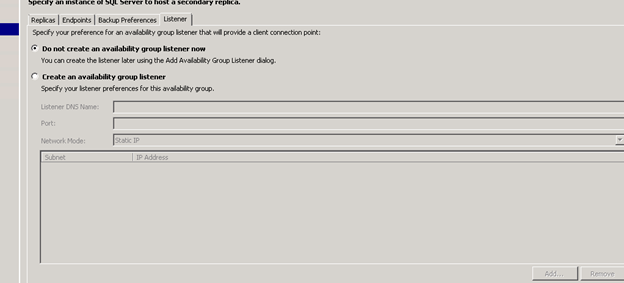
Click the Listener tab. If the listener was created prior to configuring the Availability Group, leave “Do not create an Availability Group listener now”. If a listen should be created, check the “Create an Availability Group listener” and enter the required information. Note: domain admin privileges are required to create the domain name if choosing to create the listener at this time.
[ ][25]
][25]
Click Next to save the replica settings.
In the Select Initial Data Synchronization window, enter a location for the full backup and log backup to be stored to initialize the other replicas in the Availability Group. This location can be a drive or share on any of the replicas or an external share. In the example below, replica 04 is used with the admin share to the T Drive.
[ ][26]
][26]
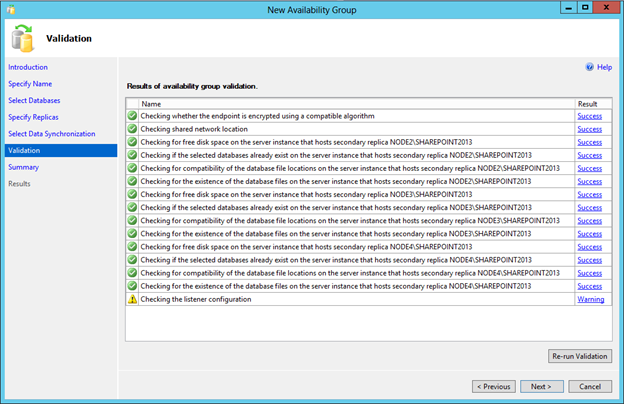
Click Next to run the validation process from the settings saved so far. The only warning should be if the listener was chosen not to be created at the time of the setup.
[ ][27]
][27]
If a warning or error has been found, click the link to review the message and act accordingly.
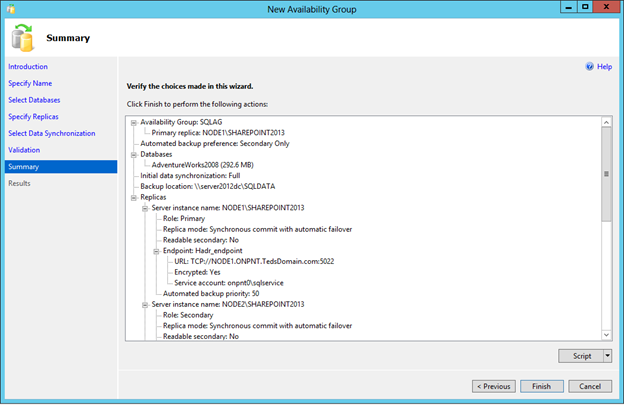
Click Next to review the choices that will be executed upon clicking Finish to create the Availability Group and initialize the replicas.
[ ][28]
][28]
Note: it is recommended to click the Script button at this time and save the script generated by the wizard to a secure location for future recovery.
[ ][29]
][29]
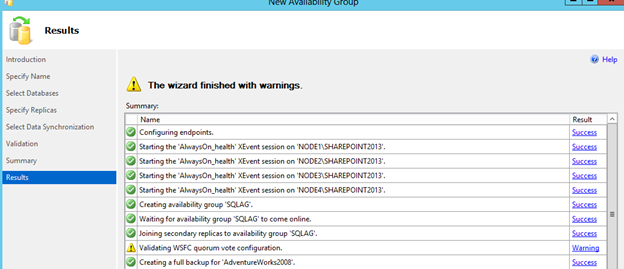
Once Finish is clicked, the Availability Group and all replicas will be initialized and created. This process can take some time depending on the size of each database in the Availability Group.
The process will execute in this order
- Endpoints will be configured/created
- Extended Events for monitoring an AG will be created
- The Availability Group will be created
- The Availability Group will be brought online
- Secondary replicas will be added to the Availability Group
- The WSFC quorum will be validated for votes of each replica server
- A full backup of the database in the Availability Group will be taken
- Steps repeated in this order for each replica
- A backup will be restored to the secondary replica
- The tail-end log backup will be taken from the primary
- The tail-end log backup will be restored to the secondary replica
- Database will be joined to the Availability Group
[ ][30]
][30]
Given the even number of node votes in this wizard driven setup, we will need to configure the voting weight of the nodes at a later point. With the even number the warning is shown as “Validating WSFC quorum vote configuration”.
Configure the Listener
If the listener was not created in the initial wizard setup, perform these steps to assign the listener to the Availability Group.
- Open SSMS 2012
- Execute the statement below to assign the listener name and IP to the Availability Group
USE [master]
GO
ALTER AVAILABILITY GROUP [SQLAG]
ADD LISTENER N'SQLAGLISTENER' (
WITH IP
((N'10.2.4.72', N'255.255.255.0')
)
, PORT=1433);
GO
Note: Assign the IP as needed in this step. This is the IP that will translate for any connection being made to the Availability Group containing all databases.
Configure Read Routing for Read-Intent Connections
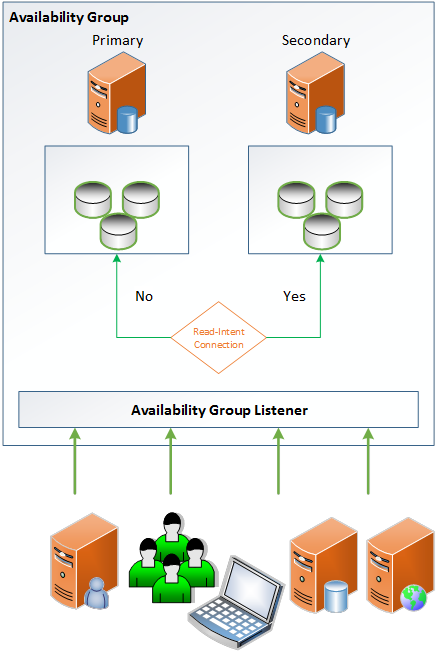
Multiple replicas can be configured for read-intent only connections. This configuration is used to route connections that specify in the connection string the “read-intent” setting. For example: the following connection string is set for read-intent and will be routed to a read-only secondary replica.
Server=SQLAGLISTENER;Database=_Cache;IntegratedSecurity=SSPI;ApplicationIntent=ReadOnly
To configure a replica for read-intent only connections, a primary and secondary role must be set. Each replica in an Availability Group has both a primary and secondary role. By default, the primary role for all replicas is All Connections. This allows for every secondary or primary to be utilized in the event of a disaster as a primary connection with full read/write capabilities. For read-only with read-intent configurations, there are two or more replicas that are configured for the role of primary with all connections and then a secondary role as a read routing for read-intent purposes.
[ ][31]
][31]
In the following configuration, the diagram illustrates the 2-node read routing configuration.
Note: Each replica requires the secondary role to be configured in a read-intent configuration. In this configuration, the primary replica has a secondary role of read-intent. In the case of the automatic failover to the secondary node, read-intent connections would be routed back to the secondary node.
ALTER AVAILABILITY GROUP SQLAG
MODIFY REPLICA ON
N'NODE1\SHAREPOINT2013' WITH
(SECONDARY_ROLE (ALLOW_CONNECTIONS = READ_ONLY));
ALTER AVAILABILITY GROUP SQLAG
MODIFY REPLICA ON
N'NODE1\SHAREPOINT2013' WITH
(SECONDARY_ROLE (READ_ONLY_ROUTING_URL = N'TCP://NODE1.ONPNT.TedsDomain.com:1433'));</code>

ALTER AVAILABILITY GROUP SQLAG
MODIFY REPLICA ON
N'NODE3\SHAREPOINT2013' WITH
(SECONDARY_ROLE (ALLOW_CONNECTIONS = READ_ONLY));
ALTER AVAILABILITY GROUP SQLAG
MODIFY REPLICA ON
N'NODE3\SHAREPOINT2013' WITH
(SECONDARY_ROLE (READ_ONLY_ROUTING_URL = N'TCP://NODE3.ONPNT.TedsDomain.com:1433'));

ALTER AVAILABILITY GROUP SQLAG
MODIFY REPLICA ON
N'NODE1\SHAREPOINT2013' WITH
(PRIMARY_ROLE (READ_ONLY_ROUTING_LIST=('NODE3\SHAREPOINT2013','NODE1\SHAREPOINT2013')));

ALTER AVAILABILITY GROUP SQLAG
MODIFY REPLICA ON
N'NODE3\SHAREPOINT2013' WITH
(PRIMARY_ROLE (READ_ONLY_ROUTING_LIST=('NODE1\SHAREPOINT2013','NODE3\SHAREPOINT2013')));
GO
Connecting to SQL Server and the Availability Group
Every Availability Group utilizes the listener for connectivity between an external source and the actual database(s) enrolled in the Availability Group. It is possible, for administrative purposes only, to connect directly to each replica’s SQL Server instance directly. These direct connections should be performed for instance level configurations such as MAXDOP, memory and so on. Configuring or making changes to the Availability Group should also be performed on the primary replica by directly connecting to it. For example: the primary in the configuration is NODE1 and this would be the instance to connect to for configuration of the Availability Group.
For database level changes such as security, connect to the database through the listener name.
For application or service connections, no other changes are needed beyond the normal connection strings utilized for connecting directly to either a named instanced, default instance or clustered instances of SQL Server. However, if a read-intent connection is desired, the ApplicationIntent=ReadOnly, attribute is required in the connection string for read routing to take place. ****
Modifying the Availability Group
Add a database to an existing Availability Group
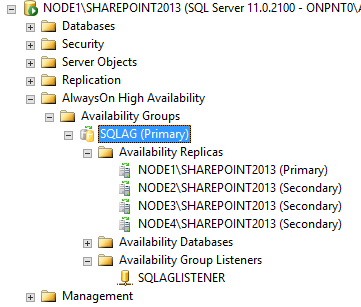
To add or remove a database from a pre-existing Availability Group, connect to the SQL Server instance acting as the primary replica via SSMS.
Expand the AlwaysOn High Availability node and expand the Availability Group that you wish change.
[ ][32]
][32]
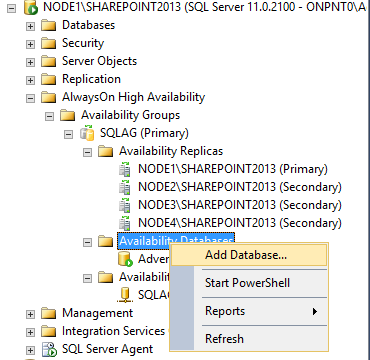
Right click Availability Databases and click Add Database.
[ ][33]
][33]
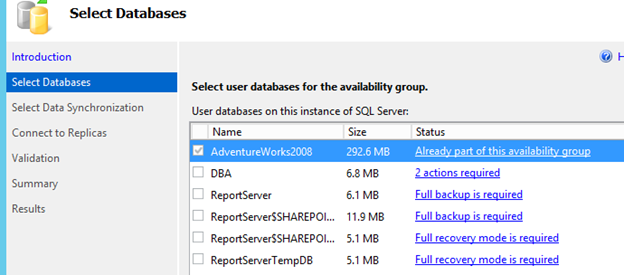
The Add Database to Availability Group wizard will be shown. This wizard is the same as the initial Availability Group setup. Each database must follow the same requirements of being in full recovery model and having a full backup taken.
Follow the screens and fill in each required piece of information that is specific to the database(s) you wish to add to the Availability Group
[ ][34]
][34]
When the wizard has completed, the database will have a full backup taken and restored to all replicas, and a tail-end log backup will be taken, before it is added to the Availability Group. During this time the other databases and the Availability Group will be available to all connections. There are no requirements beyond these steps to add a database to the Availability Group.
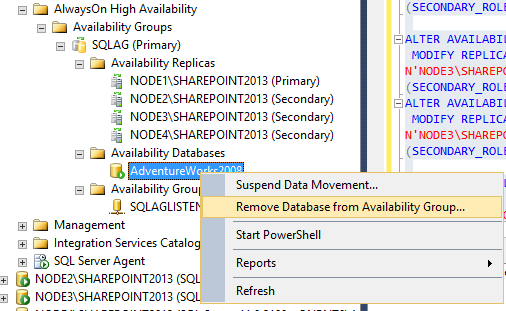
To remove a database, right click the database in the listing and select Remove Database from Availability Group. Note: this will remove the database from the Availability Group only. This will not delete the physical database located on all replicas. The primary database will persist allowing direct connections and all replica databases will be in a NORECOVERY state (restoring…).
[ ][35]
][35]
Modifying Availability Group Settings
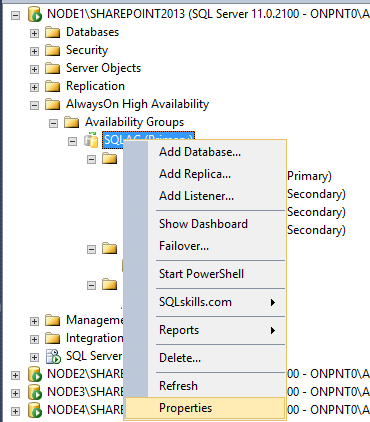
All modifications to the Availability Group should be performed on the primary replica. To modify settings for a specific Availability Group, connect to the primary replica via SSMS 2012, expand the AlwaysOn High Availability list and expand the Availability Groups node.
Right click the Availability Group requiring modifications and click Properties.
[ ][36]
][36]
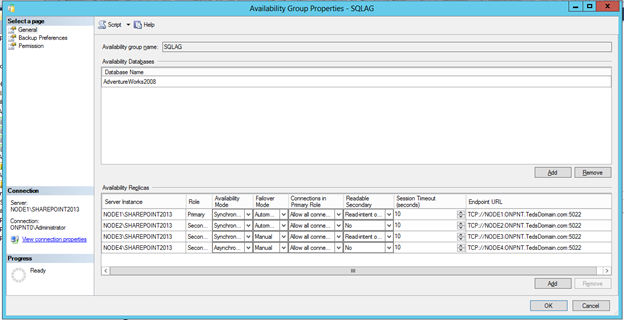
All changes should be performed in the Availability Group properties window.
[ ][37]
][37]
Changes that can be performed
1) Add or remove replicas
2) Enable read-only or read-intent replicas
3) Switch between synchronous and asynchronous committing between replicas
4) Modify endpoint utilization (Note: endpoints cannot be altered in this window. To modify an endpoint, go to server objectsàendpoints in SSMS.)
5) Backup Preferences
6) Primary and Secondary roles
7) Permissions
Failover Testing and Monitoring
Initiate a Failover
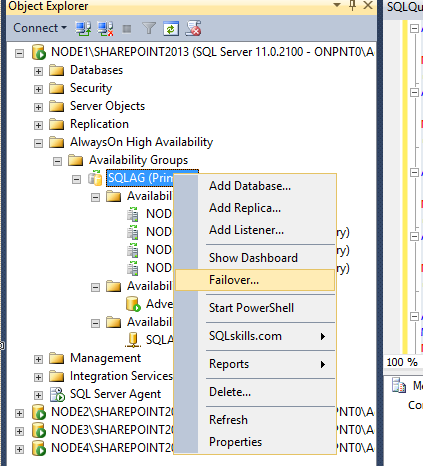
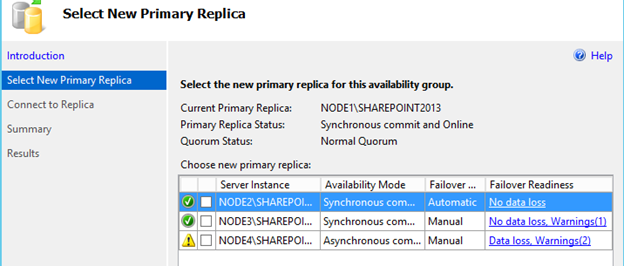
To simulate and test a failover scenario, connect to the primary or listener via SSMS 2012. Expand the AlawaysOn High Availability list and Availability Groups’ node. Right click the Availability Group to be tested and select Failover.
[ ][38]
][38]
The failover wizard will be displayed.
Select the replica to failover to and complete the wizard.
[ ][39]
][39]
Monitoring Availability Groups
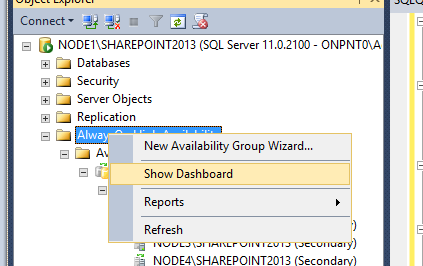
When Availability Groups are enabled on SQL Server 2012, Extended Events are implemented for monitoring the state and health of the mirroring sessions and other session states. To review the information that is being collected, connect to the listener name through SSMS and right click AlwaysOn High Availability and click Show Dashboard.
[ ][40]
][40]
A list of Availability Groups available to monitor will be shown.
Warning: The dashboard works on a refresh rate. The queries pulling information may have an impact on performance if too many dashboards are active. I do not recommend leaving any one dashboard open for a long period of time.
[ ][41]
][41]
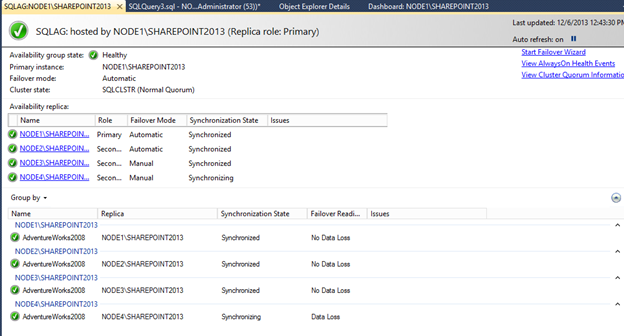
Click the Availability Group to review the health and status.
The overall health of the Availability Group, databases and replicas will be shown.
[ ][42]
][42]
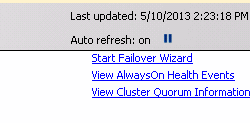
To review the extended health events, click the “View AlwaysOn Health Events” link.
[ ][43]
][43]
Review the events being captured by selecting each one to show the details.
[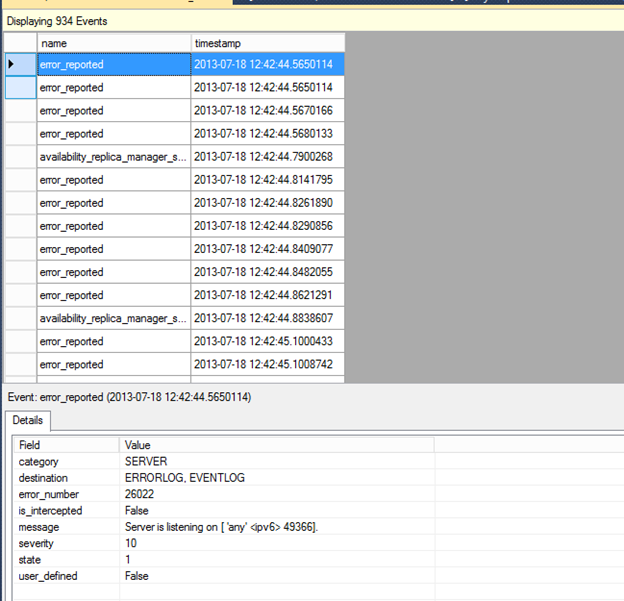 ][44]
][44]
To review the quorum configuration and votes per replica in the cluster, click the View Cluster Quorum Information link.
[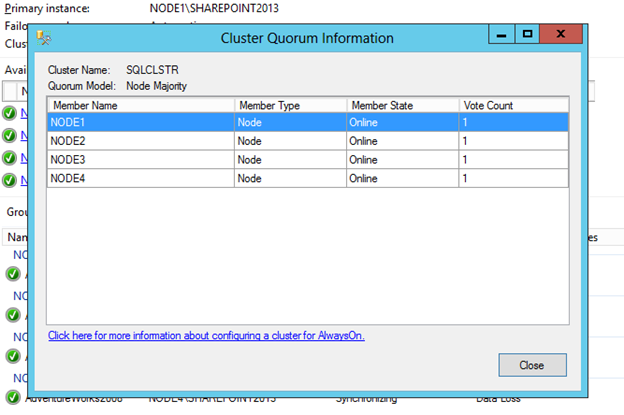 ][45]
][45]
To make modifications to the quorum or votes (NodeWeight), use the Failover Cluster Manager or PowerShell. For example: the following PowerShell statement is used to configure the votes shown above for NODE4 to have no votes in the health of the cluster. This is a common configuration for a disaster and recovery replica node in the cluster and Availability Group setup.
[ ][46]
][46]
Import-Module FailoverClusters
(Get-ClusterNode NODE4).NodeWeight=0
```<h2 style="margin: 2pt 0in 0pt">
  <span style="color: #000000;font-family: Calibri Light;font-size: large">What's next?</span>
</h2>

<p style="margin: 0in 0in 8pt">
  <span style="color: #000000;font-family: Calibri;font-size: medium">Following this example of setting up a lab to test on with Availability groups, we'll show how to script this entire solution with PoSh and T-SQL to ensure the setup, configuration and additional databases placed on the group, are not as long-winded of a process.</span>
</p>

 [1]: https://lessthandot.z19.web.core.windows.net/wp-content/uploads/2014/06/ag1.png
 [2]: https://lessthandot.z19.web.core.windows.net/wp-content/uploads/2014/06/ag2.png
 [3]: https://lessthandot.z19.web.core.windows.net/wp-content/uploads/2014/06/ag3.png
 [4]: https://lessthandot.z19.web.core.windows.net/wp-content/uploads/2014/06/ag4.png
 [5]: https://lessthandot.z19.web.core.windows.net/wp-content/uploads/2014/06/ag5.png
 [6]: https://lessthandot.z19.web.core.windows.net/wp-content/uploads/2014/06/ag6.png
 [7]: https://lessthandot.z19.web.core.windows.net/wp-content/uploads/2014/06/ag7.png
 [8]: https://lessthandot.z19.web.core.windows.net/wp-content/uploads/2014/06/ag8.png
 [9]: https://lessthandot.z19.web.core.windows.net/wp-content/uploads/2014/06/ag9.png
 [10]: https://lessthandot.z19.web.core.windows.net/wp-content/uploads/2014/06/ag10.png
 [11]: https://lessthandot.z19.web.core.windows.net/wp-content/uploads/2014/06/ag11.png
 [12]: https://lessthandot.z19.web.core.windows.net/wp-content/uploads/2014/06/ag12.png
 [13]: https://lessthandot.z19.web.core.windows.net/wp-content/uploads/2014/06/ag13.png
 [14]: https://lessthandot.z19.web.core.windows.net/wp-content/uploads/2014/06/ag14.png
 [15]: https://lessthandot.z19.web.core.windows.net/wp-content/uploads/2014/06/ag15.png
 [16]: https://lessthandot.z19.web.core.windows.net/wp-content/uploads/2014/06/ag16.png
 [17]: https://lessthandot.z19.web.core.windows.net/wp-content/uploads/2014/06/ag17.png
 [18]: https://lessthandot.z19.web.core.windows.net/wp-content/uploads/2014/06/ag18.png
 [19]: https://lessthandot.z19.web.core.windows.net/wp-content/uploads/2014/06/ag19.png
 [20]: https://lessthandot.z19.web.core.windows.net/wp-content/uploads/2014/06/ag20.png
 [21]: https://lessthandot.z19.web.core.windows.net/wp-content/uploads/2014/06/ag21.png
 [22]: https://lessthandot.z19.web.core.windows.net/wp-content/uploads/2014/06/ag22.png
 [23]: https://lessthandot.z19.web.core.windows.net/wp-content/uploads/2014/06/ag23.png
 [24]: https://lessthandot.z19.web.core.windows.net/wp-content/uploads/2014/06/ag24.png
 [25]: https://lessthandot.z19.web.core.windows.net/wp-content/uploads/2014/06/ag25.png
 [26]: https://lessthandot.z19.web.core.windows.net/wp-content/uploads/2014/06/ag26.png
 [27]: https://lessthandot.z19.web.core.windows.net/wp-content/uploads/2014/06/ag27.png
 [28]: https://lessthandot.z19.web.core.windows.net/wp-content/uploads/2014/06/ag28.png
 [29]: https://lessthandot.z19.web.core.windows.net/wp-content/uploads/2014/06/ag29.png
 [30]: https://lessthandot.z19.web.core.windows.net/wp-content/uploads/2014/06/ag30.png
 [31]: https://lessthandot.z19.web.core.windows.net/wp-content/uploads/2014/06/ag31.png
 [32]: https://lessthandot.z19.web.core.windows.net/wp-content/uploads/2014/06/ag32.png
 [33]: https://lessthandot.z19.web.core.windows.net/wp-content/uploads/2014/06/ag33.png
 [34]: https://lessthandot.z19.web.core.windows.net/wp-content/uploads/2014/06/ag34.png
 [35]: https://lessthandot.z19.web.core.windows.net/wp-content/uploads/2014/06/ag35.png
 [36]: https://lessthandot.z19.web.core.windows.net/wp-content/uploads/2014/06/ag36.png
 [37]: https://lessthandot.z19.web.core.windows.net/wp-content/uploads/2014/06/ag37.png
 [38]: https://lessthandot.z19.web.core.windows.net/wp-content/uploads/2014/06/ag38.png
 [39]: https://lessthandot.z19.web.core.windows.net/wp-content/uploads/2014/06/ag39.png
 [40]: https://lessthandot.z19.web.core.windows.net/wp-content/uploads/2014/06/ag40.png
 [41]: https://lessthandot.z19.web.core.windows.net/wp-content/uploads/2014/06/ag41.png
 [42]: https://lessthandot.z19.web.core.windows.net/wp-content/uploads/2014/06/ag42.png
 [43]: https://lessthandot.z19.web.core.windows.net/wp-content/uploads/2014/06/ag43.png
 [44]: https://lessthandot.z19.web.core.windows.net/wp-content/uploads/2014/06/ag44.png
 [45]: https://lessthandot.z19.web.core.windows.net/wp-content/uploads/2014/06/ag45.png
 [46]: https://lessthandot.z19.web.core.windows.net/wp-content/uploads/2014/06/ag46.png


