


For someone that is just interested in trying out Unit Testing the number of topics out there can seem overwhelming. From passionate articles about using TDD, to deeply technical articles around the differences in mocking frameworks, to complete sidetracks into architecture theory and how to make code more testable…just learning enough to get started and try out Unit Testing can seem like you need weeks of classes.
If you’re just catching up, I’ve been sharing commentary on the costs (and value) of Unit Testing, starting with a brief (intended to be humorous) post, a presentation at the Raleigh CodeCamp, and last weeks discussion of the “Twice as Much Code” issue.
This article will try to convey the ease with which you can add Unit Testing to a current project without (in the case of visual studio) extra downloads, installs, or configurations. Costing only a few minutes, and without any of the other terminology, products, or theory, we can get started trying out this Unit Testing concept in our own environment.
TDD, Mocks, Testability…
Automated unit testing has been around for a while and, as such, there has been time for people to define common methods to help make code more testable, components to help reduce the burden of testing certain complex interactions, and processes whose value we may not currently have the context with which to understand.
But we don’t need any of it to get started.
The only thing we need to get started with Unit Testing is some source code and a Unit Testing framework. This post uses a Microsoft .Net environment with Visual Studio 2010. This actually makes my life even easier because a testing framework is included with Visual Studio, meaning there are no extra downloads, installs, or configurations required; We can start trying it out right now.
Adding Unit Testing to a Project
The project we are working with is a basic ASP.Net web application project that I built very quickly for sample purposes. This project can be downloaded here and includes the sample project and a backup of the SQL database. Feel free to download and follow along, or simply read the post.
Our goal is to quickly add Unit Testing to a pseudo ’existing’ application and position ourselves to take advantage of Unit Testing as we continue to maintain or work on this ’existing’ application.
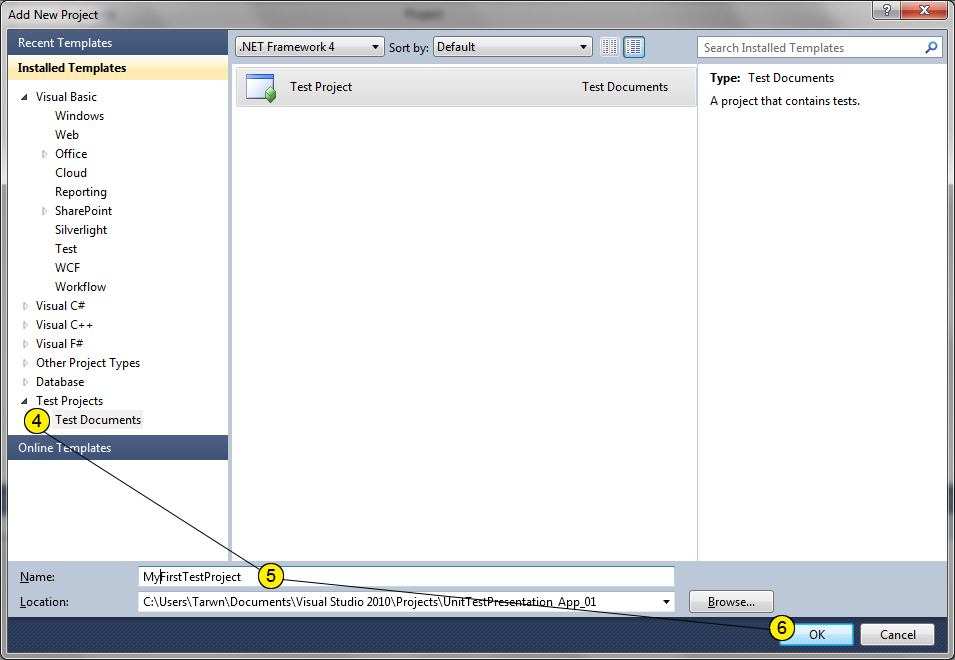
Adding the Unit Testing Project
Opening the project in Visual Studio presents us with our basic Web Application. To get started we right-click the solution and add a Unit Testing Project.
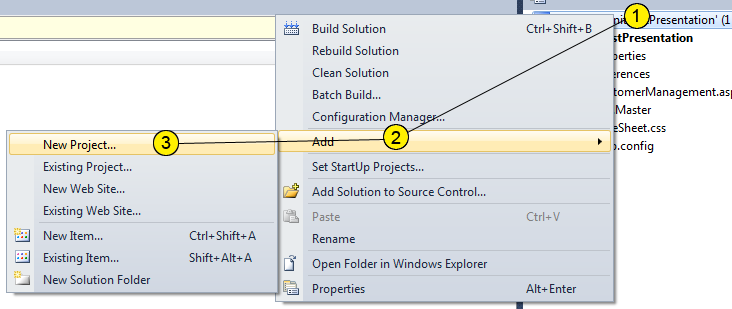
Adding a Unit Test Project
Adding a Unit Test Project
Visual Studio will add our new Test Project to the solution and along with an automatically generated Unit Test class.
Next we need to add a reference to the Unit Test project, allowing it to reference the Web Application project we are going to be testing.
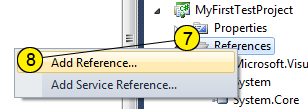
Reference the Project to Test
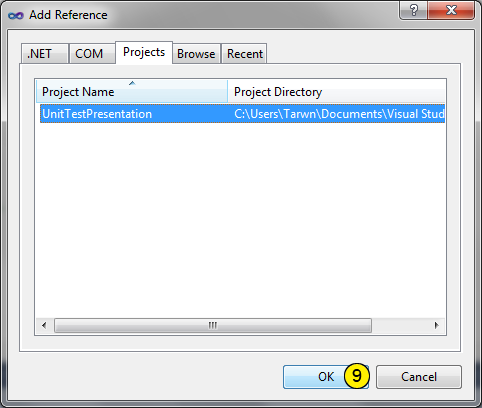
Reference the Project to Test
We’ve now added Unit Testing to the solution. In doing so, Visual Studio has done a few extra steps for us, adding a toolbar as well as some generated files.
The New Toolbar
The new toolbar in Visual Studio will helps us easily manage and run our tests.

Visual Studio's Unit Test Toolbar
From left to right:
- New Test
- Creates additional unit test class files and provides access to a wizard to help create individual unit test functions
- Run Tests in Current Context
- Runs the unit tests in the current context of the cursor (selected test, all tests in a class, etc)
- Run All Tests in Solution
- As advertised, runs all available Unit Test Methods in the solution
- Test View
- A side panel to show all tests in solution
- Test List Editor
- An editor to show all tests, allow tests to be organized into lists, and allow specific sets of tests to be selected and run (or debugged)
- Test Results
- Shows results of the last test run
- Test Runs
- Status of test runs (local or from a remote controller)
Some of these tools also show up in the right click context menu (like Create Unit Test) and have hotkeys (such as the Ctrl+R,A chord to run all tests). Initially you should start with the Test List Editor and the Run All Tests button, the rest will come with time.
The First Generated Test Class
Back to the test project for a moment. When we added our new test project, Visual Studio gave us our first Test Class file, complete with some content. Normally I delete most of this and write it myself, if I need it, but it’s useful while you are still learning what’s available and the syntax to take advantage of it.
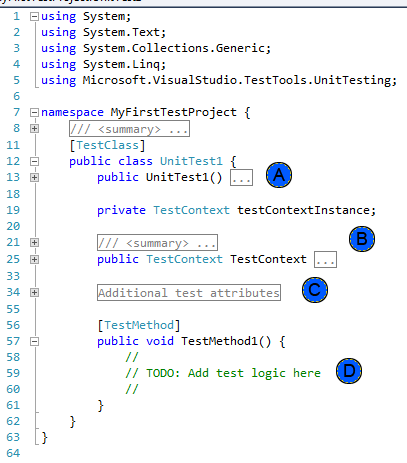
Generated Test Code
- Test Class Declaration – Using the [TestClass] attribute tells the Unit Testing framework that this class will have test methods in it
- TestContext – Stores information for the tests (notably ASP.Net page tests and data driven tests) – subject of a whole different blog post
- Additional Test Attributes – this commented out section contains additional method definitions we can use for setting up or tearing down test data and objects before and after each test or each test run
- Our first Unit Test method – Visual Studio has provided us without first test method, complete with the [TestMethod] attribute that it uses to locate all unit tests in the class
For this example we’re going to cut out most of the clutter and start with this:
using System;
using System.Text;
using System.Collections.Generic;
using System.Linq;
using Microsoft.VisualStudio.TestTools.UnitTesting;

namespace MyFirstTestProject {
	[TestClass]
	public class UnitTest1 {

		[TestMethod]
		public void TestMethod1() {
			// Do Stuff
		}
	}
}
Now that we’ve looked around, lets go ahead and make our first test.
Our First Unit Test
The sample project has all of it’s logic and code written directly in the code behind. For the purposes of this example we would like to debug and correct the address formatting. Occasionally it appears to output an extra address 2 line when it shouldn’t and, instead of manually troubleshooting, we will be using Unit Tests to troubleshoot and correct the error.
Extract Logic to Test
The first thing we will do is extract that logic out of the code behind and put it in a function. Separation of the presentation and logic is a good practice, but often we will run into existing projects that did not follow this. In those cases we need to extract the logic so it can be called from our tests (or other pages that need the same functionality).
protected void rptCustomers_ItemDataBound(object sender, RepeaterItemEventArgs e) {
            Label lblName = (Label) e.Item.FindControl("lblName");
            Label lblAddress = (Label) e.Item.FindControl("lblAddress");
            Label lblID = (Label) e.Item.FindControl("lblID");
            LinkButton lbEdit = (LinkButton) e.Item.FindControl("lbEdit");
            DataRowView dr = (DataRowView)e.Item.DataItem;

            lblID.Text = dr["Customer_ID"].ToString();
            lblName.Text = dr["Name"].ToString();
            lblAddress.Text = dr["Address_1"].ToString() + "<br/>" +
                   (!string.IsNullOrEmpty(dr["Address_2"].ToString()) ? dr["Address_2"].ToString() + "<br/>" : "") +
                   dr["City"].ToString() + " " +
                   dr["State"].ToString() + ", " +
                   dr["Zip"].ToString();
            lbEdit.CommandArgument = dr["Customer_ID"].ToString();
        }
To separate the address formatting out of the code behind, we will create a new class named CustomerInfo, add a method named GetFormattedAddress, and then extract the logic from the code behind and replace it with a call to our new method:
protected void rptCustomers_ItemDataBound(object sender, RepeaterItemEventArgs e) {
            //...
			lblAddress.Text = CustomerInformation.GetFormattedAddress(dr["Address_1"].ToString(),
										dr["Address_2"].ToString(),
										dr["City"].ToString(),
										dr["State"].ToString(),
										dr["Zip"].ToString());
            //...
        }
And the new class and method look like:
public class CustomerInformation {
		public static string GetFormattedAddress(string address1, string address2, string city, string state, string zip) {
			//lblAddress.Text = dr["Address_1"].ToString() + "<br/>" +
			//               (!string.IsNullOrEmpty(dr["Address_2"].ToString()) ? dr["Address_2"].ToString() + "<br/>" : "") +
			//               dr["City"].ToString() + " " +
			//               dr["State"].ToString() + ", " +
			//               dr["Zip"].ToString();

			return address1 + "<br/>" +
			(!string.IsNullOrEmpty(address2) ? address2 + "<br/>" : "") +
			city + " " +
			state + ", " +
			zip;
		}
	}
Now that we have a separate method to work with, we can create Unit Test methods to both troubleshoot our error and provide a defense from it occurring again.
Create the First Test
Back in our test project, Visual Studio had created a shell of a method for us to fill in with our test logic. The key difference between a Unit Test method and a regular method is the [TestMethod] decoration and the use of a class named Assert to communicate and test expectations.
When we build unit tests, we want to keep them small and simple. This reduces the complexity of the tests, makes them easier to add, change, and remove as our application is modified. The smaller and more straightforward the tests are, the easier it will be to determine what they do 3 years from now or when one of our coworkers is working with something we originally wrote.
Part of keeping our tests simple is using a good, consistent naming pattern. I recently started using one that Roy Osherove (interview|blog|twitter) included in his book.
[TestMethod]
public void MethodUnderTest_Scenario_Expectation() {}
It is a long name pattern, but it reduces the need to add commenting, communicates the purpose and expectation of the test succinctly, and helps force me to keep my tests simpler. If I can’t communicate the full intent of the test in this simple manner, then I know I have made them overly complex. Communicating the intent is useful when we see a list of tests after a test run or as part of a build.
In this case we are testing the new GetFormattedText method, the scenario is that our address 2 field is empty, and our expectation is that we will receive back two lines of formatted HTML:
[TestMethod]
public void GetFormattedText_Address2EmptyString_ReturnsTwoHtmlLines() {
    // arrange - setup necessary resources

    // act - act on the unit we are testing
    string result = CustomerInformation.GetFormattedAddress("a", "", "b", "c", "d");

    // assert - test our expectations
    Assert.AreEqual<string>("a<br/>b c, d", result);
}
```<div class="note">
  Note: The code in this function follows a common pattern for creating tests, called the <a href="http://c2.com/cgi/wiki?ArrangeActAssert" title="Read about the AAA pattern">AAA (Arrange, Act, Assert) pattern</a>. This is one more method I use to keep my tests consistent (and consistency improves maintainability and readability), though I usually do not include the comments.
</div>

Our test method calls the new GetFormattedAddress method with values for all of the arguments but address2, which is passed as an empty string. Then we use the Assert.AreEqual(_expected_,_actual_) method to tell the test framework that we expect the result to match the string <code class="codespan">"a<br />b c, d"</code>. On running this test (Ctrl+R, A), Visual Studio will give us a little green checkmark to indicate that the code met our expectations (no Assertions were in error).

_Note: if you are following along with this project in Visual Studio, you will need to add a "using UnitTestPresentation;" to the top of your test class_

<div class="imgBox">
  <a href="http://www.tiernok.com/LTDBlog/unittesting/orig/TestRun1.png" title="See larger image size"><img src="http://www.tiernok.com/LTDBlog/unittesting/TestRun1.png" alt="Test Run results" /></a><br /> Viewing Test Run Results
</div>

Technically we could list as many assert statements as we want in the function, but this contradicts our Keep-it-Simple philosophy above and Visual Studio stops evaluating assertions in an individual method after the first one fails. It's a good practice to try and limit the number Asserts so that each test method is testing one expectation and, when the customer's expectations change, it is obvious where we have to make updates and what is impacted.

### Flushing Out the Problem

Well, we have our first test and it doesn't appear to have found the problem. However we can quickly add additional tests by copying that initial test, creating new method names, and tweaking the arguments we are testing.

Here I have created two additional tests:
<code class="codespan">GetFormattedText_Address2Null_ReturnsTwoHtmlLines()</code> and <code class="codespan">GetFormattedText_Address2Whitespace_ReturnsTwoHtmlLines()</code>

```csharp
[TestMethod]
public void GetFormattedText_Address2Null_ReturnsTwoHtmlLines() {

    string result = CustomerInformation.GetFormattedAddress("a", null, "b", "c", "d");

    Assert.AreEqual<string>("a<br/>b c, d", result);
}

[TestMethod]
public void GetFormattedText_Address2Whitespace_ReturnsTwoHtmlLines() {

    string result = CustomerInformation.GetFormattedAddress("a", "  ", "b", "c", "d");

    Assert.AreEqual<string>("a<br/>b c, d", result);
}
And when we run our tests this time, we can see that the last one is the case where our function isn’t working correctly.

Viewing Test Run Results
So apparently when we have whitespace in Address Line 2, the formatting function wasn’t smart enough to ignore it. This is easy to fix and we now have 3 tests that can verify our fix will works properly.
Wrapping Up
And that’s all it takes.
During the CodeCamp presentation we were able to extract, repair, and extend the validation logic for the save button on this form in a similar time period and, later in the session, someone suggested an improvement to the corrected formatting function that took less than 30 seconds to add and verify (shorter than even pulling up the website).
Hopefully this shows how easy it would be to get started with Unit Testing on an existing project. Rather than being an activity that will take days, you can add and start trying this technology in less than an hour. Using only as much as we covered here, you can start seeing value with your existing and new projects and learn enough to be able to evaluate more advanced techniques, other testing frameworks, and additional resources.
Sample code and previous articles in this unplanned series:
- Initial “Unit Testing Costs Too Much” post: Unit Testing Costs Too Much
- Code camp review and links for slides: Raleigh Code Camp Followup
- 2x Code Followup: Unit Testing Costs Too Much – Twice The Code = Value?
- Sample Code: ZIP Archive of Sample Project and Database Backup
 My roles have included accidental DBA, lone developer, systems architect, team lead, VP of Engineering, and general troublemaker. On the technical front I work in web development, distributed systems, test automation, and devop-sy areas like delivery pipelines and integration of all the auditable things.

