


Prior to full support for availability group listeners in Azure, we were forced to use availability groups without a key feature that makes them truly valuable – listener entry points. A listener is the same concept as a cluster name in the FCI days. Essentially, we look at a listener as the single point of entry into the solution or grouping of active databases. active means: databases currently involved in a high availability solution, promoting data service uptime. Due to the lack of being capable of using a listener on availability groups, methods like the failover switch in connection strings or custom coding to validate which database was accepting read-write actively. When we look at this, we’re essentially looking at a fancy mirroring session with a few bonus features like read-copy databases and offloading some types of backups. In all, this wasn’t enough to sell much of availability groups for an Infrastructure as a Service (IaaS) in Azure.
Fortunately, support was released for listeners in Azure. However the debilitating effects of how that support was generated, they are now available and with work, can be secure.
Another fortunate aspect to IaaS in Azure is, we can utilize a trial period to work with becoming familiar with setting this type of solution up. Similar to a simple software evaluation period. As with any subscription, just ensure you pay attention to the end dates of the trial period and when cost may begin to add up. Aside from all of the trial or if a subscription is readily available, the following steps are how you can run through a quick setup of using full-featured availability groups in Azure virtual machines – IaaS.
After you have a subscription ready, the first step will be to configure your virtual network. As with the SQL Server Lab configurations, the least amount of work needed can be done, just to get things going. Although little work is needed, attention is needed to each step. This attention is pointed out as we run through this setup.
Your virtual network will be maintained internally to Azure. Keep this in mind as your setup flows and how accessing the systems within the Azure environment are performed.
Virtual Network
To create a new virtual network, simply click the, New button, at the bottom of the Azure portal page, while in the networks page.

We can take a very simplistic approach to how this test area will be setup. Keeping that in mind, the new network will be named MyDevNetwork and then take on an address space of 192.168.x.x. This will indicate that my internal IP structure will be effectively in 192.168. So, if I have a SQL Server VM and a Domain Controller VM, the IP structure could be 192.168.1.5 and 192.168.1.6, respectfully.
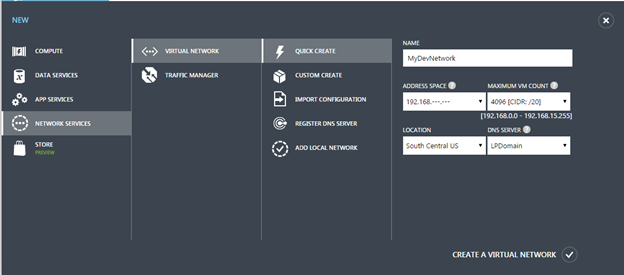
At this point, hitting the, create a virtual network, would be all that is needed to begin creating the remainder of the infrastructure.
Cloud Service
The next step will be setting up a cloud service. In this case, the cloud service will contain the SQL Server services and the active directory server. This is done to maintain them on the same subnet for this example only. Typically, cloud services will be segmented for each specific grouping of a service. For example, if there were five WSFC clusters and each had an availability group, this would be probably setup as five cloud services. The configuration of how this infrastructure setup truly depends on how you will be utilizing it.
To create the cloud service, go to the cloud service page and then click the New button towards the bottom left corner. There isn’t much that is required when setting up the cloud service. Simply enter a name, it will validate if the name is available, and complete the creation.

The test setup is now ready for virtual machines to be created. The virtual machine creation would follow a sequence of creations as follows and utilize the Windows Server 2012 R2 images
1) Active Directory and DNS
2) SQL Server Node 1
3) SQL Server Node 2
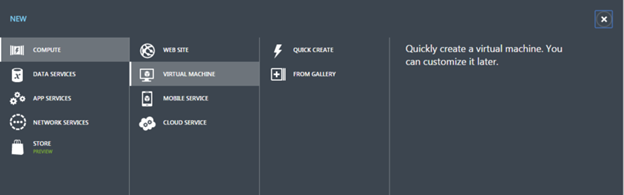
To show how quickly a Windows VM can be created, Azure has the availability of images to create quick Windows servers. While in the virtual machines page, again, click the New button in the lower left corner.
This will show the options available for the new VM you wish to create. The option to select will be the “From Gallery” option. This will load another set of screens with preloaded images to select from.
As shown, there are numerous available images from Windows Server 2012 R2 to Windows Server 2012 with SQL Server 2014 installed already. Although these images work very well, in this case, we will be using Developer Edition of SQL Server 2014. This requires SQL Server to be installed separately from the actual image however, we can use the Windows Server 2012 R2 image to advance the setup and ease of getting Windows going.

Once the image is selected, click the right arrow to move to the naming of the VM.

In this case we enter a virtual name and selected the A3 size for the VM. Note – A3 is an absolute minimum for running a SQL Server instance. Ensure for any real production or development Azure IaaS setups, a proper sized VM is selected. Although this is a value easily altered later, with a reboot of the VM, it is something to be managed and size beforehand.
In the fourth screen, we now have the opportunity to select the cloud service created earlier. This will automatically place the VM into the subnet and assign an IP that allows the VMs all to communicate without addition routing needed.
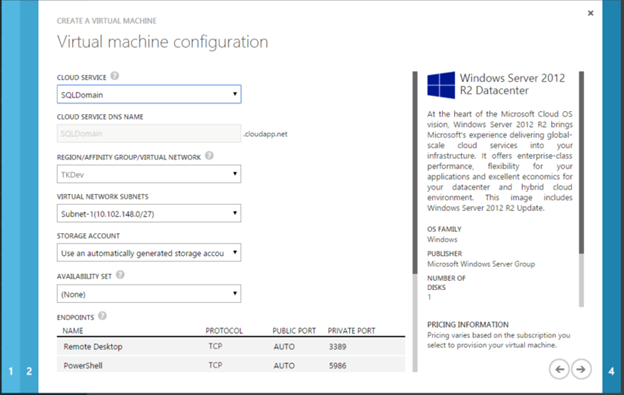
At this point, leave the endpoint options as the default. Later, the endpoint for SQL Server will be created but this will be done using Windows PowerShell for Azure.
To complete the VM setup, click the right arrow once again and then the check button to execute the provisioning and starting of the VM.
Note – one slight annoyance here is the ability to only run so many virtual machine provisioning events at once given the storage account utilized and so on. If you attempt to try to create several at once, they will more than likely fail and you will have to perform the sections in the wizard over again.
For this test setup, we are primarily concerned with seeing how the listener functions and those stages of the in-depth setup. Given this, we will not go through how to configure active directory services and DNS settings. For the active directory server, DNS services are also configured. The active directory is not much more than utilizing the wizard setup by going to the add roles and features of Windows Server 2012 R2 and adding domain services. It is recommended not to go too far into the weeds here, on the domain server. The primary reasoning for this test setup is the utilization of availability groups and using listeners so, the base setup is sufficient.
SQL Server Developer Edition is also installed and configured to meet the guidelines of what resources the A3 size VM has to offer.
For domain users and groups – an active directory group of SQLAdmin was setup and a user of SQLService was added to this group. This group, SQLAdmin, will be the group added to control SQL Server services and sysadmin rights on the instances.
Configure Clustering and Availability Groups
Up to this point, an infrastructure has been built. This infrastructure, in all, takes around 4-8 hours. The time to completion truly depends on the number of servers you intend to add, the complexity of the virtual network and the number of cloud services in addition to the test service implemented. If we took that and compared the amount of time to promote a physical test environment of the same conceptual infrastructure, the time and savings of cost is something that is undeniably, great.
The next major configuration to manage is, configuring the cluster and then, availability groups.
Connecting to your new SQL Server VM is quite simple. Each VM has been assigned an endpoint when it was created. That endpoint is set for remote desktop management. These endpoint are unique to each VM. The entry point for all the VMs is through the cloud service. The port specified then directs the connection to the port listening and promotes the transmission requested. For example, the port 56811 may be an RDP port on SQLPRIMARY and the cloud services is SQLDomain. To connect the VM of SQLPRIMARY, you issue SQLDomain.cloudapp.net:56811. This routes to the SQLPRIMARY VM and initiates an RDP session.
To utilize the portal to connect and create an RDP file for later use, select the SQLPRIMARY VM (or name you provided for one of your SQL Server VMs) and click the Connect button on the bottom menu.

This will provide the RDP file to either download or use at that time to launch the RDP session

After connecting and successfully initiating the RDP session, configuring the cluster is required. All nodes that are to act in the availability group, must be an active node in a cluster prior to allowing the configuration of them.
Setting up a Windows Server Failover Cluster (WSFC) can be complex or simplistic, depending on how far and the needs of the cluster. In this test setup, a simple WSFC is all that is needed. To accomplish creating the cluster, ensure the login used to remote into the VM is a domain administrator or in the least, has the rights to create the DNS and Domain entries that the cluster wizard will initiate.
Once the cluster is configured and active, you will be required to enable AlwaysOn High Availability option, found in the SQL Server Configuration Manager.
For a complete, step-by-step setup of the WSFC and Availability Groups, refer to: Availability Groups Setup and Configuration from A to Z
Note – Do not create a listener when the option is available.
Configuring the Listener
At this point, a cluster has been configured and an availability group has also been configured. With this landscape, a fully functional database solution has been accomplished in Azure. However, this solution persists the same issue that we discussed in the beginning – manually determining which SQL Server is active. We can add the listener in Azure with a few steps by using Windows PowerShell for Azure. The steps to accomplish the listener are well documented here: Availability Groups Listener in Windows Azure Now Supported! To take this further, this setup will show the values in which the scripts require to functionally bring the listener online.
The way the listener is supported in Azure is maintained in a rerouting solution, in a sense. When a request comes into SQL Server and the listener, it is routed through the cloud services public IP address. This routing sends the transmission through another type of an endpoint – load balanced endpoint. A load balanced endpoint allows for the redirection to a VM for which is actively accepting connections. This brings up an interesting nuisance you may run into. Given the load balanced endpoints path, if you attempt to connect to a listener while on a secondary instance in the availability group, the connection will fail. This is due to the route not functionally working while on the secondary server.
Again, we can follow the support release blog to create the listener except, due to utilizing Windows Server 2012 R2, the hotfix that is specified in the release, is not required. Earlier versions will require the hotfix though.
With the hotfix not being required, there are only two primary steps to accomplish. The load balanced endpoint creation and the implementation of the listener.
The first PowerShell script below is the script that creates the load balanced endpoint. This script requires it to be run remotely using Windows PowerShell for Azure. You can download the setup Here.
The below execution of the creation for the load balanced endpoint sets the following parameters based on the following environment:
$AGNodes is set to the two SQL Server VMs that are in the availability group. In this case, SQLPRIMARY and SQLSECONDARY.
$ServiceName is set to the cloud service created in the second step of our IaaS setup. SQLDomain. This can be found by clicking the cloud services page in the windows azure portal.
$EndpointName is any name you intend to give the endpoint and thus, will also be used in the load balanced endpoint by appending –LB to the endpoint name.
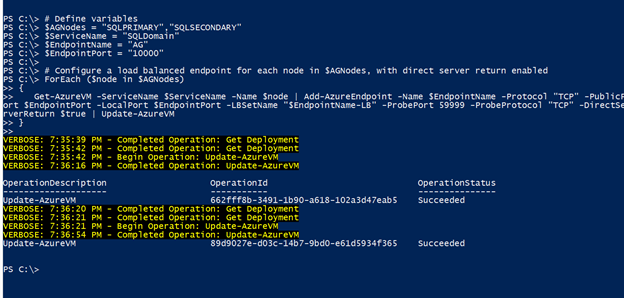
As shown above, both endpoints and the load balanced endpoint were successfully created.
To complete the remaining step of creating the listener, the second script in the release notes is used. This script is executed on the primary replica be making an RDP session to the server and then executing the script in a Windows PowerShell command window that is executed as administrator (use Run As Administrator when opening PowerShell)
The last script and the parameters needed are the availability group, “$ag being the availability group name you used”, the cluster network name, which is typically Cluster Network 1 by default. With these changed, you can execute the script and it will functionally work. However, it is recommended to change the listener port.
# Define variables

$ag = "SQLAG_DEV01" # The availability group name

$serviceName = "SQLDomain" # The cloud service name

$networkName = "Cluster Network 1" # The cluster network name, usually "Cluster Network 1" if the nodes are in the same subnet

$listenerPort = "10000" # Listener port. Same as the endpoint port.


$aglistener = $ag + "Listener"

$agendpoint = (Resolve-DnsName -Name "$serviceName.cloudapp.net").IPAddress

Import-Module FailoverClusters

# Add IP address resource for the listener to AG resource group. The probe port is set so the AG owner node will respond to probes from Windows Azure.

Add-ClusterResource "IP Address $agendpoint" -ResourceType "IP Address" -Group $ag | Set-ClusterParameter -Multiple @{"Address"="$agendpoint";"ProbePort"="59999";SubnetMask="255.255.255.255";"Network"="$networkName";"OverrideAddressMatch"=1;"EnableDhcp"=0}

# Add Network Name resource for the listener to AG resource group

Add-ClusterResource -Name $aglistener -ResourceType "Network Name" -Group $ag | Set-ClusterParameter -Multiple @{"Name"=$aglistener;"DnsName"=$aglistener}

# Set dependency for the Network Name resource on the IP address resource

Get-ClusterResource -Name $aglistener | Set-ClusterResourceDependency "[IP Address $agendpoint]"

# Start the listener resource

Start-ClusterResource -Name $aglistener

# Set dependency for the AG resource group on the listener's network name

Get-ClusterResource -Name $ag | Set-ClusterResourceDependency "[$aglistener]"

# Change port number on the listener to 1433

Set-SqlAvailabilityGroupListener -Path SQLSERVER:\SQL\$env:COMPUTERNAME\DEFAULT\AvailabilityGroups\$ag\AvailabilityGroupListeners\$aglistener -Port $listenerPort
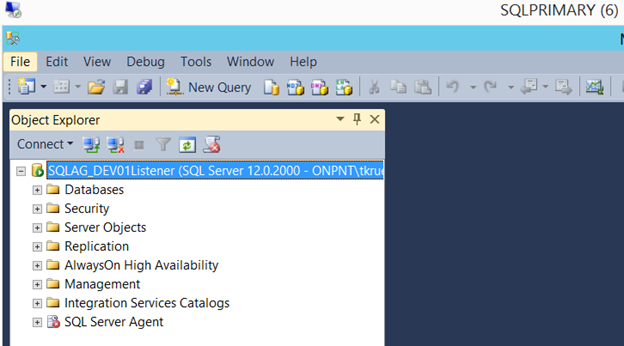
Once the script executes successfully, test the listener by connecting to the listener name from SSMS on the primary SQL Server in the availability group.
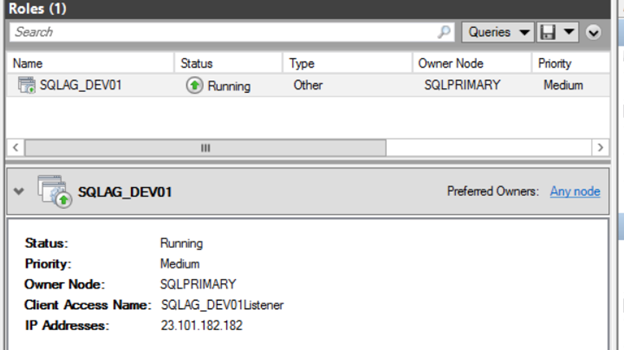
Within the Failover Cluster Manager, the cloud service IP should also be visible now, under the resources of the availability group role.
At this point, a fully functional environment has been completed, with SQL Server availability groups and a functional listener. When reviewing the steps and amount of work involved to get a test environment like this functional, there is a great deal of advantage to the rapid nature and value in savings.
Summary
The amount of time to setup this Azure driven environment compared to the amount of time it may have taken given a physical implementation, shows a great deal of value in the use of Azure for IaaS. Even when utilizing on premise virtualization environments, there are still a great deal of savings from administration down to the power usage required.
Utilize the Azure trial subscription credits to take advantage of setting this same environment up, become familiar with it, move to more advanced configurations in all the major components, and plan for how to best take advantage of the cloud services and savings they can bring.


