


Recently I’ve been working on an application that runs partially in Azure ServiceFabric. I’ve [created a local cluster]() to work against and now it’s time to configure my TeamCity deployment to deploy upgrades to my application automatically.
Initial details:
- Deploying 2 projects:
- a .Net 4.6.2 ASP.Net Core app to web app
- .Net 4.6.2 ServiceFabric project to ServiceFabric cluster
- Server:
- VM: 2-core, 2048 GB of RAM
- Windows Server 2016 x64
- TeamCity 2017.1
- SQL Server 2016
In the previous post I walked through the setup of a Service Fabric cluster on a local Hyper-V server and 3 VMs, followed by publishing a Service Fabric service manually to the cluster. In this post, I’m evolving from the manual publish step to a TeamCity automated deployment.
Here are the system details:
- TeamCity: VM w/ 2 cores assigned and 2048 MB of memory running Windows 2016 x64 with TeamCity 2017.1 and SQL Server 2016
- ServiceFabricNodes: 3 single core VMs w/ 2048 MB of memory running Windows 2016 x64
Let’s go!
Installing Dependencies
This solution has two deliverables: a front-end API that is deployed to Azure Web Site (now App Service) and a back-end agent intended to run in Service Fabric. I’ve already setup a Continuous Integration step to build the projects, run the database migration, perform front-end gulp tasks, and verify a set of unit and integration tests, so I should have most of the dependencies I need.
I’ve installed VS 2017 Community, VS 2017 Build tools, Service Fabric SDK 2.6.220, Node.js 6.11.1 (LTS), NuGet 4.1, and jonnyzzz’s Node plugin.
This is also the place I ran into the madness that is the current mess of NuGet and C# Projects.
Deploying the Service Fabric Project
My build pipeline for this project will be a single CI stage that runs the tests for both projects, and package stage that packages releasable versions for both projects, then two independent deploy stages to deploy the website and service fabric packages to their appropriate places.
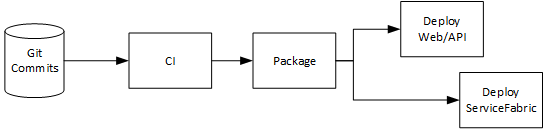
Deployment Pipeline – API updates before ServiceFabric
This is my “good enough for now” setup. If I run into versioning issues, I can come back and add some backwards compatibility tests between the packages after CI and run the deployments serially instead of in parallel.
Service Fabric Deploy Script
The Service Fabric package is created with a Deploy-FabricApplication.ps1 script that we’ll use to deploy the package once it’s built.
Local Script Deploy to ServiceFabric
The first step is testing the script locally to make sure I know how to use it.
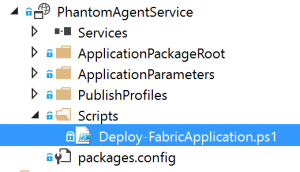
- Right click the Service Fabric project and select "Package"
- Open a powershell console and direct it to the Scripts folder in the Service Fabric project
-
Run a sample deployment with any parameters you have in the file:
.\Deploy-FabricApplication.ps1 -ApplicationPackagePath '..\pkg\Debug\' -PublishProfileFile '..\PublishProfiles\Local.1Node.xml' -ApplicationParameter @{PhantomAgent_InstanceCount='1'; CoordinatorURL='http://localhost:52860' }
I had to do this several times, so I also got to learn how to update versions:
-
Add UpgradeDeployment to your PublishProfile:
- Option 1: Right click in Visual Studio, select Publish, use the link near the bottom to edit your deployment options and then close the dialog, choose "yes" when it asks if you want to save the profile"
-
Option 2: Open the relevant PublishProfile XML file and add this to the bottom for the default Unmonitored Upgrade settings
- Go to the pkg\Debug
-
Open [YourProject]Pkg\ServiceManifest.xml
-
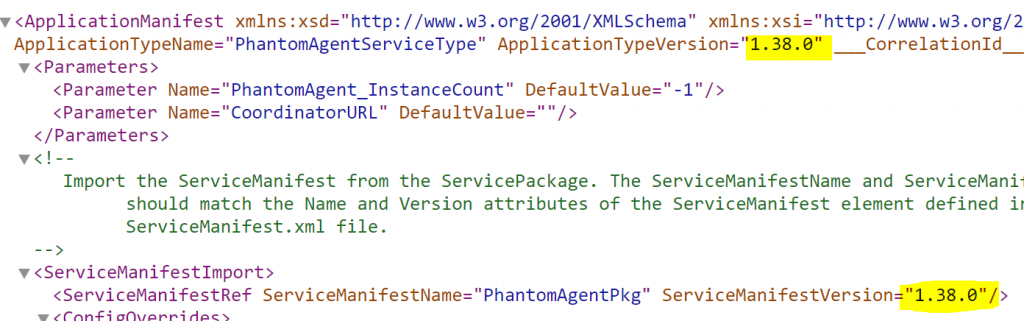
Update the version in either
-
Update the Package version in the
- Save
-
Update the version in either
-
Open ApplicationManifest.xml
-
Find
-
Update the ApplicationTypeVersion property in the
- Save
-
Find
- Now try your deployment again!
So now we have a working command locally, now we just have to get TeamCity to update versions appropriately and run this.
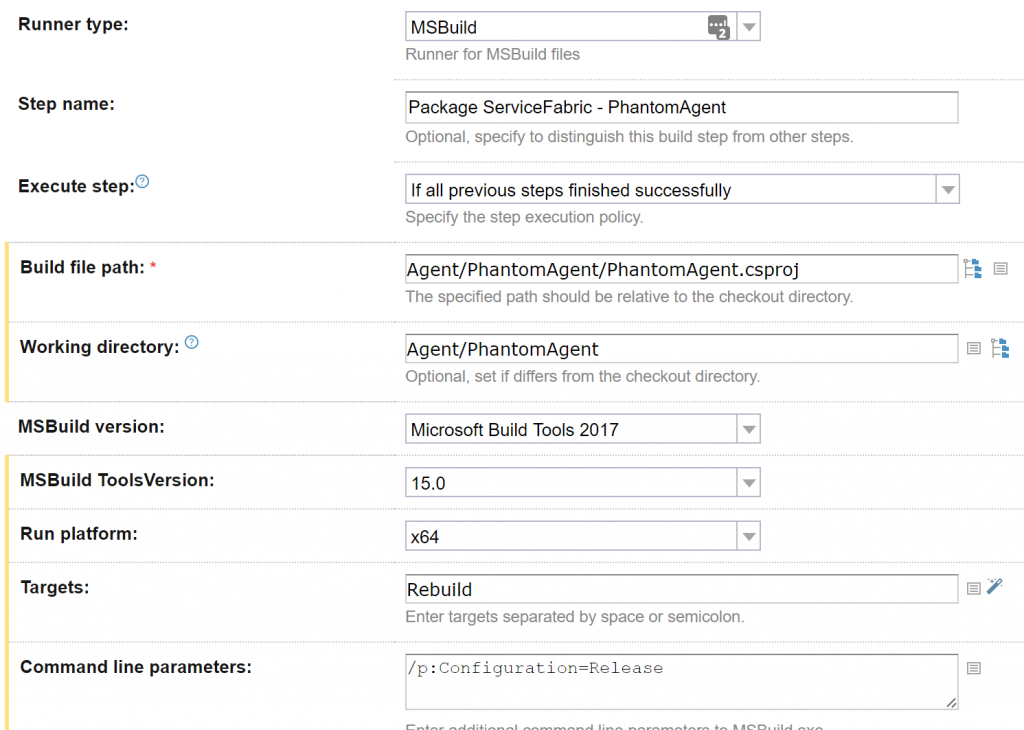
Build the package
Building the package is straightforward. We just need to build the package in release mode, then configure Archiving to capture the bin/Release folder and PublishProfiles folder.
The Build Step in my “Package Stage” configuration looks like this:
TeamCity Package Stage
Once I have the package built, I am going to replace the versions with a value that ties to the TeamCity version number.
In the “General” tab in TeamCity, I use the build number token from my CI step as the version for this step:

TeamCity Package Build Number
My CI step has this for it’s build number:

TeamCity CI Build Number
So now I will have a matching 1.X.0 value all the way from CI through to the ServiceFabric manager.
Then in a new build step, I replace the versions in my two manifest files with the build version token from TeamCity:

TeamCity Package Versions
Finally, I add entries to the “Artifact Paths” back in the “General” tab to zip up the package for use by the next step:

TeamCity Package Artifacts
The final steps look like this:
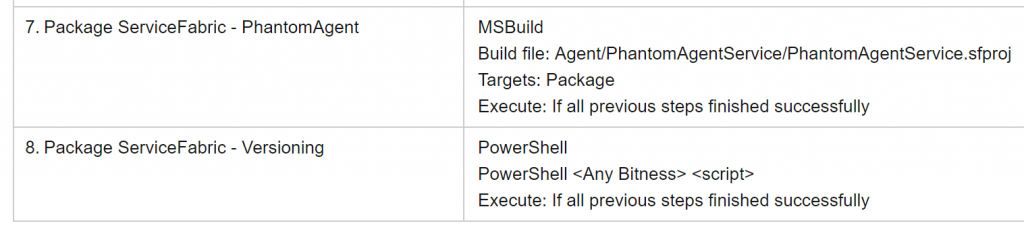
TeamCity Package Steps
Running the build, I can verify everything is successful by opening up the archived package:
TeamCity Package – Verifying Versions
Deploy
Now that I have a step building the files I need, I’ll add a new Build Configuration named “Deploy to Service Fabric”. I’ll set Snapshot and Artifact Dependencies to the prior Build Configuration and update the Build Number to use the value from that config (which is in turn using the one from CI).
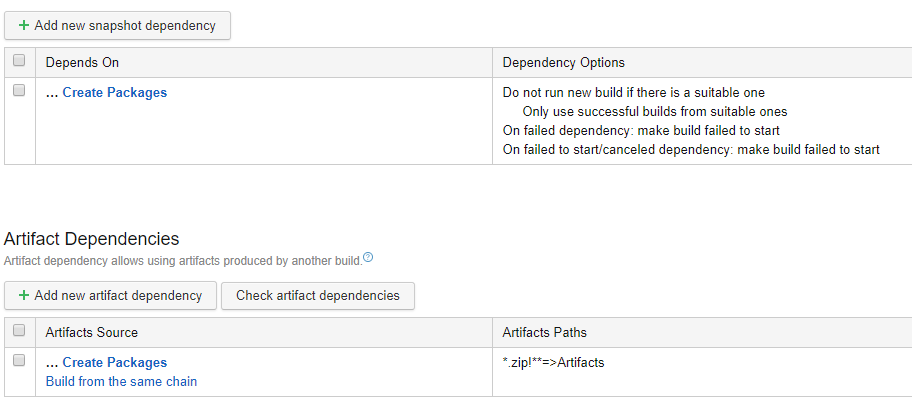
TeamCity Deploy Dependencies
I have one build step, a powershell command that matches the manual one I was running earlier that is set to treat powershell errors as errors (instead of the default, warnings). I run this as a single PowerShell source script so I can use dot notation (ServiceFabric scripts make some assumptions about having the connection variable available):
Invoke-Expression ". .\Deploy-FabricApplication.ps1 -ApplicationPackagePath ../../../Artifacts -PublishProfileFile ../PublishProfiles/LocalCluster.xml -ApplicationParameter @{PhantomAgent_InstanceCount='1'; CoordinatorURL='http://app.launchready.co'}"
My build step then runs this command like so:
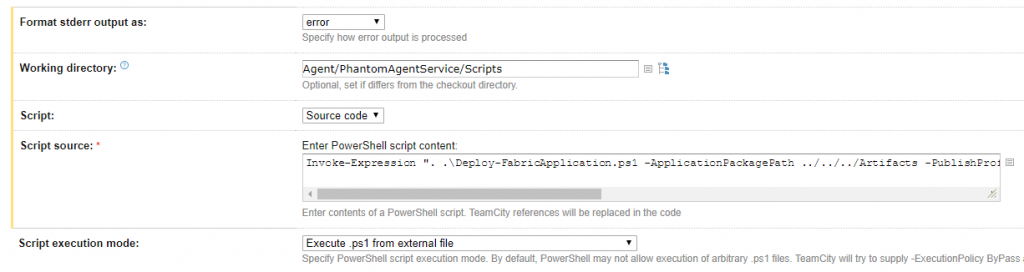
TeamCity Deploy Script
Note 1: Make sure your Server certificate is installed and permission granted to the user that TeamCity runs under.
Note 2: I also had to alter my LocalCluster.xml profile to StoreLocation="LocalMachine" instead of StoreLocation="CurrentUser", since that I where I installed the certificate.
And there we have it:
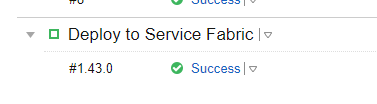
TeamCity Deploy Success for v1.43.0

ServiceFabric Success for v1.43.0
We can see matching versions in both places (1.43.0), so we know the pipeline is functioning.
 My roles have included accidental DBA, lone developer, systems architect, team lead, VP of Engineering, and general troublemaker. On the technical front I work in web development, distributed systems, test automation, and devop-sy areas like delivery pipelines and integration of all the auditable things.


