


Introduction
Making a splashscreen in WPF is easy, since the .Net framework SP1 there is even a built in method to do this. But this method only accepts a static image. I would have liked a more dynamic thing. Something that says what it is doing. And something that fades in and out and has a custom shape. I’m not very demanding but I know this would be very complicated in windows forms. Possible but difficult. In WPF it seems a bit easier. So I went on a Google frenzy and combined several things I found along the way.
The static splashscreen
- Make a nice Image.
- Add it to the project via Add->Existing Item or Ctrl+D.
- Click on the file and change the Build action to SplashScreen
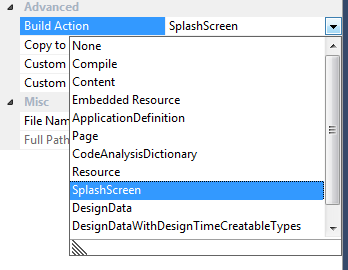
And that’s all there is to it. It does have fade-in and fade-out effect.
The dynamic splashscreen
This was very easy since Google’s first hit was this MSDN forum post.
And someone even handed us the VB.Net sample.
So I just had to add a window called splash.xaml
That had these properties.
ResizeMode="NoResize"
ShowInTaskbar="False"
WindowStartupLocation="CenterScreen"
WindowStyle="None"
Topmost="True"
ShowActivated="False"
And this in the code behind.
Namespace View.Forms
    Public Class Splash
        Public Splash()
        Private Shared InitCompleted As AsyncCallback
        Private Shared result As IAsyncResult
        Private Sub Window1_Loaded(ByVal sender As System.Object, ByVal e As System.Windows.RoutedEventArgs) Handles MyBase.Loaded
            InitCompleted = AddressOf _initCompleted
            result = My.Application.dLoadSplash.BeginInvoke(Me, InitCompleted, Nothing)
            lblProgress.Content = "Loading..."
        End Sub

        Private Sub _initCompleted()
            My.Application.dLoadSplash.EndInvoke(result)
            Dispatcher.BeginInvoke(New Action(AddressOf _closeWindow), Windows.Threading.DispatcherPriority.Normal, Nothing)
        End Sub

        Private Sub _closeWindow()
            Close()
        End Sub

        Public Sub SetProgress(ByVal Message As String)
            Dispatcher.BeginInvoke(New Action(Of String)(AddressOf _SetProgress), Windows.Threading.DispatcherPriority.Normal, Message)
        End Sub

        Private Sub _SetProgress(ByVal Message As String)
            lblProgress.Content = Message
        End Sub

End Class
End Namespace```
I changed it so that you can show messages to the user and I set the progressbar to continuous.

Then we just make this form the startup form. And we add a little bit of code to the codebehind of Application to make it all work.

```vbnet
Imports TDB2009.View.WPFMenu.View.Forms
Imports TDB2009.Utils.IoC
Imports TDB2009.View.WPFMenu.Startup.Interfaces
Imports System.Windows.Threading

Public Class Application

    Public dLoadSplash As New _dLoadSplash(AddressOf LoadSplash)

    Public Delegate Sub _dLoadSplash(ByVal w As Splash)

    Private Sub LoadSplash(ByVal w As Splash)
        w.SetProgress("Configuring Container")
        IoCUtil.InsertConfigOfContainingType(Of IoC.Configure)()
        Dim _StartUp As IStartUp = Container.Resolve(Of IStartUp)()
        w.SetProgress("Starting Mainwindow")
        Dispatcher.BeginInvoke(New Action(AddressOf CreateMainWindow), DispatcherPriority.Normal, Nothing)
    End Sub

    Private Sub CreateMainWindow()
        MainWindow = Container.Resolve(Of View.Forms.Interfaces.IMenu)()
        MainWindow.Show()
    End Sub

    Private Sub Application_Exit(ByVal sender As Object, ByVal e As System.Windows.ExitEventArgs) Handles Me.Exit
        Container.DisposeAll()
    End Sub
End Class
Edit: the above without my IoC interfering.
Imports TDB2009.View.WPFMenu.View.Forms
Imports TDB2009.Utils.IoC
Imports TDB2009.View.WPFMenu.Startup.Interfaces
Imports System.Windows.Threading

Public Class Application

    Public dLoadSplash As New _dLoadSplash(AddressOf LoadSplash)

    Public Delegate Sub _dLoadSplash(ByVal Screen As Splash)

    Private Sub LoadSplash(ByVal Screen As Splash)
        Screen.SetProgress("Starting Mainwindow")
        Dispatcher.BeginInvoke(New Action(AddressOf CreateMainWindow), DispatcherPriority.Normal, Nothing)
    End Sub

    Private Sub CreateMainWindow()
        MainWindow = new MainWindow()
        MainWindow.Show()
    End Sub

    Private Sub Application_Exit(ByVal sender As Object, ByVal e As System.Windows.ExitEventArgs) Handles Me.Exit
        Container.DisposeAll()
    End Sub
End Class
That was simple and I didn’t change much from what I saw in the post. You can just copy/paste it but you have to understand what it is doing.
The fade in and fade out
But the above code is still not much better than what we can do in winforms. So now it is time to add some fade in and fade out to it. Again I directed my attention to Google and found some inspiration in a Stackoverflow article.
But there are some problems with what they said, the solution is not really copy-pastable as is.
Getting a fade in is easy. you just add a trigger to the window, like so.
<Window.Triggers>
        <EventTrigger RoutedEvent="Window.Loaded">
            <BeginStoryboard>
                <Storyboard>
                    <DoubleAnimation Storyboard.TargetProperty="Opacity" From="0" To="1" Duration="0:0:2" FillBehavior="HoldEnd" />
                </Storyboard>
            </BeginStoryboard>
        </EventTrigger>
    </Window.Triggers>```
That works, but it had one minor glitch that I will cover in a little bit.

Then you need to add the fadeout. This is more work and needs some code behind.

First you add some xaml.

```xml
<Window.Resources>
        <Storyboard x:Key="closeStoryBoard" Completed="closeStoryBoard_Completed">
            <DoubleAnimation Storyboard.TargetProperty="Opacity" From="1" To="0" Duration="0:0:2" FillBehavior="HoldEnd" />
        </Storyboard>
    </Window.Resources>```
And then you add a few bits to the codebehind.

```vbnet
Private closeStoryBoardCompleted As Boolean

        Private Sub Splash_Closing(ByVal sender As Object, ByVal e As System.ComponentModel.CancelEventArgs) Handles Me.Closing
            If Not closeStoryBoardCompleted Then
                Me.Resources("closeStoryBoard").Begin(Me)
                e.Cancel = True
            End If
        End Sub

        Private Sub closeStoryBoard_Completed(ByVal sender As System.Object, ByVal e As System.EventArgs)
            closeStoryBoardCompleted = True
            Me.Close()
        End Sub
This has a slight bug in it. Which can only be seen if your splash screen is not going to be shown long enough (less than 4 seconds to be precise). So I had to make a few adaptations so that I would still get a fade in and out even if the loading of the form takes less than 4 seconds.
First we add an event completed to the beginstoryboard. like so.
xml
<Window.Triggers>
        <EventTrigger RoutedEvent="Window.Loaded">
            <BeginStoryboard>
                <Storyboard  Completed="beginStoryBoard_Completed">
                    <DoubleAnimation Storyboard.TargetProperty="Opacity" From="0" To="1" Duration="0:0:2" FillBehavior="HoldEnd" />
                </Storyboard>
            </BeginStoryboard>
        </EventTrigger>
    </Window.Triggers>
And then we change our codebehind to this.
```vbnet Private closeStoryBoardCompleted As Boolean Private beginStoryBoardCompleted As Boolean
    Private Sub Splash_Closing(ByVal sender As Object, ByVal e As System.ComponentModel.CancelEventArgs) Handles Me.Closing
        If Not closeStoryBoardCompleted AndAlso beginStoryBoardCompleted Then
            Me.Resources("closeStoryBoard").Begin(Me)
            e.Cancel = True
        End If
    End Sub

    Private Sub closeStoryBoard_Completed(ByVal sender As System.Object, ByVal e As System.EventArgs)
        closeStoryBoardCompleted = True
        Me.Close()
    End Sub

    Private Sub beginStoryBoard_Completed(ByVal sender As System.Object, ByVal e As System.EventArgs)
        beginStoryBoardCompleted = True
    End Sub```
I added the beginstoryboardcompleted and made sure it only it was set to true, meaning the fadein is done, before starting the fadeout. Simple really, if you understand what you are copy pasting.
The custom shape
To make a form a custom shape is just as easy. First you set your window properties like so.
xml
Background="Transparent"
AllowsTransparency="True"
Then you add an image to form. and that’s it.
And just for fun I made the ugliest splashscreen you can think of, but it works. This is the design view.
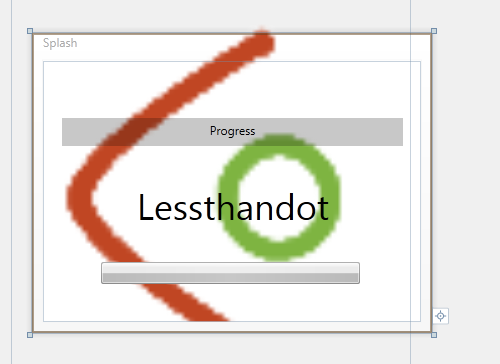
See how the image is outside of the bounds of the window?
Now see that when you run it it will chop of those parts.
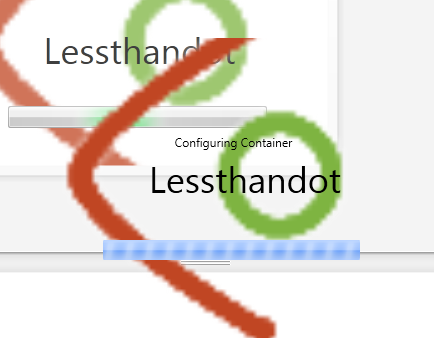
So now your window is completely transparent and as ugly as I could make it ;-).
Conclusion
Making a dynamic splashscreen in WPF is easy and well worth the trouble. Your users will love you. Getting to grips is easy too, you can use Google and find just about anything you want or can think of. Some examples are just good and some examples need a little work. Some examples need to be ignored. But remember don’t just copy paste the code, try to understand it first. You know you understood it when you can combine and change different pieces and make them work together.
 Chris is awesome.
