Interested in finding out where your iPhone has been?
How about importing that data into SQL Server and being able to analyze it and create maps from the spatial data?
If you have an iPhone and/or follow any of the security news about it, you may have seen multiple posts recently stating that Apple is tracking everywhere your iPhone goes even when you have location services turned off. There’s even an open source application called iPhoneTracker that will create a map for you. I’m not going to debate the good, bad, and why’s of this “feature”, but what I will do is show you how you can find this data, import into SQL Server, and some things you can do with it.
Where is the iPhone data?
To find the location data from your iPhone you’ll need to find the consolidated.db file that is stored in your iPhone backup. On Windows 7 the default backup directory should be similar to
C:Users
In the Backup directory there should be a folder for each device you’ve synced with iTunes. To verify you are in the correct one, open the Info.plist in a text editor and look for a ‘Device Name’ value in the XML. It should match the name of your iPhone if you are in the correct one. If it doesn’t match check the other directories in the Backup folder until you find the one that does.
Now that you’ve found the correct directory, we need to find out which file is the consolidated.db. I found two ways to do this:
Parsing the Manifest.mbdb and Manifest.mbdx files. This didn’t work for me but here’s the link to the instructions if you’d like to try it. In my case the Python script errored out.
Trial and Error – This is the method I used and it’s not as bad as it sounds. I also found some other interesting things doing it this way that I’ll share later in the post. Below are two options for finding the file by trial & error. Using either option below I was able to find the correct file in less than 5 minutes.
Trial & Error Option 1:
Sort your directory by Size (largest to smallest) and starting at the top, open each file in a text editor. The file you are looking for will start with ‘SQLite format 3’ and should contain the following string ‘CREATE TABLE CellLocation’. On my system the file was approximately 11MB.
Trial & Error Option 2:
Using FireFox and the SQL Lite Plug In try connecting to each file and looking for a table named CellLocation in the database.
If the file you are opening is not a SQL Lite file the plugin will give you an error and you can simply move on to the next one.
Once you’ve found the correct file, make a note of the full path and file name as you’ll need it in a few minutes. Also, it’s worth noting that this file name doesn’t seem to change after syncing your iPhone. I’ve synced a few times after doing the initial discovery and the file is updated but the name remains the same.
Hang in there, we’re almost to the good stuff…
Connect to the Data:
To access the file and import your data into SQL Server you’ll need to install the SQLite ODBC drivers available for free from http://www.ch-werner.de/sqliteodbc/
32-Bit: http://www.ch-werner.de/sqliteodbc/sqliteodbc.exe
64-Bit: http://www.ch-werner.de/sqliteodbc/sqliteodbc_w64.exe
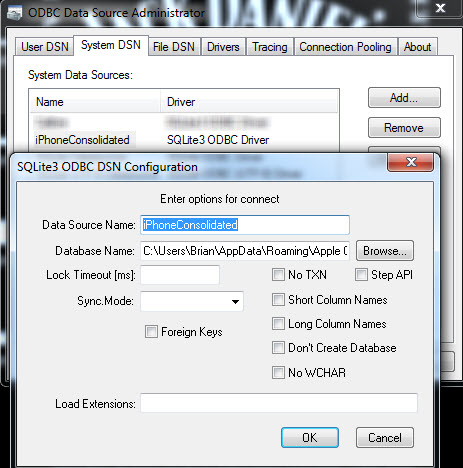
Now that the SQLite ODBC drivers are installed we can create a DSN and setup a linked server to access the data. (Yes, I know linked servers are bad but this is just for demo purposes. If I were going to do this on an ongoing basis I would automate the import.) The DSN setup is fairly easy. Create a new System DSN using the SQL Lite 3 ODBC Driver and name it whatever you like. I named mine iPhoneConsolidated. For the Database Name, be sure to enter the full path and filename of the Consolidated.db file we found above.
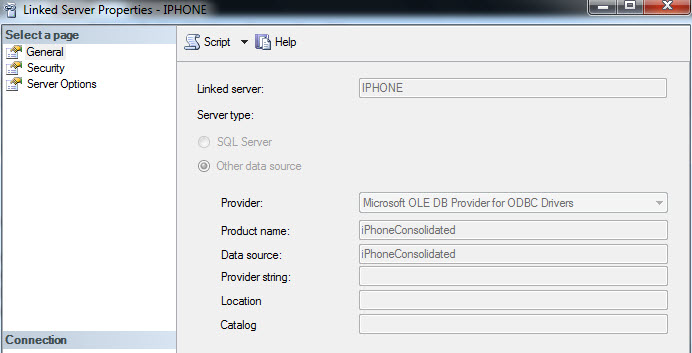
Next, in SQL Server create a new linked server and choose the Microsoft OLE DB Provider for ODBC Drivers as the Provider. Next, fill in the Product Name and Data Source with the DSN with the one we created earlier. Save your linked server and we’re ready to go.
Alright! Discovery and setup are done and since you’ve stuck with me this long it’s time for some fun…
Show Me The Data!
Now that you’ve got your linked server setup let’s look at how we get the data out of SQL Lite and into SQL Server. You can run the following query to get the location data out of the SQL Lite database.
SELECT timestamp, latitude, longitude
FROM OPENQUERY(iphone,'SELECT Timestamp, Latitude, Longitude FROM CellLocation')
There are other fields in the table that you might or might not be interested in but for this post I am only dealing with the TimeStamp, Latitude, and Longitude. I don’t know about you, but for me, I’d rather see a DateTime value instead of the TimeStamp value, so I’ll convert that and I’ll also convert the latitude and longitude to geography values. The TimeStamp is stored in MAC Universal Format, which is based off of 1/1/2001. To get the converted values we can run the following query.
SELECT DATEADD(s, timestamp, '20010101') AS DateTm
, geography::Point(latitude, longitude, 4326) AS Geo
FROM OPENQUERY(iphone,'SELECT Timestamp, Latitude, Longitude FROM CellLocation')
Now that we can query the data and get it in a format we want, let’s load it into SQL Server. We can use the following script to load the data into a new table.
SELECT DATEADD(s, timestamp, '20010101') AS iDateTime
, geography::Point(latitude, longitude, 4326) AS iGeo
INTO dbo.iPhoneLoc
FROM OPENQUERY(iphone,'SELECT Timestamp, Latitude, Longitude FROM CellLocation')
If you’re impatient and wnat to see the spatial results immediatly you can simply run the following query and click on the Spatial tab in the results window.
SELECT TOP 5000 * FROM iPhoneLoc
Below is a zoomed in section of the spatial results tab.
Why did I put TOP 5000 in the query you ask? Simply because the spatial results tab will only display the first 5000 points.
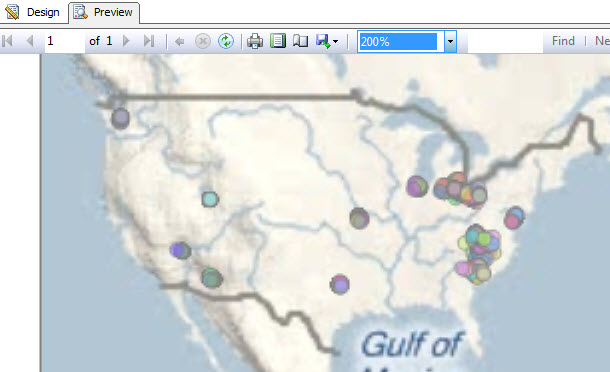
Now that you’ve got your spatial fix, let’s add some bling or rather Bing, maps that is, and spice up presentation of your data a little. By simply adding a Bing map to a SSRS report we can get a decent visualization of where our iPhone has been. The below screenshot shows a sample of what can be done very quickly with BIDS and Bing maps.
OK, I’ve Done All This and it’s Pretty Cool…Now What?
That depends on you. If you’re really interested in tracking the data on an ongoing basis you could automate the loading of the data from consolidated.db file and deploy the report we created. You could also take a look at some of the other data available and do some analysis of it and create other reports. If you’ve never played with spatial data before this is a good chance to do so and to use some personal data to make it even more interesting.
What’s that? The spatial data is cool but you want more data from your iPhone…
Well, you’re in luck! There is a good possibility that you can get a lot more data using these same steps. Instead of looking specifically for the consolidated.db file, look for any file that starts with ‘SQLite’ and take a look at the data it contains just like we did above. I’ll bet you find some interesting stuff, I know I did. I use an application called NewsRack for reading RSS feeds and another application called CardBank to store all of my ‘customer loyality’ card information instead of having them all on my key chain or in my wallet. Guess what? Yep, you’re right, they both use SQL Lite to store the data and I can pull that data into SQL Server.
What are you still doing here? Go discover what data is on your iPhone that you can import into SQL Server and have some fun doing it!


