SpecFlow is a .Net library that allows us to describe user expectations in a consistent Domain-Specific Language that can be wired for automatic execution. By writing executable tests in a human readable manner, our tests can serve as a bridge between the users expectations and the code we produce to meet them.
This post will walk through the benefits and high level details of these methods before diving into a practical example of implementing several tests against the MVC Music Store site from my Continuous Delivery project. Along the way we will also use Selenium Web Driver, the Page Object pattern, and Nunit as we interact with an ASP.Net MVC site.

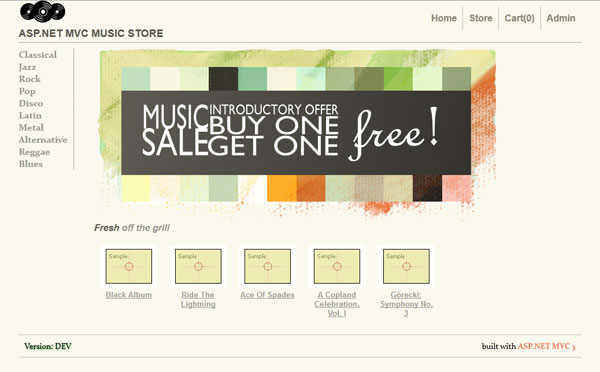
ASP.Net MVC Music Store
Why Executable Tests
End users don’t have a very clear idea of what they need. This is reflected in the requirements gathering time of projects that operate from detailed, up front specs. It’s also reflected by Agile practices, which promote short, iterative coding phases, one purpose of which is to get quick user feedback specifically to mitigate this risk.
Our users aren’t to blame.
Part of the problem is our misunderstanding of what the users are trying to achieve. With different backgrounds, vocabularies, and general contexts, communication gaps and misunderstandings are to be expected. Add the fact that our end user often has only a vague definition in their own mind of what they want, which takes seeing or using a particular piece of software to determine whether their idea is works or needs further improvement or refinement. And as if that weren’t enough, there’s often a failure ask for the appropriate level of understanding committing code to editor.
Tests can’t solve all of these issues, but they can help close the gap.
SpecFlow, Gherkin, and Readable Tests
SpecFlow defines features (user stories) and scenarios in a language called Gherkin, which describes itself as a Business-Readable Domain-Specific Language. Using a structured language to define business expectations first requires us do the appropriate level of analysis, or at least ask ourselves what the appropriate level of analysis is. Using a business-readable syntax means we can share the written requirements with our end user and they can confirm (or help correct) our understanding of their expectations.
With our user expectations written in a clearly structured DSL, we can then use a parser to wire those expectations directly to test code, minimizing any further misunderstandings or translation errors that would occur if we were write up the executable tests separately. Now we can consistently test our application against the very clear expectations we have confirmed with the end user.
Following the Behavior Driven Development (BDD) or Acceptance Test Driven Development methods, if we wire these tests up prior to starting to code for them, then we can help keep our work targeted directly to the end user expectations, minimizing waste from unnecessary additions and catching potential problems far sooner.
Introducing the project
As part of the Continuous Delivery project I mentioned above, I implemented a barebones interface testing project that uses Selenium WebDriver and Nunit to execute a couple basic tests against a deployed MVC site. The raw source code for the project is available on BitBucket.
If you haven’t used Selenium before or are unfamiliar with the Page Object pattern, you can find more information in this earlier post which covers these topics in depth.

MVCMusicStore Interface Tests Project
Currently the project has a minimal base page object and a few lightly defined pages, just enough to support a test to browse the main navigation links through the site and verify some genre links work. The SpecFlow tests that I add to the project will force me to continue fleshing out the necessary functionality of the Page Library and test project as we need new functionality or shortcut methods to keep the test implementations clean and readable.
The tests are written in Nunit and extend a TestFixtureBase class that is responsible for initializing a RemoteWebDriver (browser) and quitting it for each individual test. A singleton Settings object exists to load settings from a local configuration file for the full test run, letting us provide a configured base URL and to later add sample values that are specific to the environments the tests run in.
Adding SpecFlow
The first step is to add SpecFlow. While there is a NuGet package for it, you will actually want to download the SpecFlow installer and install it. The installer includes templates, intellisense, and other bits and bobs that you won’t get with the NuGet package. That said, I actually did both, first installing it then using NuGet to pull down the package for my project so I could commit the packaged references to the projects source code repository.
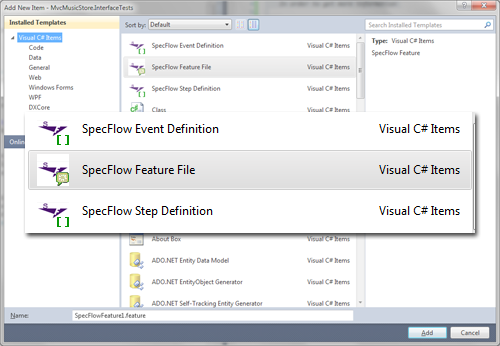
After installing the full install package, there will be a few new items in the “Add New Items” menu in Visual Studio.

"Add New Item" dialog in Visual Studio
The “SpecFlow Feature File” option will create a new pair of files for our feature and the generated code behind that feature. The feature is where we will write our user story and the individual scenarios in Gherkin. The generated code reflects the scenario as an Nunit test, with each step in the scenario treated as a potential function to call out to.
The “SpecFlow Step Definition” item is just a *.cs class file that we would put the individual step functions in for the tests to call. Both the Feature File and Step Definition file are populated with an addition sample as part of their template..
Adding a SpecFlow feature
To start with, lets discuss what we’re going to be testing. Since the application is a Music store, lets define how we want the cart total to work. Here’s the User Story (feature) we will be working with:
As a shopper I would like to see my up to date cart total as part of each screen so I don’t have to visit my cart to verify my items are in it
Now this probably sounds like enough to go ahead an implement it, but lets nail down some scenarios first. If I was an working with an end user, these are the type of things we would probably come up with:
- When I have nothing in my cart, it displays a total of 0
- When I add an item to my cart, it displays a total of 1
- When I add two of the same item to my cart, it displays a total of 2
- When I add two separate items to my cart, it displays a total of 2
- When I have two items in my cart and I remove one, it displays a total of 1
- When I have two items in my cart, after I checkout it displays a total of 0
Note that these are a collaborative effort. My pretend end user probably came up with some, which I then helped to expand on via questions and experience.
Writing this in a Feature File in Gherkin we would have something like:
Feature: Cart Total
	As a shopper
	I want to see my cart total on every screen
	So I don't have to leave my current page to verify it's contents

@UI
Scenario: Empty Cart
	Given I have the Home Page open
	Then the cart is empty

@UI
Scenario: Add an Item
	Given I have the Home Page open
	And I select a genre from the left
	And I select an album from the genre page
	When I add the album to my cart
	Then the cart has a total of 1

...
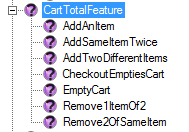
I’ve added a SpecFlow Feature File to the project and I can write all of the scenarios for the feature. After saving it, I can run the Nunit GUI and see a series of new, inconclusive tests, each named after the Scenario name I provided in the Feature File.

Inconclusive tests in Nunit GUI
Feature File: View the file on BitBucket
Now it’s time to start wiring them into the Page Library calls.
Wiring in the Browser
When each scenario runs, we want it to start clean with a fresh browser instance. This is similar to how the existing TestFixtureBase works, so we can reuse that object with a few tweaks. The challenge with the SpecFlow scenarios is that I will be reusing steps in several different features and I don’t want several different browsers to open based on which class is instantiated to make a coded step definition available. Also, unlike the current interface tests that execute inside a single method, the fact that we are running tests across multiple methods will make it trickier to keep track of the current page instance.
Based on coding up several earlier SpecFlow steps, I ended up with a base class for my step definitions that helped resolve both of these issues, while also providing some properties to help improve readability.
InterfaceTests/Features/FeatureBase.cs
namespace MvcMusicStore.InterfaceTests.Features {
        public class FeatureBase : TestFixtureBase {

                #region Properties for Readability

                /// <summary>
                /// Shortcut property to Settings.CurrentSettings.Defaults for readability
                /// </summary>
                protected DefaultValues Default { get { return Settings.CurrentSettings.Defaults; } }

                /// <summary>
                /// Sets the Current page to the specified value - provided to help readability
                /// </summary>
                protected PageBase NextPage { set { CurrentPage = value; } }

                #endregion

                protected PageBase CurrentPage {
                        get { return (PageBase)ScenarioContext.Current["CurrentPage"]; }
                        set { ScenarioContext.Current["CurrentPage"] = value; }
                }

                [BeforeScenario("UI")]
                public void BeforeScenario() {
                        if (!ScenarioContext.Current.ContainsKey("CurrentDriver")) {
                                Test_Setup();
                                ScenarioContext.Current.Add("CurrentDriver", CurrentDriver);
                        }
                        else {
                                CurrentDriver = (RemoteWebDriver)ScenarioContext.Current["CurrentDriver"];
                        }
                }

                [AfterScenario("UI")]
                public void AfterScenario() {
                        if (ScenarioContext.Current.ContainsKey("CurrentDriver")) {
                                Test_Teardown();
                                ScenarioContext.Current.Remove("CurrentDriver");
                        }
                        string s = "";
                }
        }

}
I’ve used the SpecFlow hooks for BeforeScenario and AfterScenario to handle initialization and I’ve used the provided ScenarioContext to help store a common driver and the current page. I’ve also specified that these hooks only occur for tests tagged with “UI” so I can later create some additional tests that will make direct calls to the JSON controller endpoints without spinning up a whole browser session.
At this point I still get all “Inconclusive” test results from Nunit, but I can see that each tests fires up a browser as Nunit progresses through the test run and the Before/AfterScenario hooks are called.
Defining the Step Definition File
With the Feature completed and a base Feature file created to handle our browser, it’s time to write the code that will be executed behind the individuals steps of the file.
Besides creating tests that result in “Inconclusive” results, SpecFlow also provides us with some basic code to get started with the step definition file. In the text output tab of the Nunit GUI we can see that each undefined step from SpecFlow outputs the information needed to implement the step, like so:

Step Definition text in Nunit Text Output
Back in Visual Studio I will create a new “SpecFlow Step Definition” file and copy the content of the Nunit Text output window into the class in this file, removing the unnecessary addition example steps and all the extra class definitions and plain text. Each statement that appears in a Scenario in the Feature File has a corresponding method in the generated Nunit test, so each one will need a method. I’ve actually cheated a little and reused some steps from some earlier SpecFlow features, so my final file only has the new steps defined:
The other steps are in a previously defined Step Definition file. I’ll probably centralize common steps at some point to make them easy to find, but for the meantime the base class will help keep the current page and web browser accessible to the steps in both files and I have few enough tests that I’ll remember where those definitions are (remind me I said this when I go back in a week and make a fuss on twitter about not remembering where they are).
Once I have the Step Definition methods setup, I can go ahead and wire in the code necessary to drive the browser. I’ll walk through the methods for the “Add an Item” feature.
InterfaceTests/Features/Cart.feature
Given I have the Home Page open
	And I select a genre from the left
	And I select an album from the genre page
	When I add the album to my cart
	Then the cart has a total of 1
Keep in mind if you look at the code repository some of these steps are in separate files.
Given I have the Home Page Open
Each of my scenarios starts with the same step, ensuring we have the browser open and pointing to the site. The step definition is then fairly straightforward, given the base class already ensures we have a fresh browser available:
InterfaceTests/Features/NavigationSteps.cs – this is the step I borrowed from a previous test
[Given(@"I have the Home Page open")]
public void IHaveTheHomePageOpen() {
	NextPage = PageBase.LoadIndexPage(CurrentDriver, Settings.CurrentSettings.BaseUrl);
}
The class definition for FeatureBase above includes a CurrentPage property that we use to store and retrieve the page object associated with the browsers current page. To improve readability a little, I’ve created the NextPage property, which is simply a setter for the CurrentPage one.
And I select a genre from the left
All pages in the application display the genre list on the left, so this makes a simple way to get to a specific genre page no matter where we are in the site.
InterfaceTests/Features/CartSteps.cs
[Given(@"I select a genre from the left")]
public void GivenISelectAGenreFromTheLeft() {
	NextPage = CurrentPage.SelectGenre(Default.Genre.Name);
}
All page objects extend the PageBase class, so I’ve added a partial class for PageBase (PageLibraryPageBase.Navigation.cs) that includes navigation and behavior that’s common to all pages in the application.
Default.Genre.Name: As I mentioned earlier, there is a singleton Settings object that is responsible for loading settings from an XML file and making them available to the tests. I’ve added a Genre and Album element to the settings file so I can provide some default values without hardcoding them into the test code or, worse, each individual test. I then created another shortcut property in my FeatureBase so I can reference these values by the property name Default instead of the much longer Settings.CurrentSettings.Default.
And I select an album from the genre page
Once I have the genre page open, I can select an album that I intend to add to the cart.
InterfaceTests/Features/CartSteps.cs
[Given(@"I select an album from the genre page")]
public void GivenISelectAnAlbumFromTheGenrePage() {
	NextPage = CurrentPage.As<BrowsePage>().SelectAlbum(Default.Album.Name);
}
One of the downsides of having a single property to track the current page is that it is typed as a PageBase object. I could add cast statements to each line, but by adding a generic method to handle the cast, I preserve the left-to-right reading order of the statement. Had I used an inline cast, we would be looking at:
[Given(@"I select an album from the genre page")]
public void GivenISelectAnAlbumFromTheGenrePage() {
	NextPage = ((BrowsePage)CurrentPage).SelectAlbum(Default.Album.Name);
}
Which just doesn’t seem as readable to me.
I’ve added the generic cast method to the PageBase method to make it easily accessible:
PageLibrary/Base/PageBase.cs
public abstract partial class PageBase : CommonBase {

	//...

	public TPage As<TPage>() where TPage : PageBase, new() {
		return (TPage)this;
	}
}
When I add the album to my cart
If you remember, the original scenario we listed above was “When I add an item to my cart, it displays a total of 1”. Often it is fairly easy to separate the Given portion of our scenario from the When/Then portion because the Given part is often the part that we took for granted when we were describing the scenario or when it was described to us.
InterfaceTests/Features/CartSteps.cs
[When(@"I add the album to my cart")]
public void WhenIAddTheAlbumToMyCart() {
	NextPage = CurrentPage.As<AlbumDetailPage>().AddToCart();
}
As you can tell by now, the actual logic that goes into the step definition files is fairly minimal. This is by design and is similar to the MVC concept of a thin controller. By keeping the page behavior in the page objects, we’re attempting to minimize the brittleness of our test code.
Then the cart has a total of 1
The last step is to verify the expectation. We’re going to do something a little special with this step because it matches a similar step across several of the tests, with the exception of the number we are expecting to see.
InterfaceTests/Features/CartSteps.cs
[Then(@"the cart has a total of (d+)")]
public void ThenTheCartHasATotalOf(int expectedTotal) {
	CurrentPage.VerifyCartTotalIs(expectedTotal);
}
SpecFlow allows us to enter a regular expression in the step definition, which it will then use to populate arguments for our step definition function. So instead of making a separate function for testing a cart total of 0, 1, and 2, I can make one function that tests whichever value matches the match group in my decorators expression.
Result
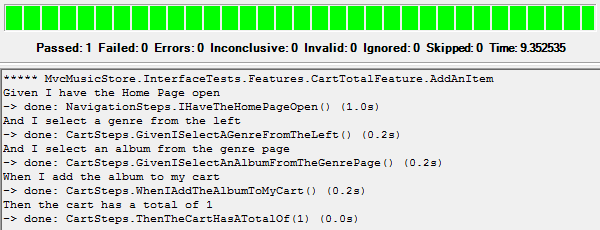
With all of the steps built, I can now run the test for verification:

Pass test run for 'Add Item' scenario
The text output tab of Nunit still provides us with information at the step level, but more importantly we now have a “Pass”.
Wrapping Up
By capturing the end users expectations in this way, we have some structure that helps gather them at a good level of detail while also providing a testable version that we can automatically run as we develop the solution and as a regression suite when we are finished. The requirements are readable by our end user, by ourselves, and can be programmed against. As we build up a library of common step definitions we will start being able to put new tests together even faster as well as have some visibility into what portions of the application are the most critical (if a step shows up in 50% of our tests, it’s a good bet it’s a lot more critical to the stability of our application than the item that shows up once in a single test).
All of the code for this project is available in BitBucket.


 My roles have included accidental DBA, lone developer, systems architect, team lead, VP of Engineering, and general troublemaker. On the technical front I work in web development, distributed systems, test automation, and devop-sy areas like delivery pipelines and integration of all the auditable things.


