jNEAT is a Java implementation of the NEAT method. NEAT is a technique for evolving neural networks, which uses genetic algorithms to learn network structures aswell as weights. For more information there are several papers at the links above.
Building jNEAT
Download the latest version: http://nn.cs.utexas.edu/?neat-java
Download and install Apache Ant: http://ant.apache.org/ (`apt-get install ant` on Ubuntu/Debian)
It’s fairly straightforward to build a jNEAT library using Ant. Extract the archive somewhere and place the following code into build.xml in the root directory.
<project name="jneat" default="jar" basedir=".">
  <property name="src" value="."/>

  <target name="compile">
    <javac srcdir="${src}"/>
  </target>

  <target name="compile-debug">
    <javac debug="on" srcdir="${src}"/>
  </target>

  <target name="jar" depends="compile">
    <jar jarfile="jneat.jar" basedir="${src}">
       <include name="gui/*.class"/>
       <include name="jneat/*.class"/>
       <include name="jNeatCommon/*.class"/>
       <include name="log/*.class"/>
    </jar>
  </target>
</project>
Running ant from a command line in the jNEAT root directory will produce jneat.jar which can be added to your development environment such as:
NetBeans: Right click Libraries->Add JAR/Folder
Eclipse: Right click project->Build Path->Add External Archives
Create a jNEAT Population
Import the jNEAT library.
import jneat.*;
Initialise a jNEAT population:
neatPop = new Population(30 /* population size */, 9 /* network inputs */ , 2 /* network outputs */, 5 /* max index of nodes */, true /* recurrent */, 0.5 /* probability of connecting two nodes */ );
The only parameters we need to worry about are the population size, network inputs and network outputs. The value of these depend on the simulation. Associate each member of this population with one member of your simulation.
Evaluation
Evaluate the population by running your simulation for a set period of time, query each organism’s network for actions every update.
// Within main simulation loop
//

Vector neatOrgs = neatPop.getOrganisms();

for(int i=0;i<neatOrgs.size();i++)
{
  // Extract the neural network from the jNEAT organism.
  Network brain = ((Organism)neatOrgs.get(i)).getNet();

  double inputs[] = new double[numInputs+1];
  inputs[numInputs] = -1.0; // Bias

  // Populate the rest of "inputs" from this organism's status in the simulation.
  //
  //

  // Load these inputs into the neural network.
  brain.load_sensors(inputs);

  int net_depth = brain.max_depth();
  // first activate from sensor to next layer....
  brain.activate();

  // next activate each layer until the last level is reached
  for (int relax = 0; relax <= net_depth; relax++)
  {
      brain.activate();
  }

  // Retrieve outputs from the final layer.
  double output1 = ((NNode) brain.getOutputs().elementAt(0)).getActivation();
  double output2 = ((NNode) brain.getOutputs().elementAt(1)).getActivation();

  // Use the outputs to modify the associated member of the population.
  //
  //

}
Evolution
After this evaluation process has run for enough iterations, assign each member a fitness and move to the next generation by instructing jNEAT to evolve the population:
Vector neatOrgs = neatPop.getOrganisms();

for(int i=0;i<neatOrgs.size();i++)
{
  // Assign each organism a "fitness". A measure of how well the organism performed since the last evolution.
  ((Organism)neatOrgs.get(i)).setFitness(fitness);
}

neatPop.epoch(generation++); // Evolve the population and increment the generation.
Examining the Population
There are a couple of methods which can be used to see if the population is changing at all:
neatPop.viewtext();
This will print a breakdown of the population and can help diagnose problems if you aren’t seeing any improvements.
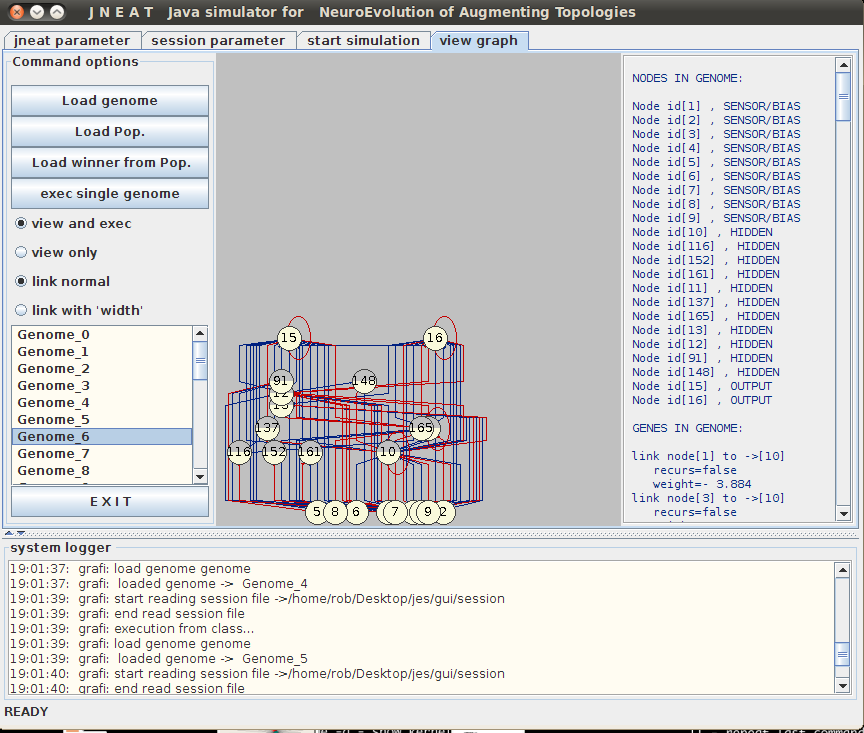
jNEAT also comes with a handy GUI which can display a visual representation of each organism’s neural network. Before doing this the population needs to be saved to a file:
neatPop.print_to_file_by_species(“SavedPopulation.txt”);
To run the GUI, open a command line and run the following:
cd /path/to/jNEAT/gui/
./run.sh gui.MainGui
Select the View Graph tab, click Load Pop and locate the saved population. Selecting an organism from the list on the left will display its network structure.