


On occasion, with a landscape that consists of multiple SQL Server Instances, we find the need to pull information from all of them, work with that information, and then load that information into a repository or warehouse-type reporting destination. This type of scenario is well-designed for creating multiple SSIS packages to do distinct tasks. This way, each package becomes a reusable object and more valuable to the entire scheme of your SSIS development tasks.
This same type of requirement brings up the question of how we can connect to multiple instances without having to create dozens of connection managers. The question can also be asked: what happens if we add instances often? The task of maintaining those connections could become a time-consuming and potential risk if not well-documented and if knowledge transfer is not performed. Knowledge transfer and documentation can never be bypassed. We can limit the time and overall complexity of the task though. To do this, we can make the connections dynamic by using a few variables and expressions.
Dynamic Connections
To create a dynamic connection strategy, we will first create two packages, Parent.dtsx and Child.dtsx. Once we have these packages created the steps will be…
1) Create and configure the variables to be used
2) Create a source that contains the list of the instances names to connect to
3) Using a Foreach Enumerator, set a variable for each instance name
4) Call an Execute Package Task while passing the instance name
5) Configure the Child package to accept the variable holding instance name
6) Create and configure a data flow task
7) Add and configure a connection that uses an expression for the property ServerName
8) DFT configures source to use the connection string using the expression
9) DFT destination to a repository using a secondary connection that has a static instance name
The variables that will be required:
Parent – variable “InstanceNameParent”
Child – variable “InstanceName”
Create each variable in the packages as a data type of string. Leave the value empty.
In the Parent package, add a Foreach Loop Container that uses the Foreach Item Enumerator. In the Enumerator configuration, add a column. Add as many rows that contain each unique instance name as needed.
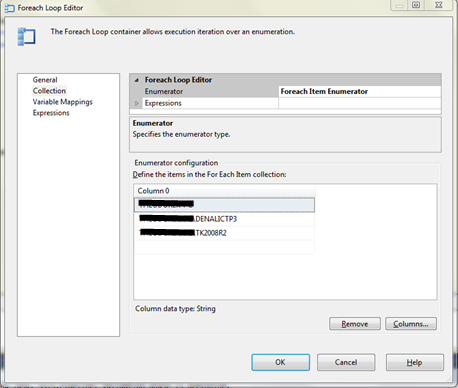
Go to the variable Mappings page and add a mapping from the User::InstanceNameParent to index 0 for the enumerator.

The Foreach container is now configured and ready. Click OK to save the changes. Place an Execute Package Task into the Foreach container next. The only change that is needed to the execute package task is the child package to call and parameter mapping. This allows the variable that needs to pass to the child package and can be consumed by the configuration settings that will be done in the child package.
For more on passing variables between parent and children packages, read “Making SSIS Dynamic: Passing variables between packages“
Once completed, the parent package will contain one Foreach Loop Container and one task within it, Execute Package Task.
Child Package Setup
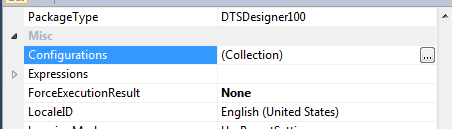
In the child package, first configure the package to accept the variable being passed to it from the parent package. In SQL Server 2012, click an empty area in the Control Flow and then, in the properties window, click to open the configurations collection.
Map the variable as shown below
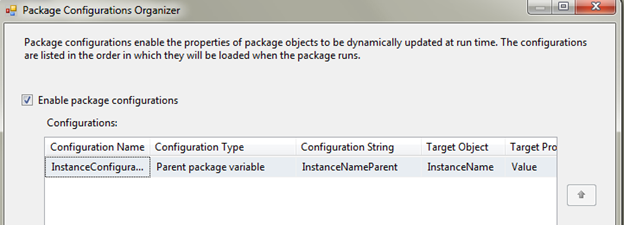
This is described in detail in “Making SSIS Dynamic: Passing variables between packages“
Close the Package Configurations Organizer.
Create an ADO.NET Connection by going into connection manager configuration. Name this connection in a meaningful way as it will be used for many SQL Server connections.
In the connection just created, change DelayValidation to True. Click the Expressions property next to open the Property Expression Editor. Select ServerName Property and then use the following expression as the expression for ServerName
ISNULL(@[User::InstanceName]) ? “SERVERNAME\DENALICTP3” : @[User::InstanceName]
Note: Change the instance name that will be the default if the variable name is null to one that is active on your development servers. Validating empty strings should also be performed.
Close the expression editor by clicking OK and also close the property editor.
Add another connection that will be the instance the data retrieved from all the instances passed from the parent package will be stored on.
Place a Data Flow Task on the Control Flow and go into the Data Flow designer.
Add an ADO.NET Source and ADO.NET Destination to the data flow.
Source Setup
To configure the source, first select the dynamic connection created earlier. Next, to allow for the retrieval of all the databases on the instance and the actual instance that is being focused on, use the following query as a SQL command in the source
SELECT [Name],@@SERVERNAME ServerName FROM sys.databases
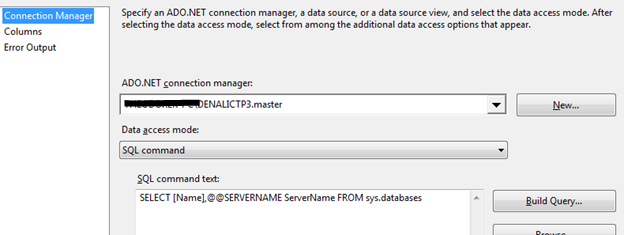
Click OK to close and save the configuration.
Destination Setup
To configure the destination, create the following table in the database and instance that has been selected as the repository for the data retrieved from the other, dynamic instances.
CREATE TABLE [dbo].[AllMyDatabases](
	[Name] [nvarchar](128) NULL,
	[ServerName] [nvarchar](128) NULL
) ON [PRIMARY]
Note: If the instance that is being used for the storage of the data retrieved is also in the list of instances to check dynamically, ensure you use another connection and not the same dynamic connection. If you do not use multiple connection managers in this case, the connection will never change from the static destination that was set.
Connect the precedence to the ADO.NET destination and open the destination editor. Select the destination connection and the table, AllMyDatabases. Select mappings to ensure proper mappings from the source and destination.
Execute the parent package to ensure everything works as it should.

Success!!! Connect to the destination and verify the contents loaded.
If you go down this route of dynamic connections, it is recommended to read Jamie Thomson’s blog, “Verify a connection before using it [SSIS]” on validating the connection are active before allowing a long hanging process and failures in the packages.
Happy auditing and I hope this helps both on dynamic connections and utilizing multiple packages.


